
There is something very satisfying about physical knobs and buttons. Unlike various software sliders that you drag with your cursor, you can feel when a real button clicks and get a perfect sense of scale when you rotate a physical knob even without looking at it. In this article, we’re going to 3D print a smart oversized USB volume knob! An infinitely rotatable and clickable dial that can play/pause your current song or skip to the next one on double click without you ever leaving the currently opened application!
The basic idea
We’re not going to route the audio signal through the knob physically. If you, for example, route the signal through a potentiometer to adjust the volume, you’re unavoidably going to degrade the signal. Instead, our volume knob will behave very much like a keyboard with media control keys. We’re going to send keystrokes to the operating system, which will then handle the rest. This works really well because your OS knows whether you have Spotify or similar application running, so it will simply forward the command to it. And it works on all Windows, Mac and most Linux distros.
3D printing the knob
Let’s start with what you probably understand the best, 3D printing. We’ve prepared a few different versions of the knob you can choose from with ready to print G-codes and 3MF project files at PrusaPrinters.org.

The knobs are interchangeable, so you can pick any one of these and use it with any of the knob bodies. If you create your own, don’t forget to share it with others. 🙂
The hardware
We need just 2 components!
- Rotary encoder
- Arduino Pro Micro (Arduino Leonardo works too, but it’s big)
- Original Arduino – Arduino store, Amazon US, Amazon DE
- Clone boards – Amazon US, Aliexpress
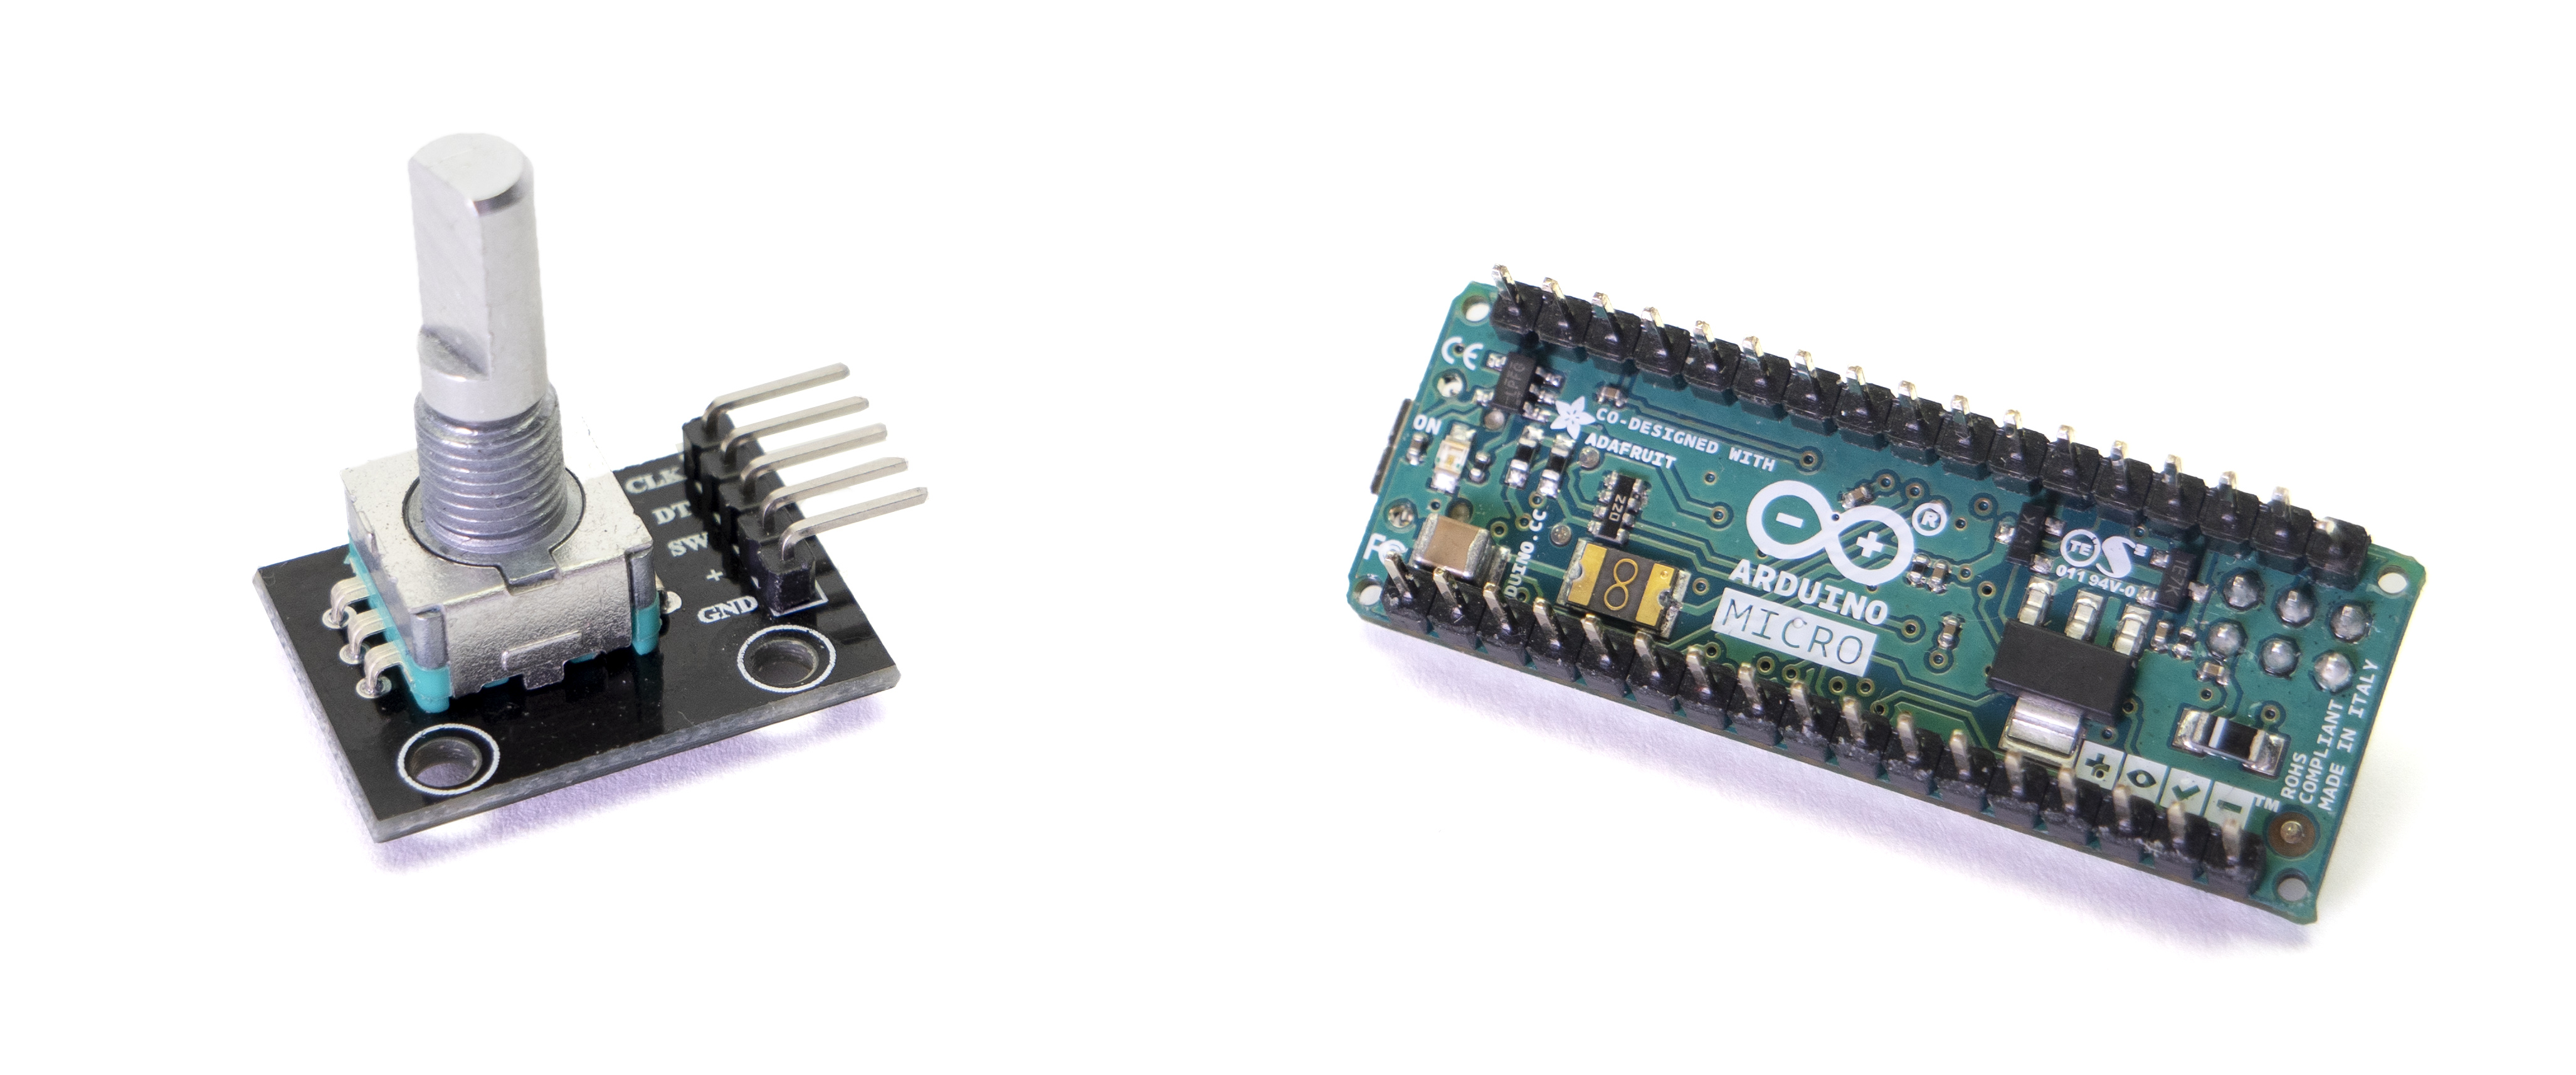 The rotary encoder is actually the same component that’s under your 3D printer’s control knob. It spins. Indefinitely – which is awesome! No need to handle what happens, when you reach the end. It also clicks! When you press it, the rotary encoder behaves just like a button. This opens up a surprising amount of control because you can map different actions to a single click, double click or long-press.
And the Arduino?
Arduino basics
We’re going to assume you have no experience with Arduino boards what so ever. If that’s not the case, feel free to skip a bit further down this article.
Arduino is an open-source project (yay), responsible for a variety of single-board microcontrollers. Think of them as small computers. These boards are equipped with analog and digital input/output (I/O) pins, so they can interact with the world. Read data from a temperature sensor, send a signal to turn on the fan, check if the temperature dropped… all kinds of stuff. And there are many different types of Arduino boards. Some are big with tons of I/O pins and a wide range of input voltage like Arduino UNO, which is great for prototyping. Some have fewer I/O pins, but they are incredibly small (Arduino Pro Micro).
Using Original Arduino boards?
Just like Original Prusa 3D printers, Arduino project is open-source. If you search online, you’ll be able to find clones of original Arduino boards for as little as $2. So why spend more on the originals? In short – build quality, documentation, development. Without investment into development, there won’t be any innovations. You can clone a board over and over, but eventually, you’d want things like new more-power efficient Bluetooth or Wi-Fi support, better development software with a nicer UI or a faster processor. So at least consider buying an original Arduino board. 🙂
With that said, some of the clone boards with fewer I/O pins, unsoldered header pins and smaller size can actually come in handy – for example in our case of building a compact volume knob.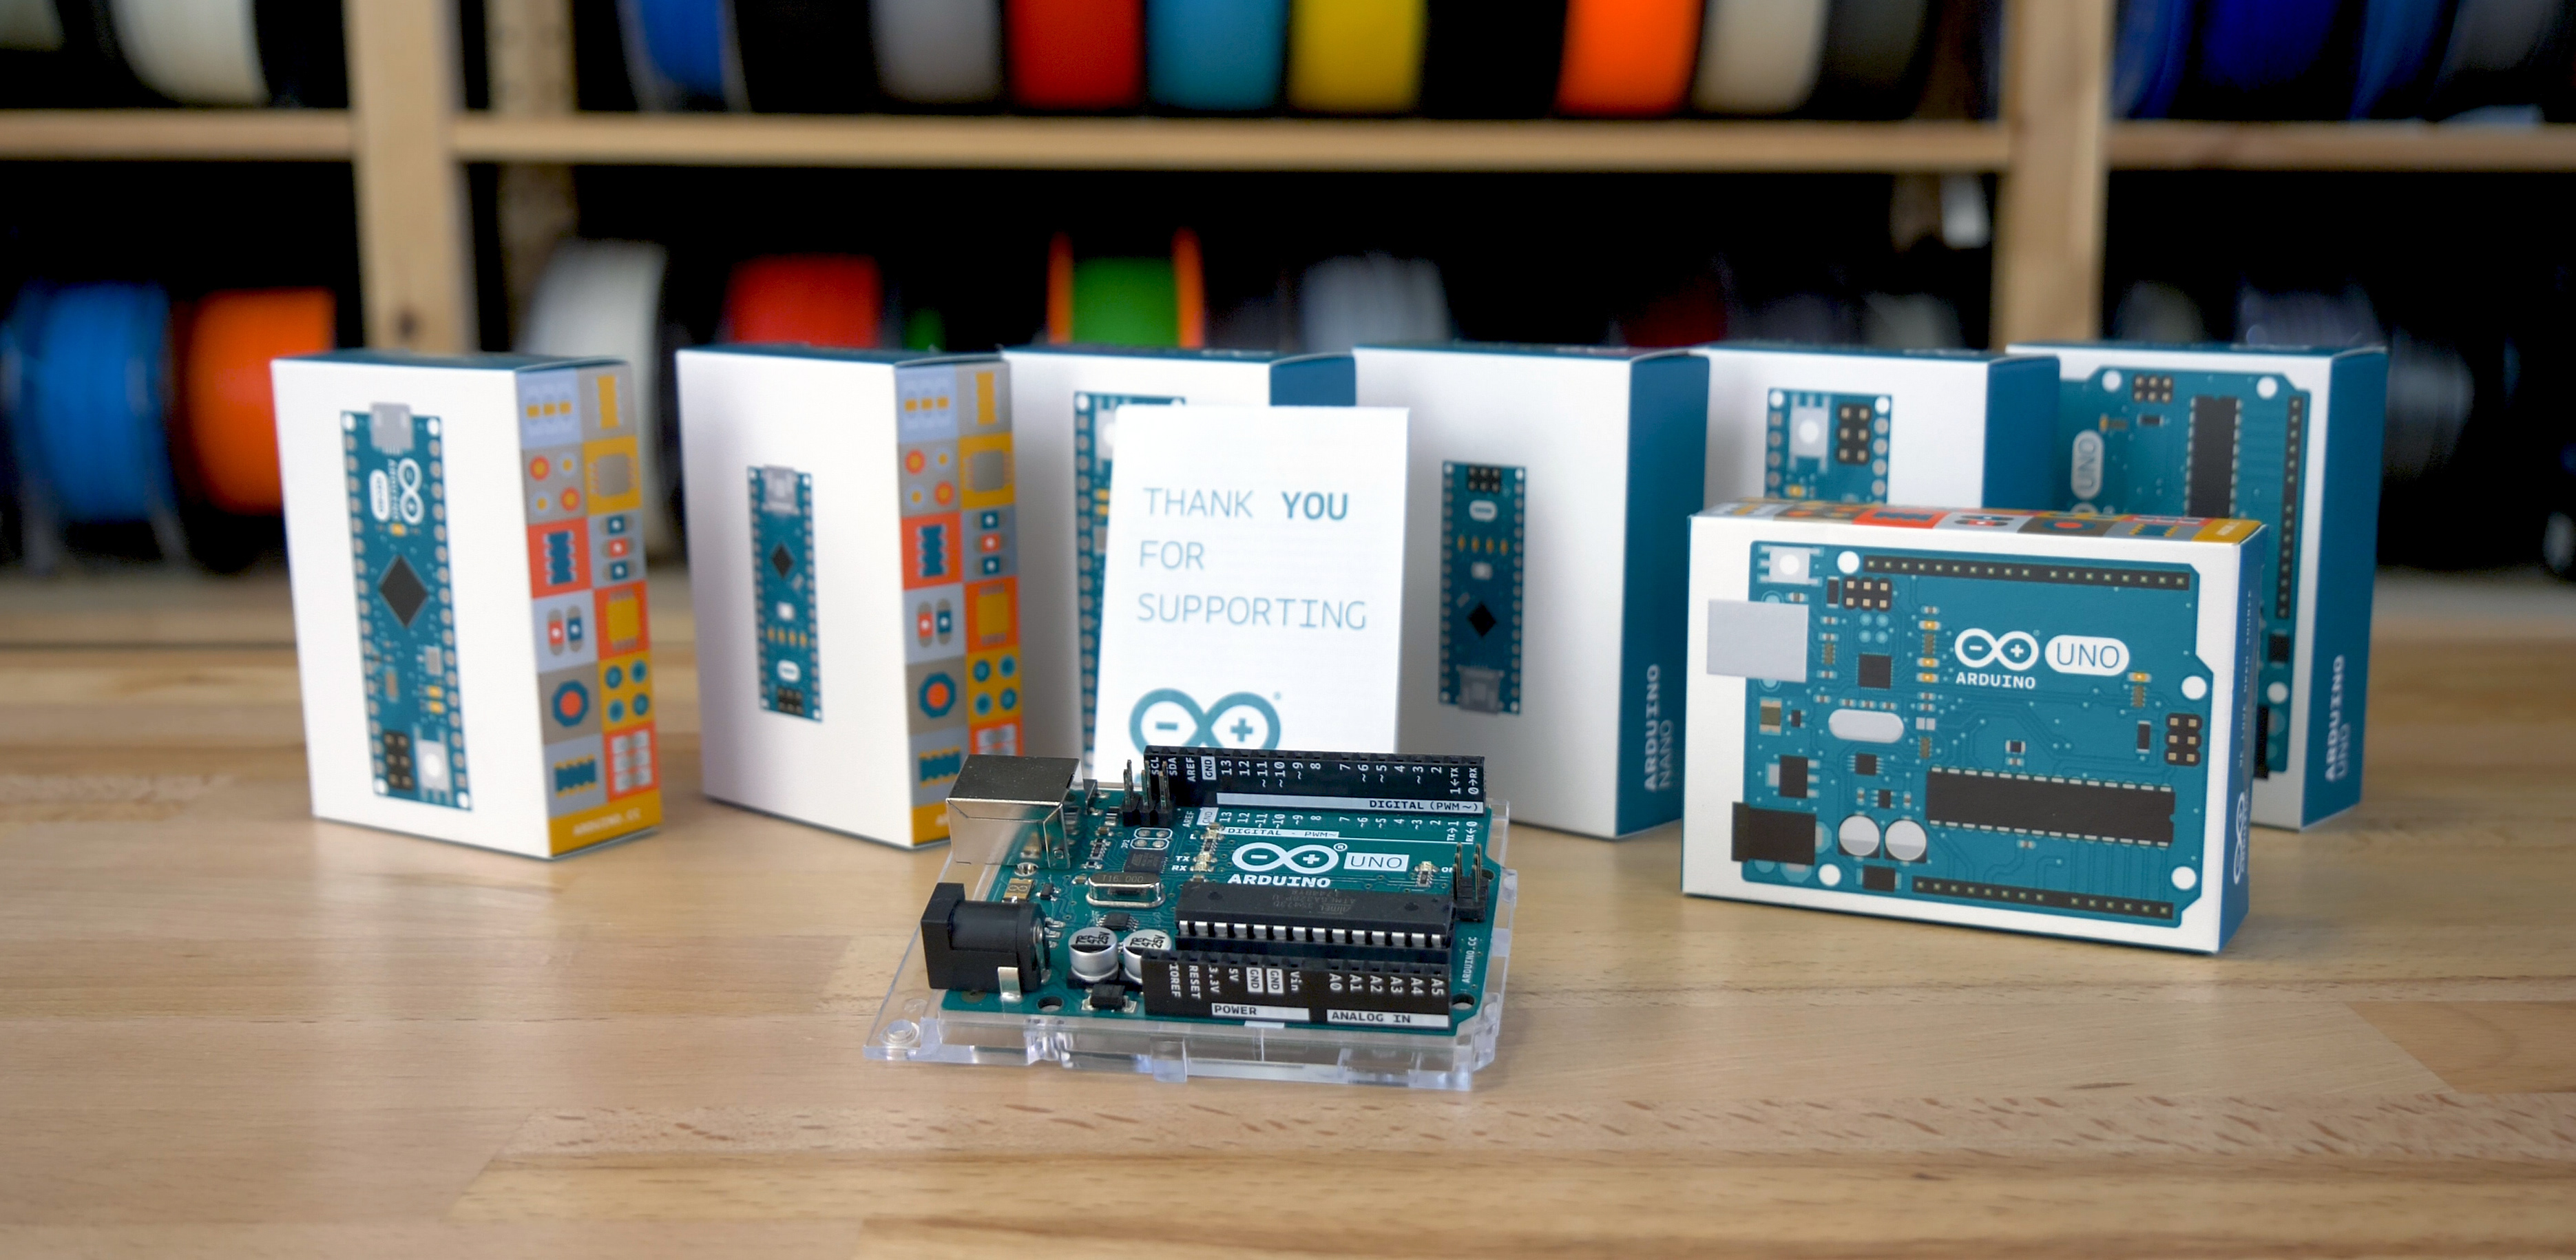
In our case of building an oversized volume knob, the microcontroller’s job is to read the input from the rotary encoder and translate it into a keystroke. All Arduinos have a basic keyboard emulation functionality built-in. However, unlike the Arduino Uno or Nano, which use USB to Serial adapter, the Arduino Pro Micro supports USB directly thanks to the ATmega32u4 microchip. This is important! The media control keys won’t work on Arduino Uno/Nano (unless you reprogram the microcontroller). Besides, as the name suggests, the Pro Micro is really small and has a micro USB connector, so we want to use it anyway.
Wiring
Since we have only two components to connect to each other, it’s really simple. Connect the pins labeled GND (ground) to GND and plus to VCC (5V). Then there are two pins that handle the rotation, usually labeled CLK and DT, connect them to analog inputs labeled A0 and A1. Finally, there’s the button pin labeled SW – connect it to the analog input A2.
If the labels on your rotary encoder are different, don’t worry. You can simply try to switch the 3 cables connected to analog inputs once we upload the code.
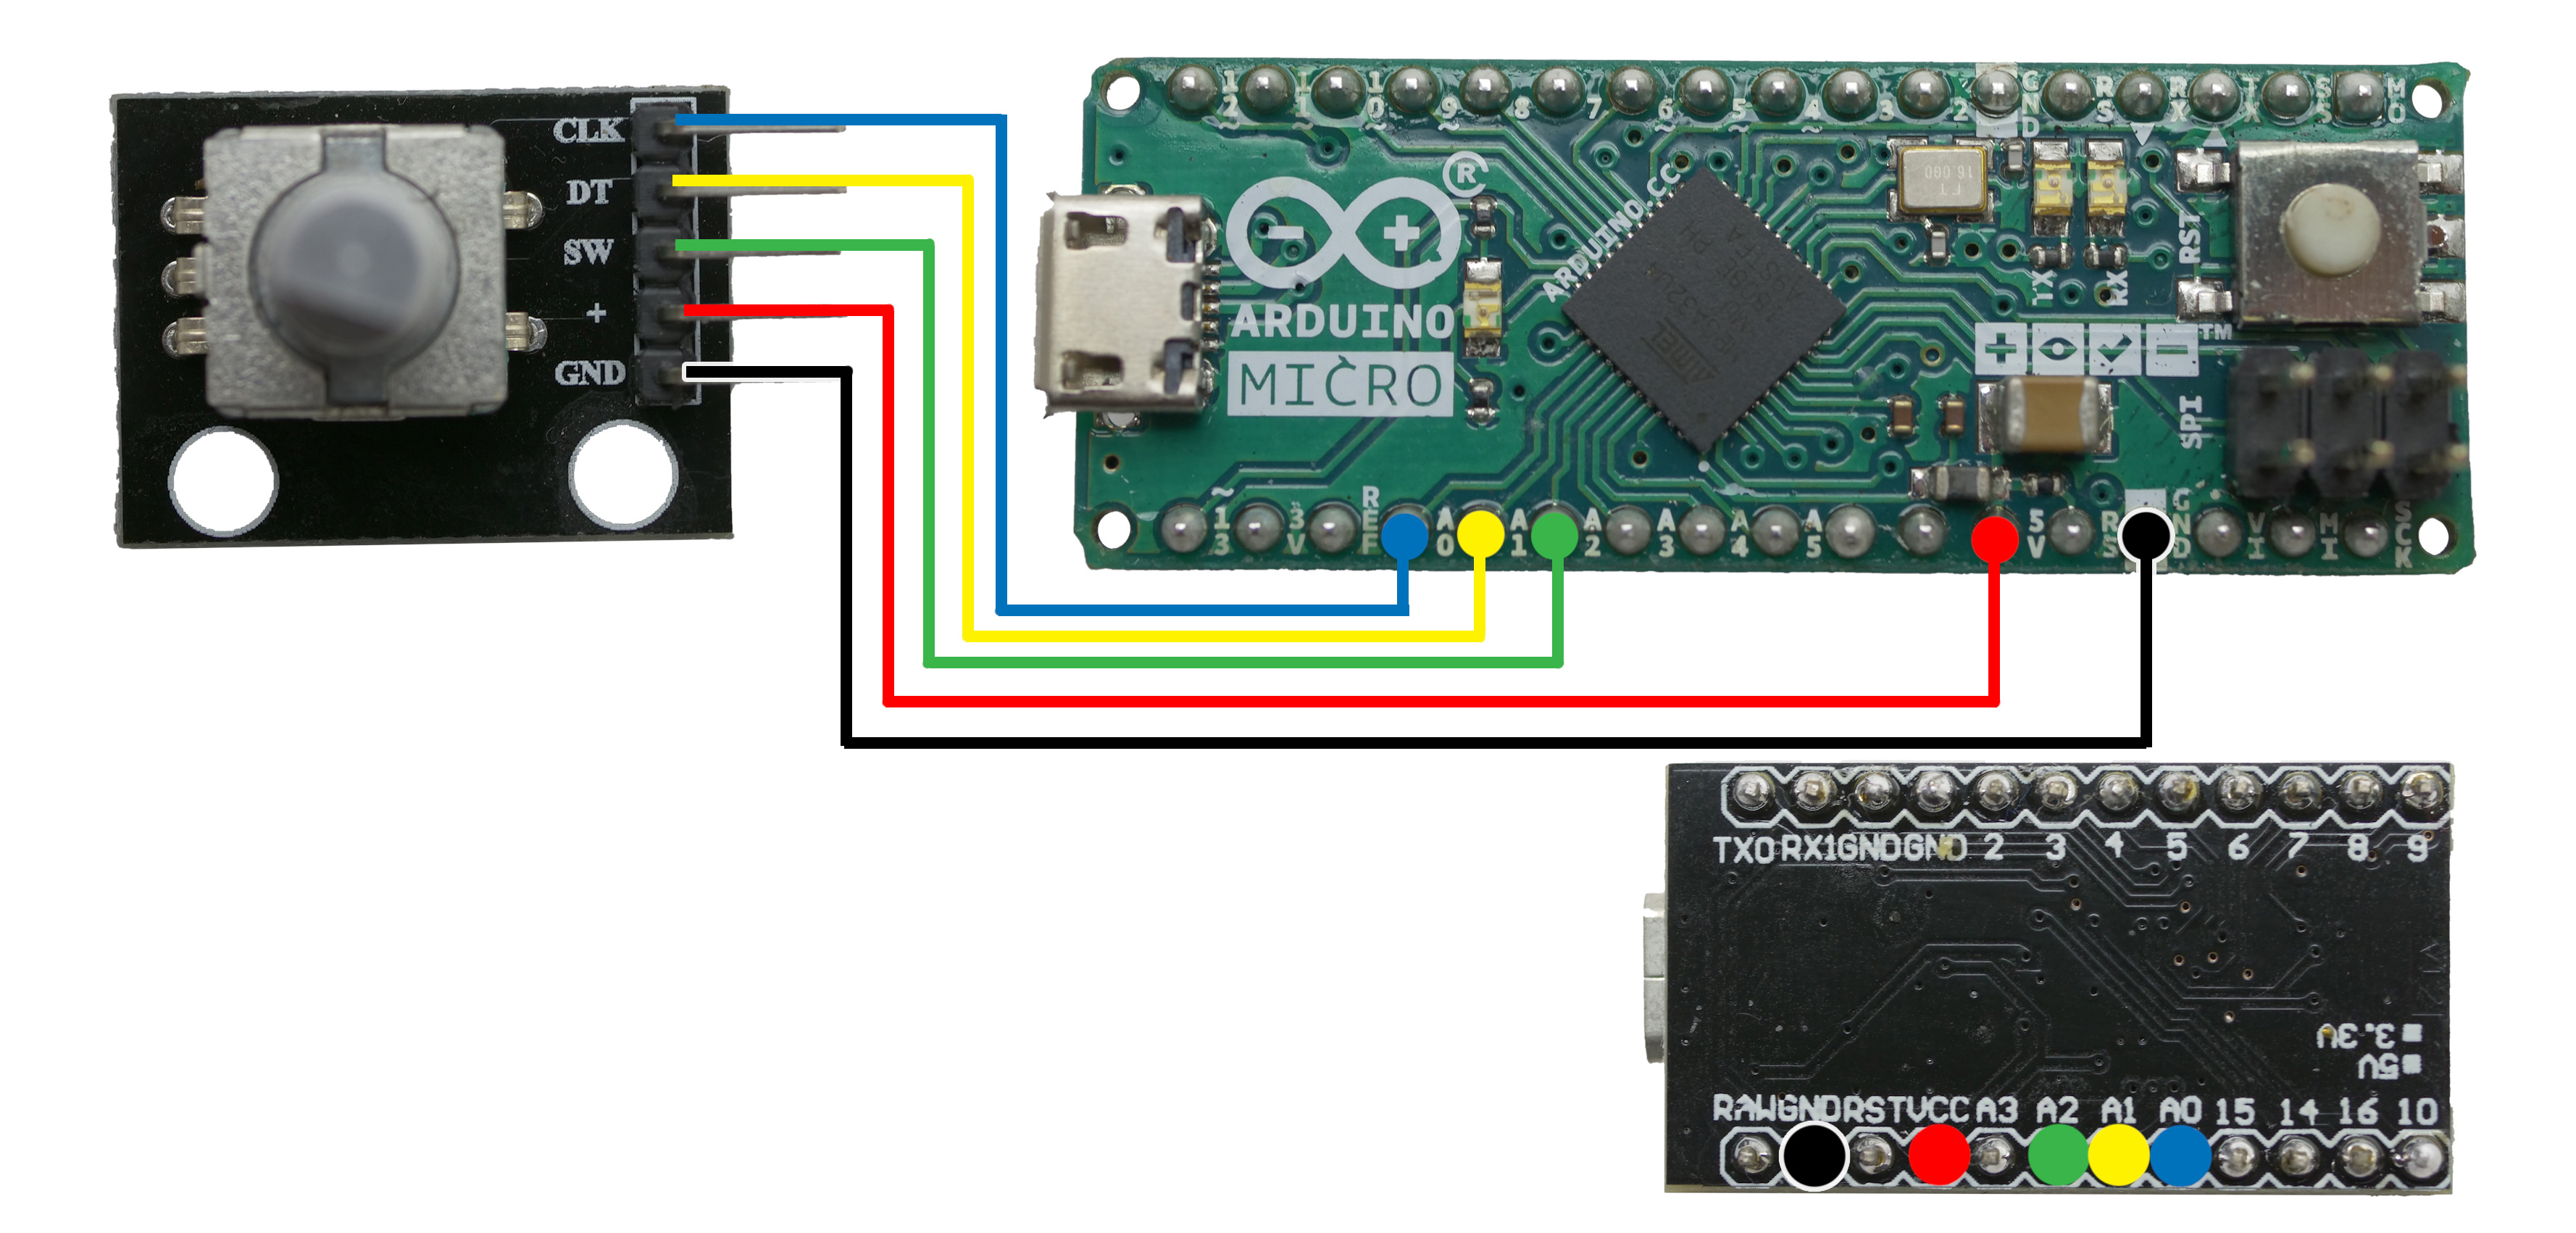
You can use female-to-female jumper wires, which are ideal for testing things out. Once everything’s working, consider soldering cables directly to the board. That way, they’ll stay firmly in place, and you can save some space by getting rid of the Pro Micro’s pins. Or even better: grab a new Arduino without pins soldered to it. Then you can put cables through the tiny holes, where the pins would normally be, which makes the soldering job way easier and the resulting size smaller. And you can keep the Pro Micro with the pins attached for prototyping of your next project.
Programming the Arduino
We have the code ready for you! Unlike, for example, 3D printer firmware, it’s not common to share pre-compiled code for an Arduino. Instead, we share the source code, so that anyone can make changes to the code or choose a different target board. That means you will have to compile the code before uploading it, but that’s fairly simple.
- First, download, install and open the Arduino IDE
- Then download the code for the oversized volume knob
- Open the downloaded code In Arduino IDE (File – Open)
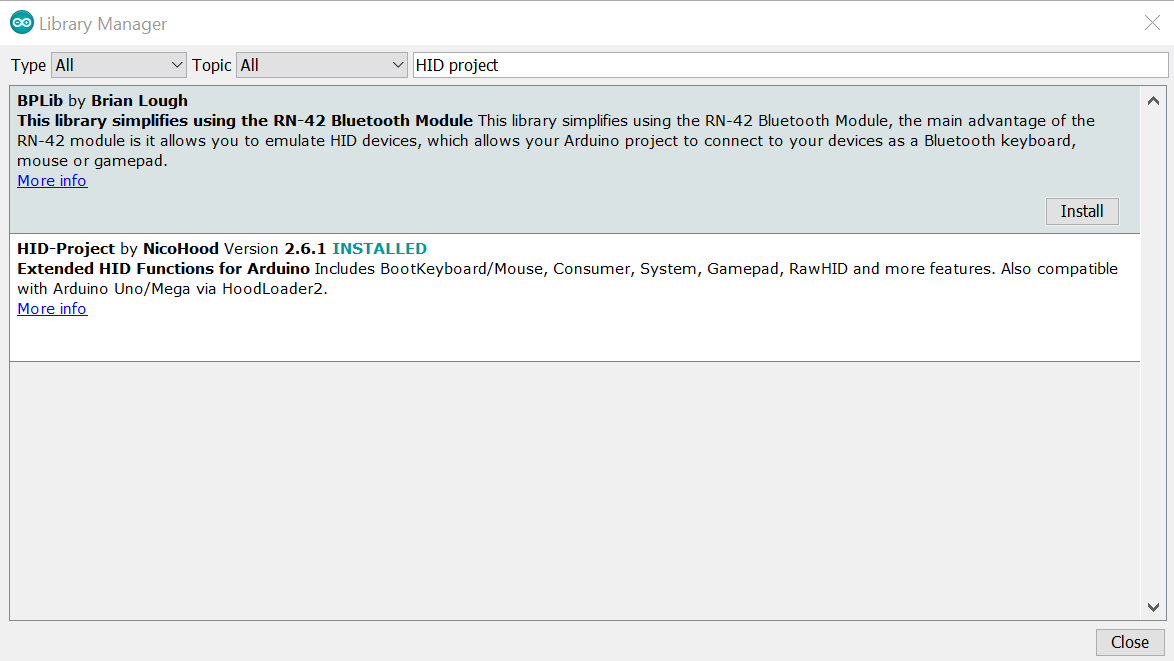
The code uses a custom library “HID-project” that has definitions of the media control keys and makes the code really easy to understand.
- In the top toolbar select Tools – Manage Libraries
- In the new window, type “HID-project” into the search bar
- Click on the HID-project by Nicohood and select Install
- You can now close the Library Manager
 We’re also going to use another library (actually two of them) for reading the data from the rotary encoder. The first one is called “TimerOne” and you can install it exactly the same way, as described above, except that you search for “TimerOne” instead of “HID-project”.
The other library called “ClickEncoder” has to be installed manually.
- Download the ClickEncoder library here
- Use the green button Clone or download – Download ZIP
- Select Sketch – Include library – Add .ZIP library and choose the file downloaded in step 1
Now we just have to tell Arduino IDE which board we’re using and to which USB/Serial it should upload the code.
- Select Tools – Board and select the Arduino/Genuino Micro
- If you’re using a different board, make sure you change it here
- Connect your Arduino Pro Micro to your computer
- Select Tools – Port
- You should see COM1 and COM? (Arduino/Genuino Micro), where ? is some number other than 1 (e.g. COM6)
- Select the COM? (Arduino/Genuino Micro)
- Hit the Upload button

That’s it! Once the upload finishes you can test your volume knob. If rotating it changes the volume in the wrong direction, simply switch the two cables that handle the rotation (CLK and DT). Or change VOLUME_UP to VOLUME_DOWN and vice versa in the code. The default behavior is single-click for play/pause, double-click for skipping to the next song.
Analyzing and changing the code
We took the time commenting the code to make each part as clear as possible. The main structure of every Arduino code looks like this:
- Definitions of pins and variables
- setup() function that runs once after the Arduino board boots up
- loop() function that repeats over and over until the power is cut
Feel free to change anything in the code and see what difference it made.
Summary
We now have a functional 3D printed media control knob! Once you get used to it, you won’t be able to live without it 😉 Just during the writing of this article, I reached for it so many times only to realize it’s in the studio for the video recording 🙂 Feel free to remix the design and improve it – or change the code completely. And if you do so, don’t forget to share it with others! It would be really cool to get the Spacenav project running on the knob, a compatible alternative to the proprietary 3Dconnexion driver.
Let us know in the comments if you enjoyed this article and share your ideas for the next tutorial! And as always, happy printing!
Love it! More projects like please. I love the fact that it combine 3D printing with electronics to create a useful tool.
I learned absolutely everything about my question when I read this post, thanks to the author for the detailed description. I wrote my review on the myperfectwords review you can go in and read. Thank you very much for your attention and your time.
I love the side of the black knob. How did you design it?
Yeah, I like it too – knurling.
It’s basically a coil + circular pattern, here’s the tutorial I followed:
https://www.youtube.com/watch?v=oe0f7288Enw
The video also shows a 6 key media control “keyboard”. Do you have by chance a link to that project?
Not really, that’s another thing I’m working on, but it’s not finished. It’s essentially the same thing as the knob, but instead of a rotary encoder, you have mechanical switches on the input, which is even easier to read. It’s simple LOW/HIGH on a PIN, one PIN for each button.
After that, the code is very similar.
I hope you release that project here as well. And also more of these projects with arduinos included.
+1 For the 6 key keyboard & arcade board release when complete
+1 for this project as well…
Thank you for this great Project!!
In the video I saw a bottom Cap for the knob. In the files I cant find it. Could someone help me out?
I designed one if you want the file…keeps everything tucked away neatly.
I’d like to see that, chiefb711.
I’ve added the bottom cap to the abstract body upload + I’ve added the chief’s cap to the collection 😉
3D printing is used to manufacture molds for making jewelry, and even the jewelry itself. 3D printing is becoming popular in the customizable gifts industry, with products such as personalized models of art and dolls, in any shapes. It is also used in Sony Smart TV
Is there any way to slow down the volume control step?
Yes, you could do that in code using a simple counter. So that only every x steps creates the keypress.
Please could you post an example?
Change the line with the encoder constructor to
encoder = new ClickEncoder(ENCODER_DT, ENCODER_CLK, ENCODER_SW, 4);
The last number in the constructor sets the stepsPerNotch variable. Don’t ask me why, but 4 makes the steps smaller than the default 1.
also, you can call:
encoder->setAccelerationEnabled(false);
right after that to disable acceleration.
I just built on of these, which usually works very well. I put a “.25” value on the speed, to give full range in a single rotation. It works, but every once in a while it will reset to default, somehow. Unplugging the cord sets it back to what I had programmed, but I don’t know why it does this. Any ideas?
I think I’m going to build this but have the rotary action send an up/down keystroke and the push send delete.
Then I can go through my inbox quickly with a satisfying thump to bin off all the crappy emails 🙂
I just finishing building mine, thanks for the great design.
Does anyone know what keycode will change the playback device on PC, say from Speaker (which is actually my headphones) to monitor speakers?
Thanks for the nice project 🙂
Is it possible to add a Long Press function with the knob to launch for example the calculator or a key like the letter M. I have seen several examples, but my code does not work.
case ClickEncoder::Held: // Button is being held
Consumer.write(CONSUMER_CALCULATOR); // Fun stuff happens here
while (encoder->getButton() != ClickEncoder::Open); // wait until the Button is released
break;
works for me, maybe it’s crap 🙂
svnlinde, thank you very much I just tried your code and it works!
is it possible or do you know how to launch a keyboard key like the letter M for example in triple click the knob?
Could I use an Arduino Trinket for this?
I went with one of the suggested clone boards (https://www.aliexpress.com/item/32849563958.html?spm=a2g0s.9042311.0.0.43bc4c4dpvWqVD) for my media control knob but I get this error when I try to compile: HID Project can only be used with an USB MCU. Any ideas on how to resolve this or do I need a different Arduino?
I have the same board and it compiles and uploads fine. I had to select board type “Arduino Leonardo” for it to work, as if I try the “Arduino pro or pro mini” I get the same error code as you.
Just built this neat little project, and the play/pause and next works perfectly.
But the volume part doesn’t work. When I rotate the dial in one direction the serial monitor shows 0,1,0,1 etc. thus the volume only fluctuates between 98-100 and back.
I’ve tried changing wiring, and increasing and decreasing the various delays in the code, but I can’ figure out where the error is..
I’ve been using this for a few weeks and was really happy with it.
Until today: suddenly I have this exact same issue. Maybe something with a windows update? (assuming you’re using windows like I do now)
Weird. Just tried it on my old octoprint laptop with ubuntu, and it behaves erratically there as well.
I’ve tried to read up on it and found this site https://www.best-microcontroller-projects.com/rotary-encoder.html mentioning noise issues with cheap rotary encoders and how to interpolate the signal. I have yet to find out if any of the libraries included with the project does any of that.
Are you using headers or have you soldered the wires directly to the board jpvd01? It feels like a wiring/noise issue to me, in both our cases.
And it was a wiring problem with mine, unsoldered and soldered all pins and it works again
I tried soldering all my connections, the volume part still doesn’t work.
I have ordered another encoder and board to see if it’s due to hardware failure.
The button click doesn’t seem to work. The light blinks when clicked, but it doesn’t pause or skip? Any thoughts?
Checked Serial Monitor as well, No output there when pushing the button. I am using the KeeYees Pro Micro ATmega32U4 5V 16MHz Micro USB Development Board Module Microcontroller for Arduino IDE Leonardo Bootloader
Hi, what computer (OS) are you using?
I can’t get it to work on Mac OS but on Ubuntu works fine.
On Mac OS only the volume works.
I had to modify the design to:
– create a holder that maintains the Arduino board on the bottom cover raised and aligned with the height of the USB connector
– create a holder that maintains the usb connector steady avoiding it can break the tiny Arduino board by flexing
– create an improved bottom cover that fits better on the upper part.
It can be closed with double adhesive tape or screws. Holes are not present, since I used very tiny screws.
https://www.tinkercad.com/things/gaCXCKWZVSm
Oh my god, Thank you!! Using the hex nut thing would make the volume knob too high, and I didn’t know how to install the knob without it rotating inside!! Great job
HI.
Great project.
I have a problem with compilation. I am using Arduino Nano board and when I start compilation I got an error: “#error HID Project can only be used with an USB MCU.”
I tried it also with Arduino Uno board with the same result.
When I select the Arduino/Genuino Micro, the code is compiling without any problem, but I don’t have this board and I want to use Nano.
Is there any solution for that issue?
OK, I didn’t watch the video carefully. This is not working with these two boards. Case closed.
Thank you for having this great information here! I was searching for this material and it was very useful for my recent project with paper now
Works great for me. Thanks alot for doing this. I seen a video where they did this with a ESP32 and used the bluetooth to connect with the PC. I have never had a ESP32 yet but would like to try it out so I wouldn’t have to keep my laptop so close to my mixer. Any chance of you you making a video on how to do this with the esp32. the video I seen was in german so was kinda useless to me.
How would I make a panel with multiple knobs like getpcpanel.com? What kind of knobs do they use?
Hi Mikolas,
I am just wondering if there is a way to add a long press case for the click encoder library?
Not to worry I figured it out. 🙂 If anyone would like to add an additional long hold/press function to this media controller just add the following code after the double click function:
case ClickEncoder::Held: // Button was held
Consumer.write(MEDIA_PREVIOUS); // Replace this line to have a different function when holding
break;
Merry Christmas to everyone for tomorrow 🙂
I checked click encoder and couldn’t figure out it was held, thanks.
It’s there a way to make the held function easier to manipulate?
I really like it. We re-did the code and now we can adjust the volume in increments of 2. The new code needed new wiring because we needed to use a PIN that support interrupts.
hello I would like to add in addition the function fast forward, but I don’t know how to do it.
thank you
I had this working fine. Now all of a sudden volume works but pause and skip are not working. I added serial.print commands in the button section. The button is working and the LED blinks when it’s pressed. This is on Win10 build 1909.
Same issue here. I’ve tested this on my tablet and works fine. Seems to be a problem with Windows.
Really cool just tried and it work immediately thanks to the clear and detailed tutorial, how can i adjust the sensitivity of the knob? for me it is to abrupt how it raised the volume
Try changing this line, third down in the setup function. The fourth argument with the value “4” allowed for a two step volume change per click on my rotary encoder with Windows 10.
encoder = new ClickEncoder(ENCODER_DT, ENCODER_CLK, ENCODER_SW, 4);
Hi! First, thank you for this great project!
Is there any chance to start Spotify with a long press?
If the button shuold have any value for me i need to have the button mute the microphone. This is a must, doing many online meetings every day. Is it possible? I have tried all of the HID options with no success. I see the shortcut for the mute function is CTRL-m, how hard could it be to add some value to the functionality? Regard 🙂
how would you reprogram the nano and what do you reprogram it with?
Cool. Technology does not stand still, and the emergence of the automatic knob of the sound switch for the computer proves this once again. I got the task to write an essay about developing areas of technology, but due to lack of time I am afraid that I will not be able to cope with this task, so I will immediately order from https://www.rushmyessay.co.uk/ I think I will get a good composition in the end. It will be interesting to get acquainted.
For anyone wanting to try this with a pico pi, I put together a quick tutorial – https://github.com/jackhickey/pico-volume-controller
I have an Arduino Nano and have been trying to install per the instructions. Tried different board selections (Nano, Micro, Uno, Leonardo).
Either I get the usual USB MCU error or, in the case of Leonardo and Micro I get “programmer is not responding” errors, “buffered memory access not supported” errors, and “did not respond to command” errors.
Please Help.
If you have the need to buy a discord account then do not have to look too long and try to not know where to find old accounts which are already clogged and so on. You can buy a very good account with all the indicators here https://accfarm.com/social-media-accounts-for-sale/discord-accounts, I have done so more than once and I know that here will not let you down and the accounts will be the most good quality. I hope you will find it useful too.
Could someone help me set this up? First time using Arduino. I have managed to get the volume to work however I would like to use the click/double click and hold for keyboard inputs.
click for letter p
etc. I have tried to edit the code but not sure I am doing it correctly. Thanks
Please make a PRUSA CURATED Printables club/subscription/purchase list for BIG PROJECTS like this!!!! Users could submit their own projects for publication.
I would love MORE THAN JUST MODELS!!! It's a lost opportunity since the applications of 3D printing have so much potential as a tool towards things like this.