
The default nozzle diameter for most of today’s printers is 0.4 mm, and the nozzles used in Original Prusa i3 MK3S+ and the MINI printers are no exception. Changing the nozzle takes just a few minutes and it can bring a number of benefits. According to our survey, only approximately 20 % of users tried replacing their printer’s nozzle at some point, which is quite a low number. Let’s look at how changing the nozzle can improve your experience.
A smaller nozzle is great for detailed (but slower) prints, while larger nozzles print faster, but the quality suffers – or does it? In reality, it’s a bit more complicated. In our article, we will demonstrate the benefits of smaller and larger nozzles in real situations. But first, we need to clarify something users often get wrong – the correlation between layer height and nozzle diameter.
Layer height vs nozzle diameter
Layer height should not exceed 80 % of the nozzle diameter. If you are using the standard 0.4mm nozzle, the maximal layer height is about 0.32 mm. However, with a 0.6mm nozzle, it’s possible to achieve up to a 0.48 mm layer height.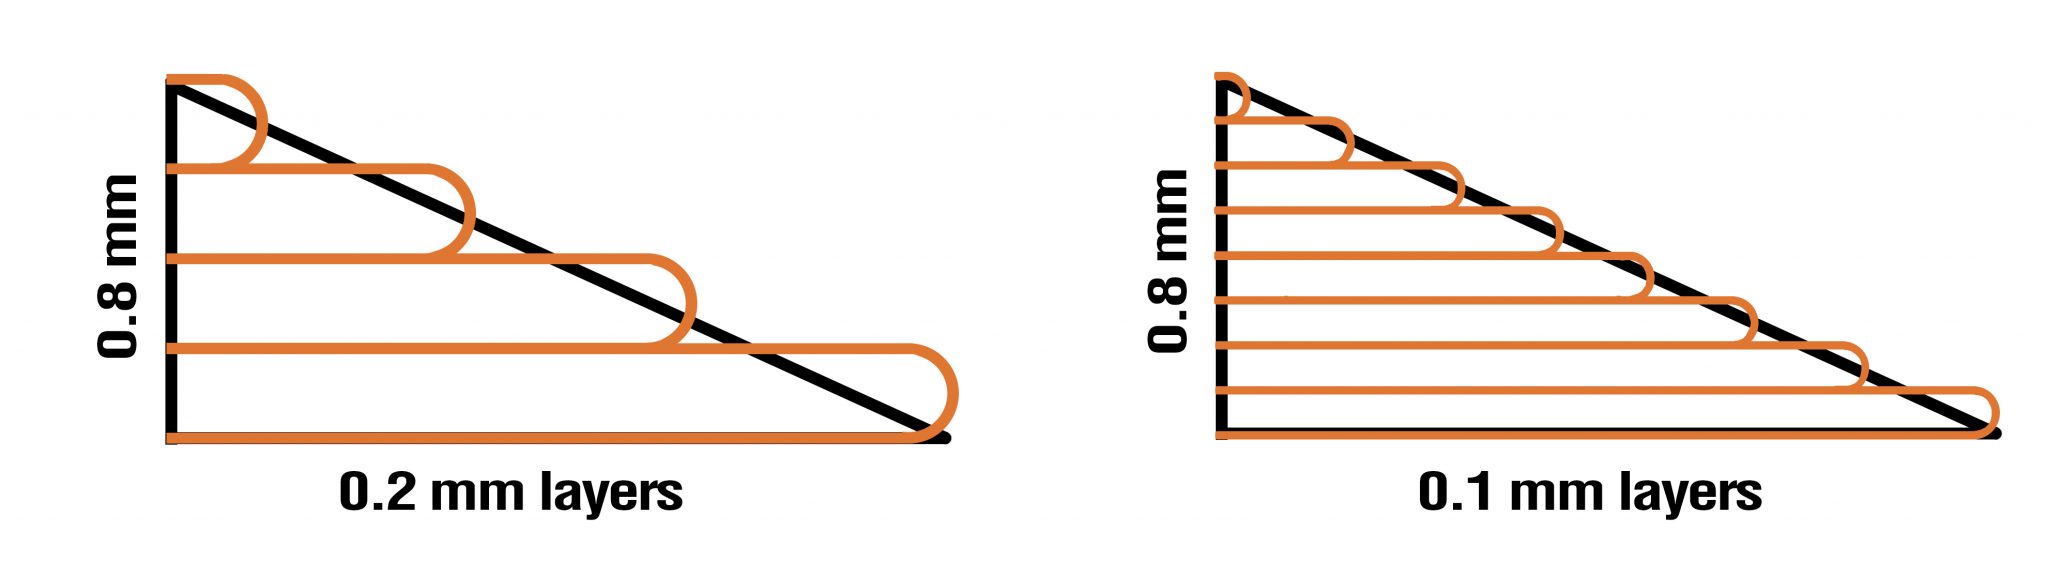
Apart from these limitations, the two parameters are independent of each other. Tweaking their settings separately will bring completely different results. The nozzle diameter affects the overall level of detail almost exclusively in the horizontal plane (parallel to the print surface). What does this mean? With a smaller nozzle, you will be able to print a more detailed text – assuming it’s placed on the top side of the printed object. Contrary to that, the layer height affects the level of detail on vertical and slanted sides of an object. You have a much greater chance of seeing individual layers on organic-looking objects. The lower you set the layer height, the better the overall result. On the other hand, it makes little sense to print rectangular-shaped objects with very low layer height. There will be little to no difference in the end result, plus the printing time will be unnecessarily long.
Print up to 4 times faster!
3D printing is not exactly a fast process. Even a print that is just a few inches tall can take several hours to complete. So it’s quite puzzling how overlooked large-diameter nozzle printing is, despite the fact that it can lead to a dramatic improvement of the printing speed.
 STL download link – Chibi Grim by Tanya Wiesner
A larger-diameter nozzle lays down wider perimeters, which means that it uses fewer perimeters than a smaller-diameter nozzle to print a wall of the same thickness. A nozzle with a larger diameter also allows for printing with increased layer height. Combining these two effects leads to a noticeably shorter print time. There’s a catch, though: if you keep the same layer height to print something with just one perimeter, like a vase, you won’t notice any improvement in speed. Because the nozzle has to go through exactly the same sequence of moves, independent of diameter. Yes, the vase will have a slightly thicker wall, but the print time will be almost the same.
Effect on mechanical properties
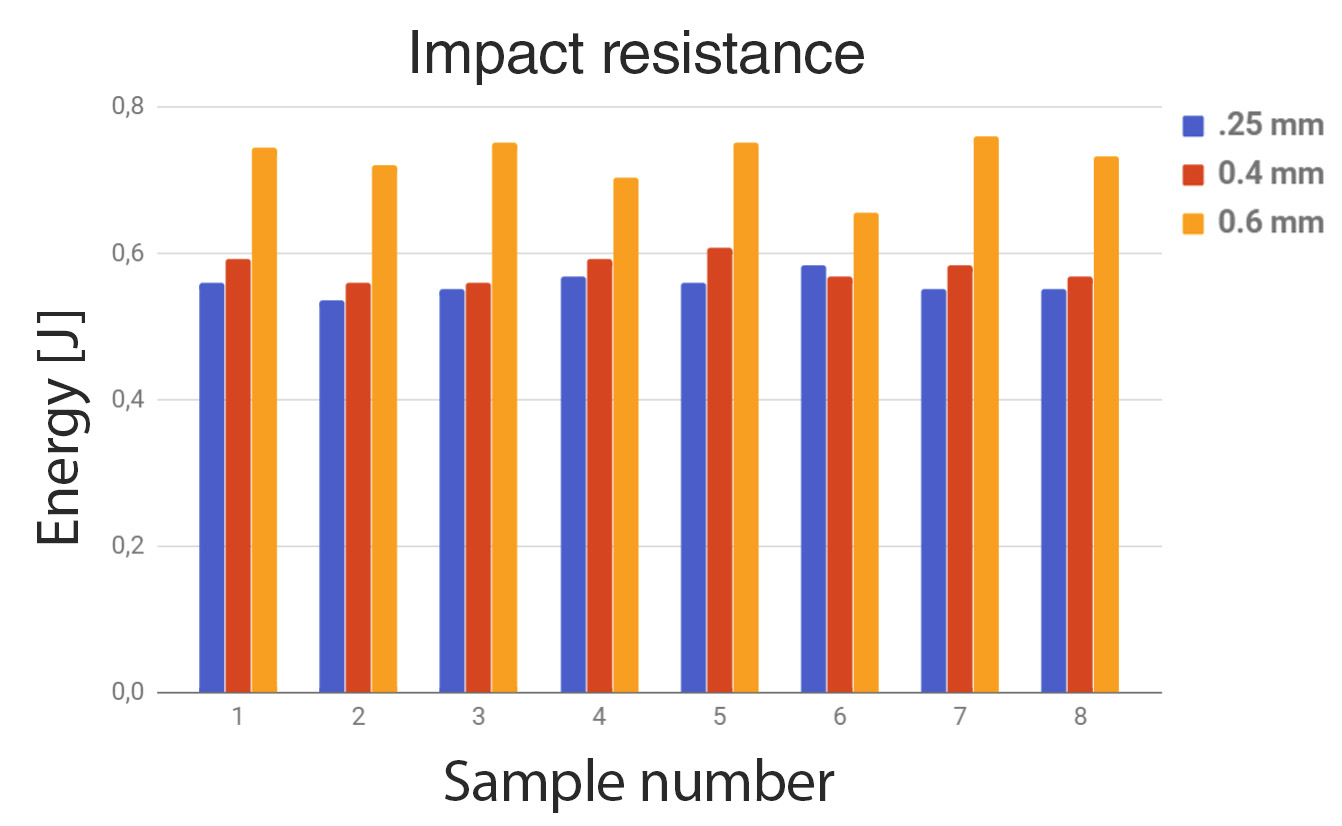
Another advantage of using larger nozzles is the increased toughness of printed objects. An impact resistance test revealed that the objects printed with the 0.6mm nozzle absorbed up to 25.6 % energy more than those printed with a 0.4mm nozzle. And objects printed with a 0.25mm version absorbed 3.6 % less energy than those printed with a 0.4mm nozzle. This test was performed on ten different samples. We then removed the minimum and maximum values, which is why you can see values of 8 samples. To learn more about the Charpy impact strength test, please visit this link.
Supports
Supports are usually printed as a one perimeter wide polyline. If you go to slicer settings, you may often notice that the supports are deliberately underextruded, so they are easier to remove. And, of course, using a different printer nozzle directly affects the width of support walls. You can turn this into an advantage. By simply using a smaller nozzle supports will be thinner and easier to remove. Using larger nozzles has an opposite effect leading to wider and sturdier supports, which can be a bit difficult to remove.
How to replace the extruder nozzle?
Ready-made settings for 0.25mm, 0.6mm, and 0.8mm nozzles
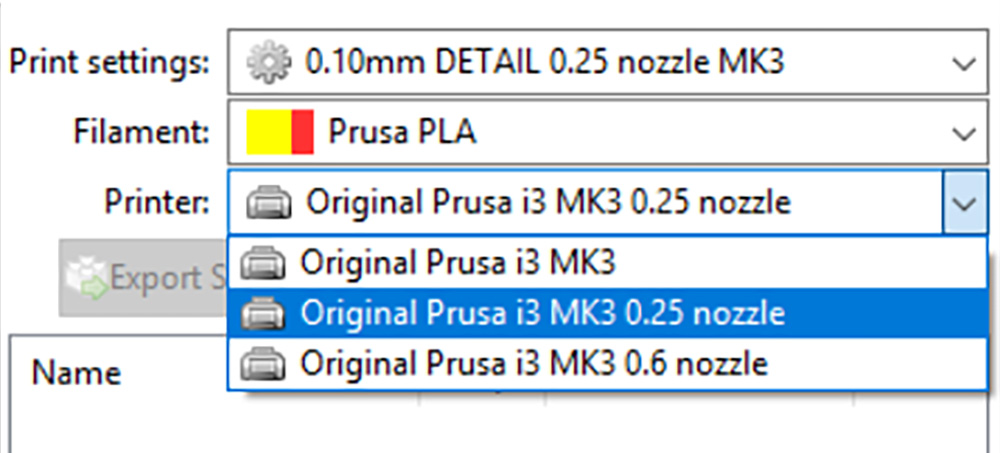
If you want to try 0.25mm, 0.6mm, or 0.8mm nozzle and own an Original Prusa printer, you don’t need to create brand new slicer profiles. We’ve done that for you! Open the Configuration Wizard in PrusaSlicer and tick the nozzle diameter checkbox under your printer corresponding to your nozzle size. Then simply select it as the active printer profile.
0.25mm nozzle
Pros
Better looking printed texts
Better resolution in XY axes – perfect for jewelry, logos…
Extremely easy-to-remove supports
Cons
Significantly longer print times
Higher risk of nozzle getting clogged
Not compatible with some filaments (filaments containing larger particles)
Examples of practical use (0.25 mm)
Printing texts
As already mentioned, the nozzle diameter has a noticeable effect on the printing resolution of the plane parallel to the print surface. This means that a 0.25mm nozzle is suitable for printing detailed text. Let’s compare it to the default 0.4mm nozzle. Despite the fact that ‘Detect thin walls’ is enabled, parts of the letters can be lost during slicing. This won’t happen with a 0.25mm nozzle, so you can use it to print an unusual business card to woo the crowds 🙂 It’s worth mentioning that changing the layer height won’t affect the text legibility.
 Slic3r preview shows that the object’s details are too small for the selected nozzle
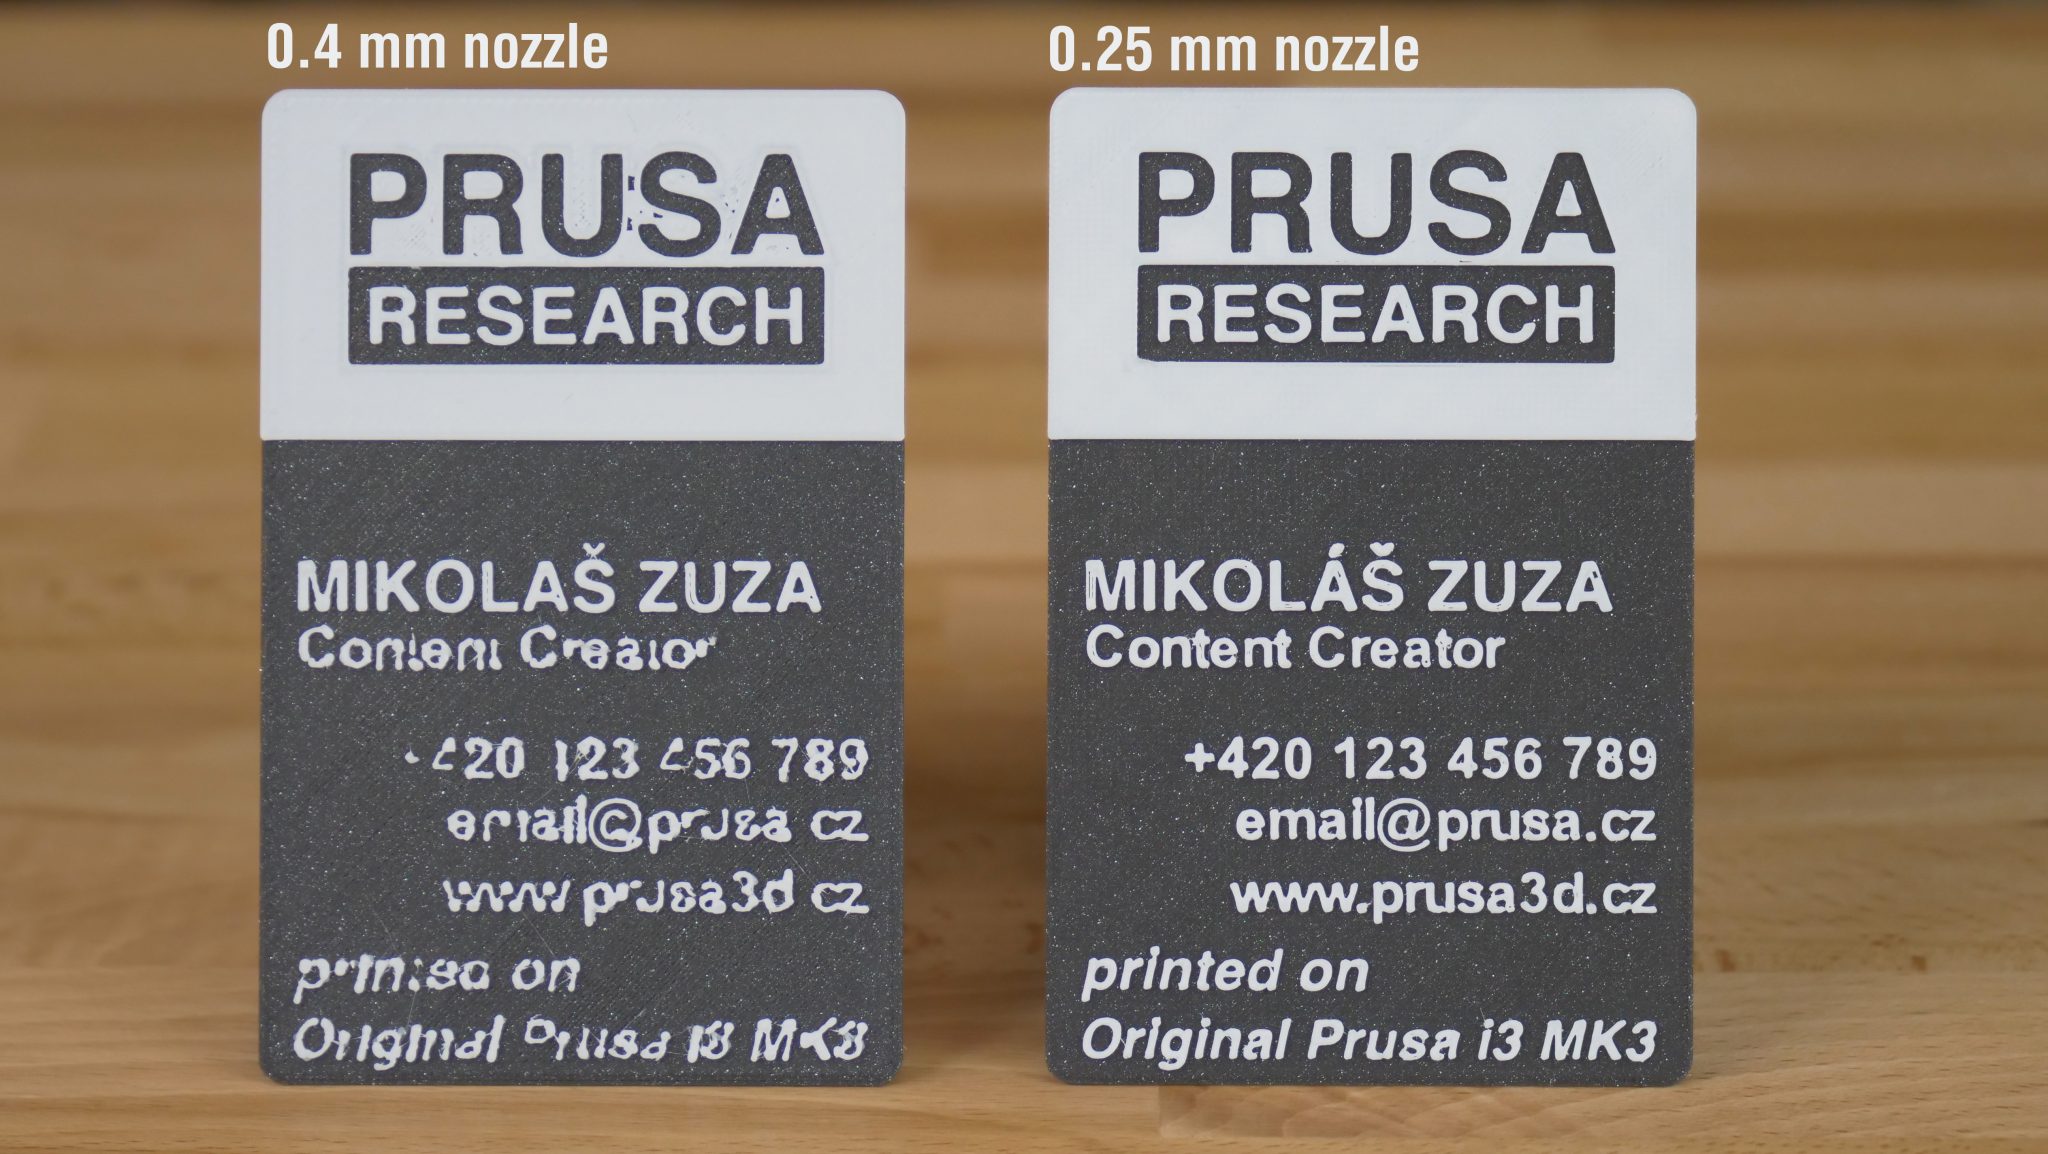
Left: Business card printed with a 0.4mm nozzle. Right: Same model, printed with a 0.25mm nozzle.
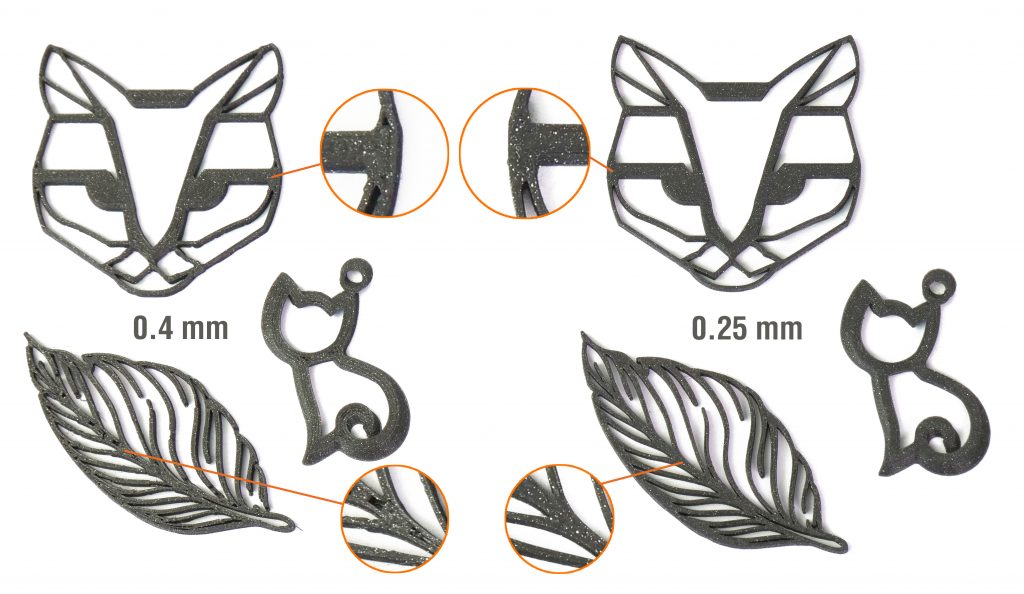
Printing jewelry
This is another great use of a smaller nozzle. The difference between a 0.4mm and a 0.25mm nozzle is not so dramatic, because even a 0.4mm nozzle can print small objects reasonably well. Improvements will be visible especially when printing thin lines.
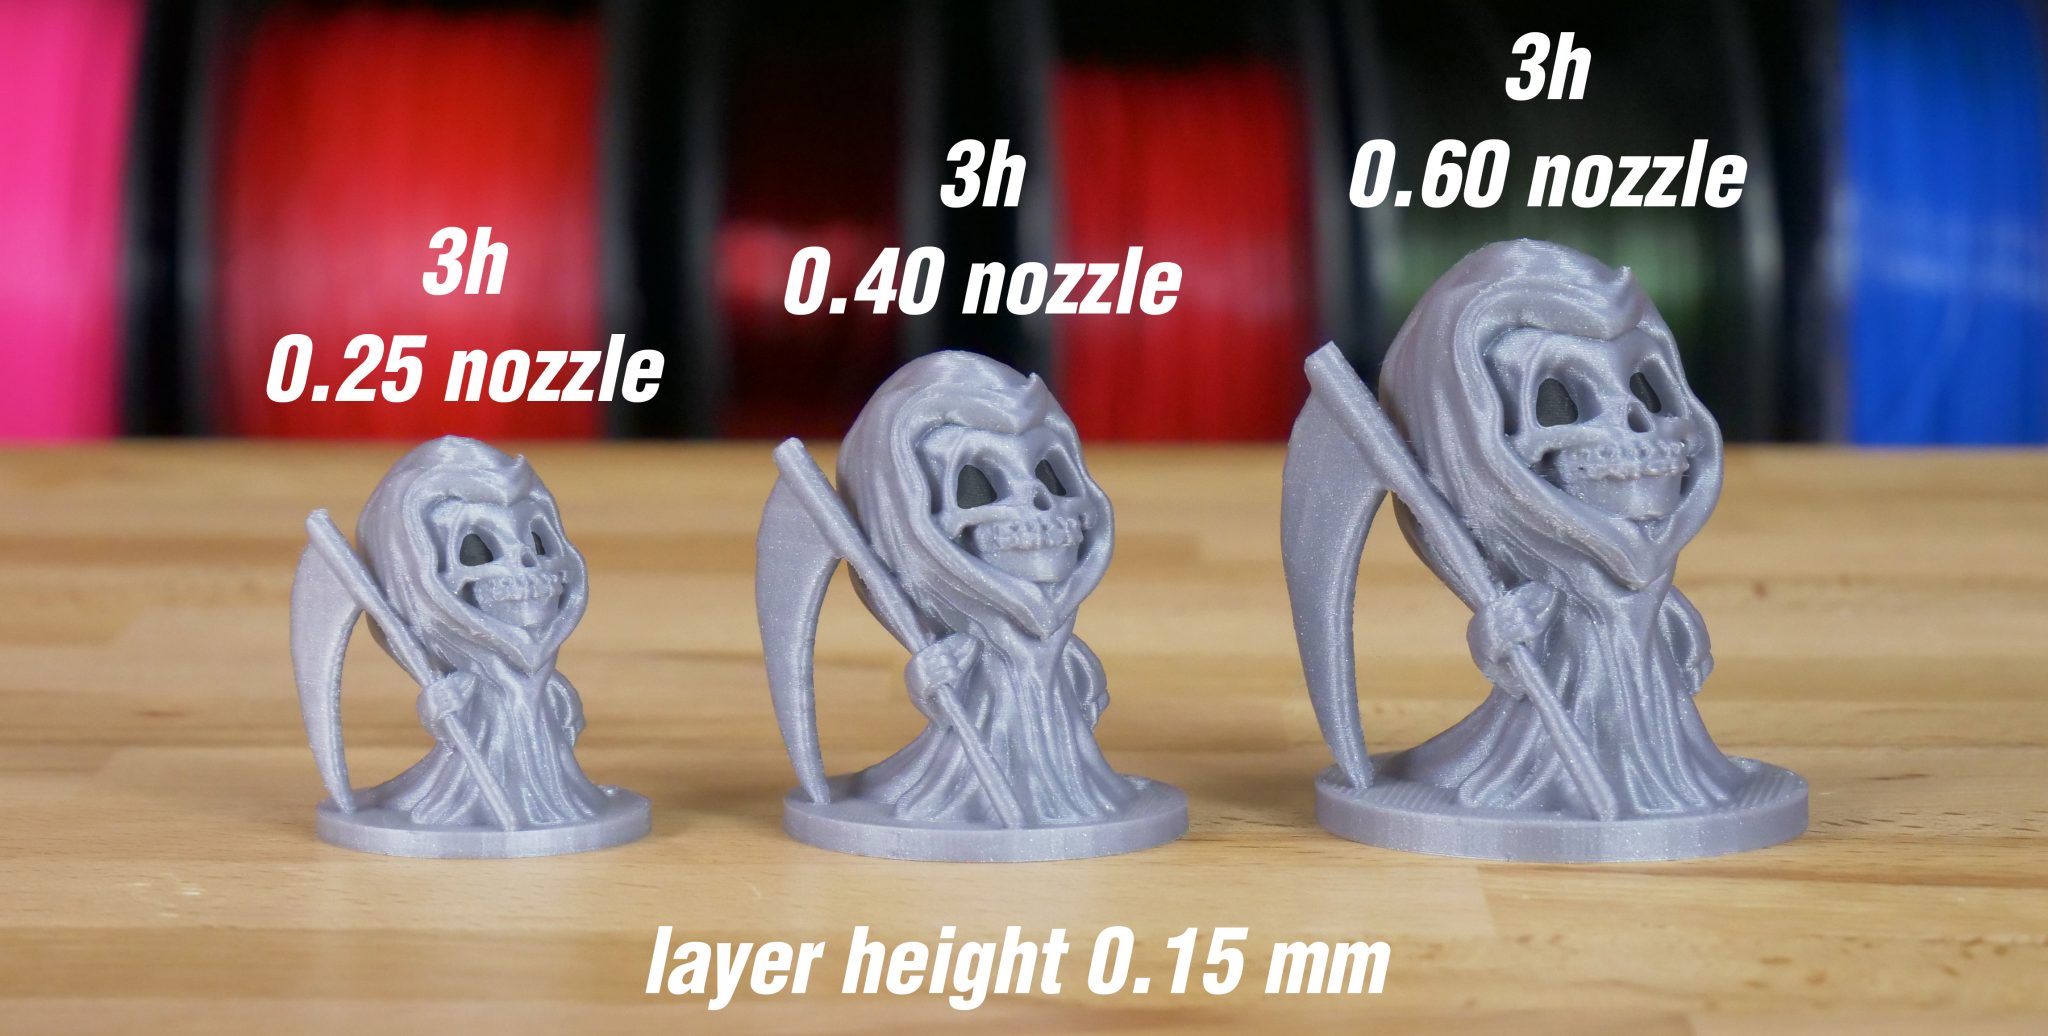
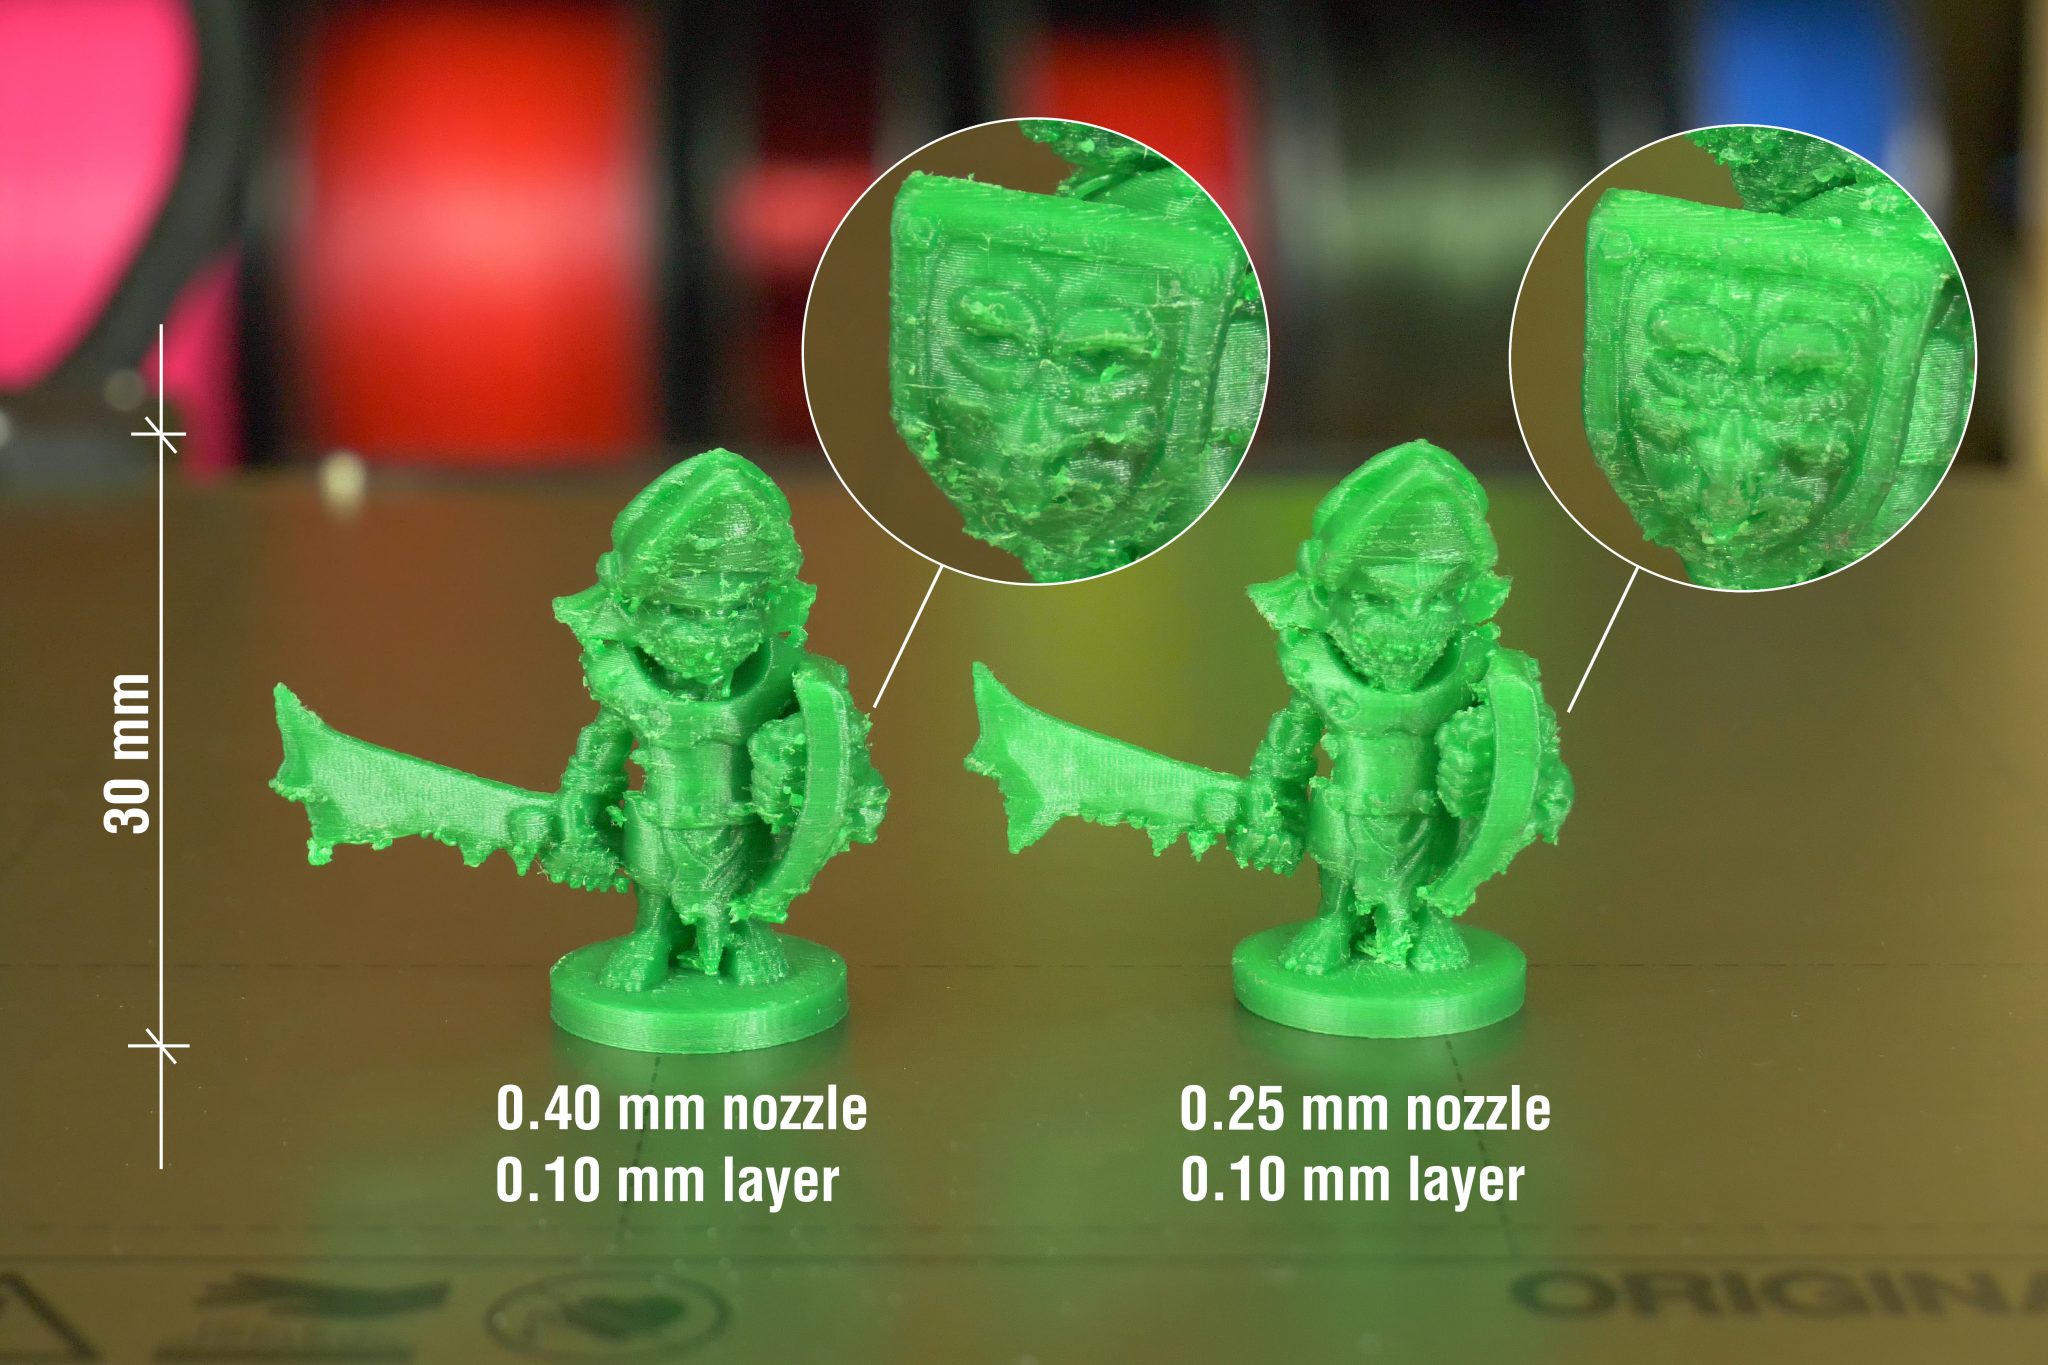
 Printing miniatures

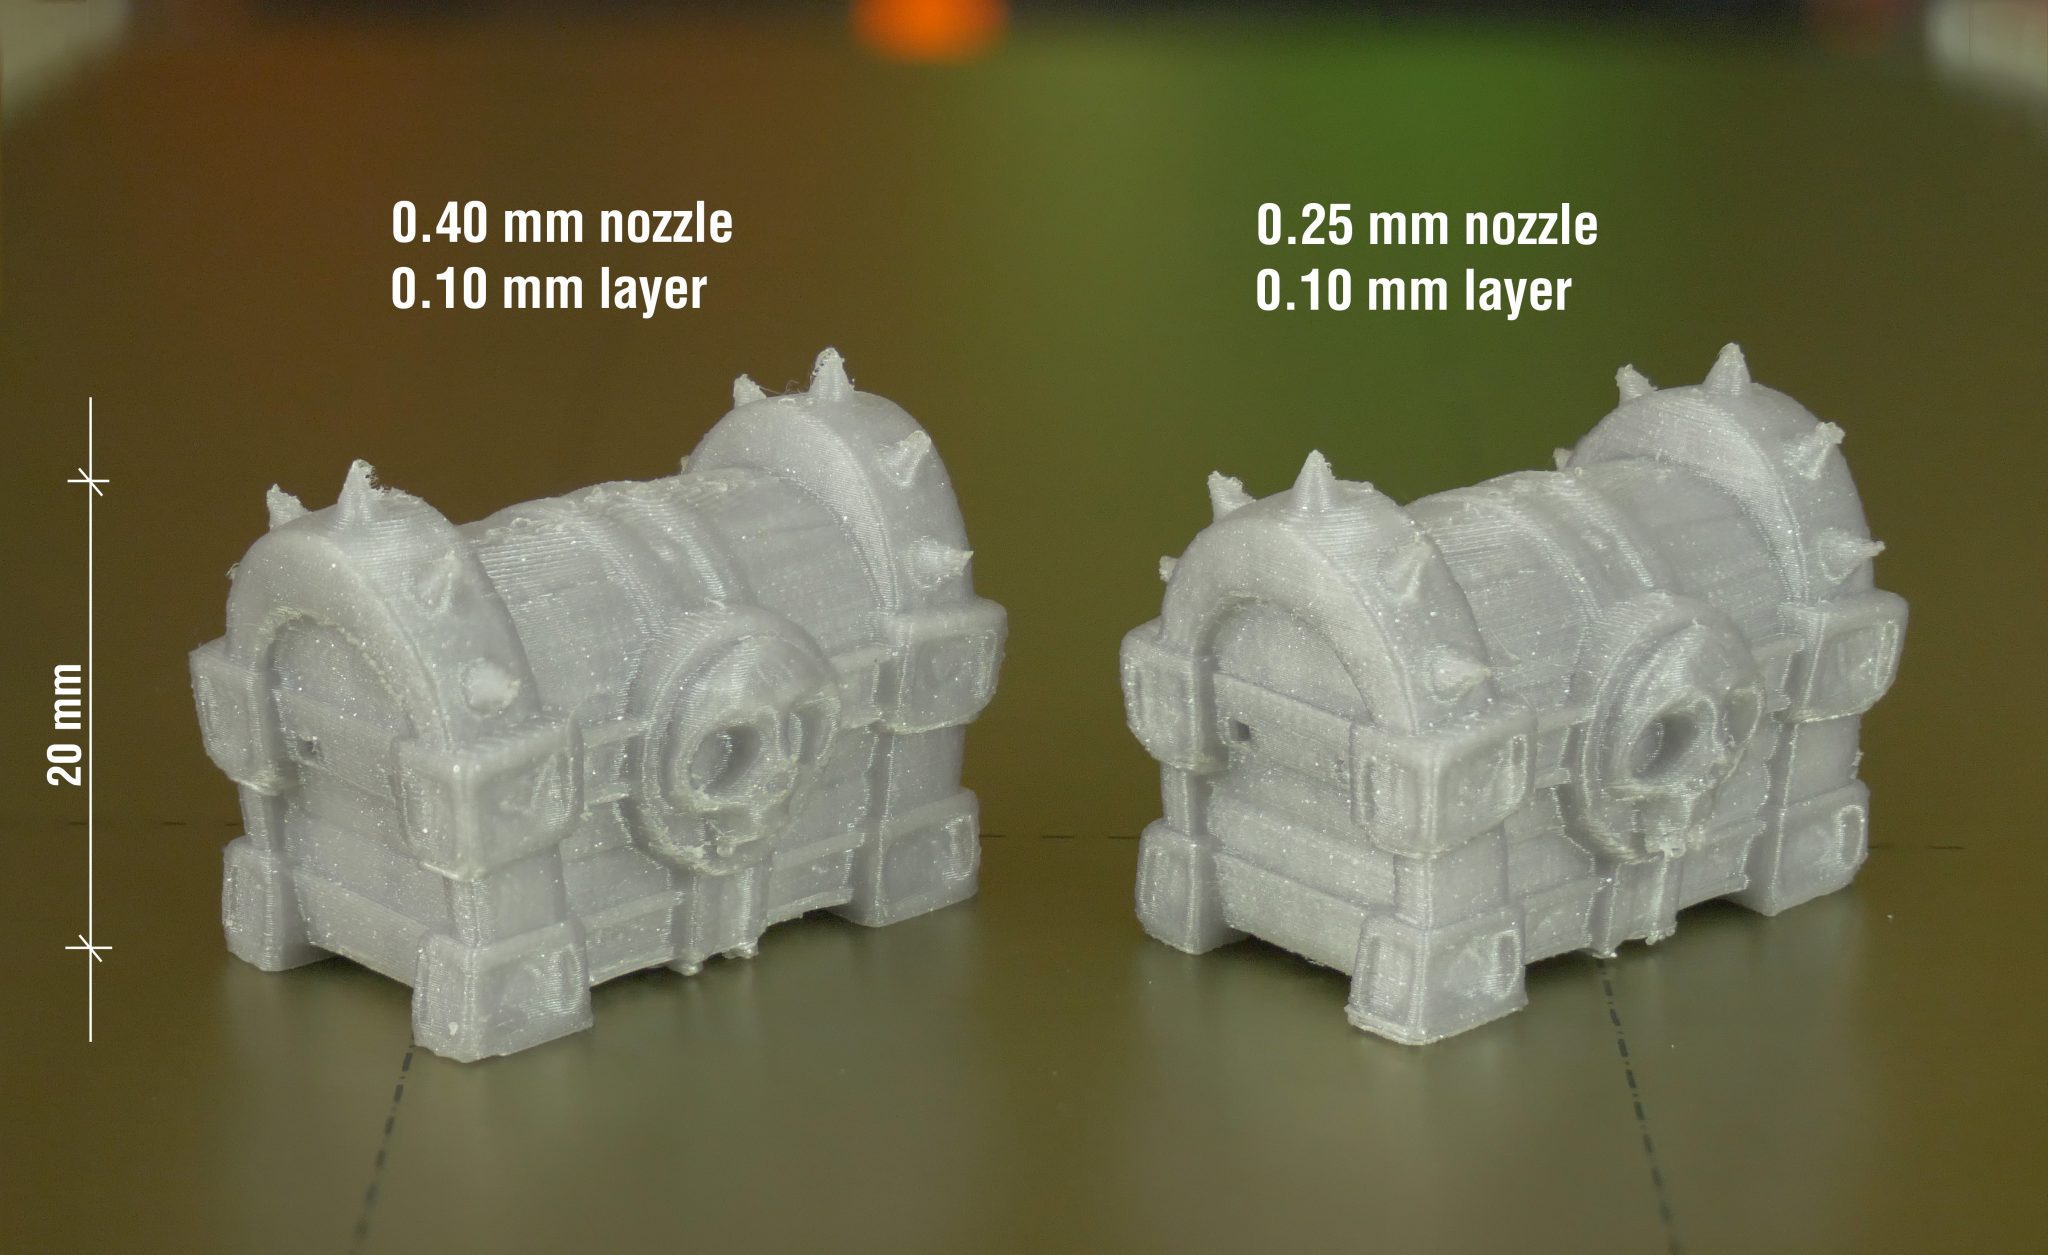
Surprisingly, printing miniatures using a small-diameter nozzle leads to a fairly minor improvement in print quality. You’ll notice the biggest improvement while printing supports for these objects. Supports printed with a 0.25mm nozzle are easy to remove and they leave nearly invisible marks on the object.
On the other hand, if you don’t need supports, the difference between a 0.4mm and a 0.25mm nozzle is close to zero. Honestly, if we had switched the labels above those two chests, could you tell?
0.60mm nozzle
A 0.60mm nozzle is suitable for any print that doesn’t rely on tiny details. Headphone stands, various holders, racks or flower pots… can all be printed in half the usual time. We have been mostly using a 0.4mm nozzle during the past few months, so frankly it was a pleasant re-discovery of how nifty the 0.6mm nozzle is.
Pros
Print times up to twice as fast
Almost the same print quality as a 0.4mm nozzle
More durable prints
Low risk of a clogged nozzle
Cons
Worse resolution of tiny details and texts
Supports are more difficult to remove
Examples of practical use (0.6 mm)
Flower pots and vases
Flower pots usually don’t feature any intricate details, so the difference between a 0.4mm and a 0.6mm print is nearly impossible to tell. In the example below, we’re using the same layer height. With an increased layer height, the 0.6mm would finish the print even faster. And thanks to the shape of the flower pot, the difference wouldn’t be too noticeable.

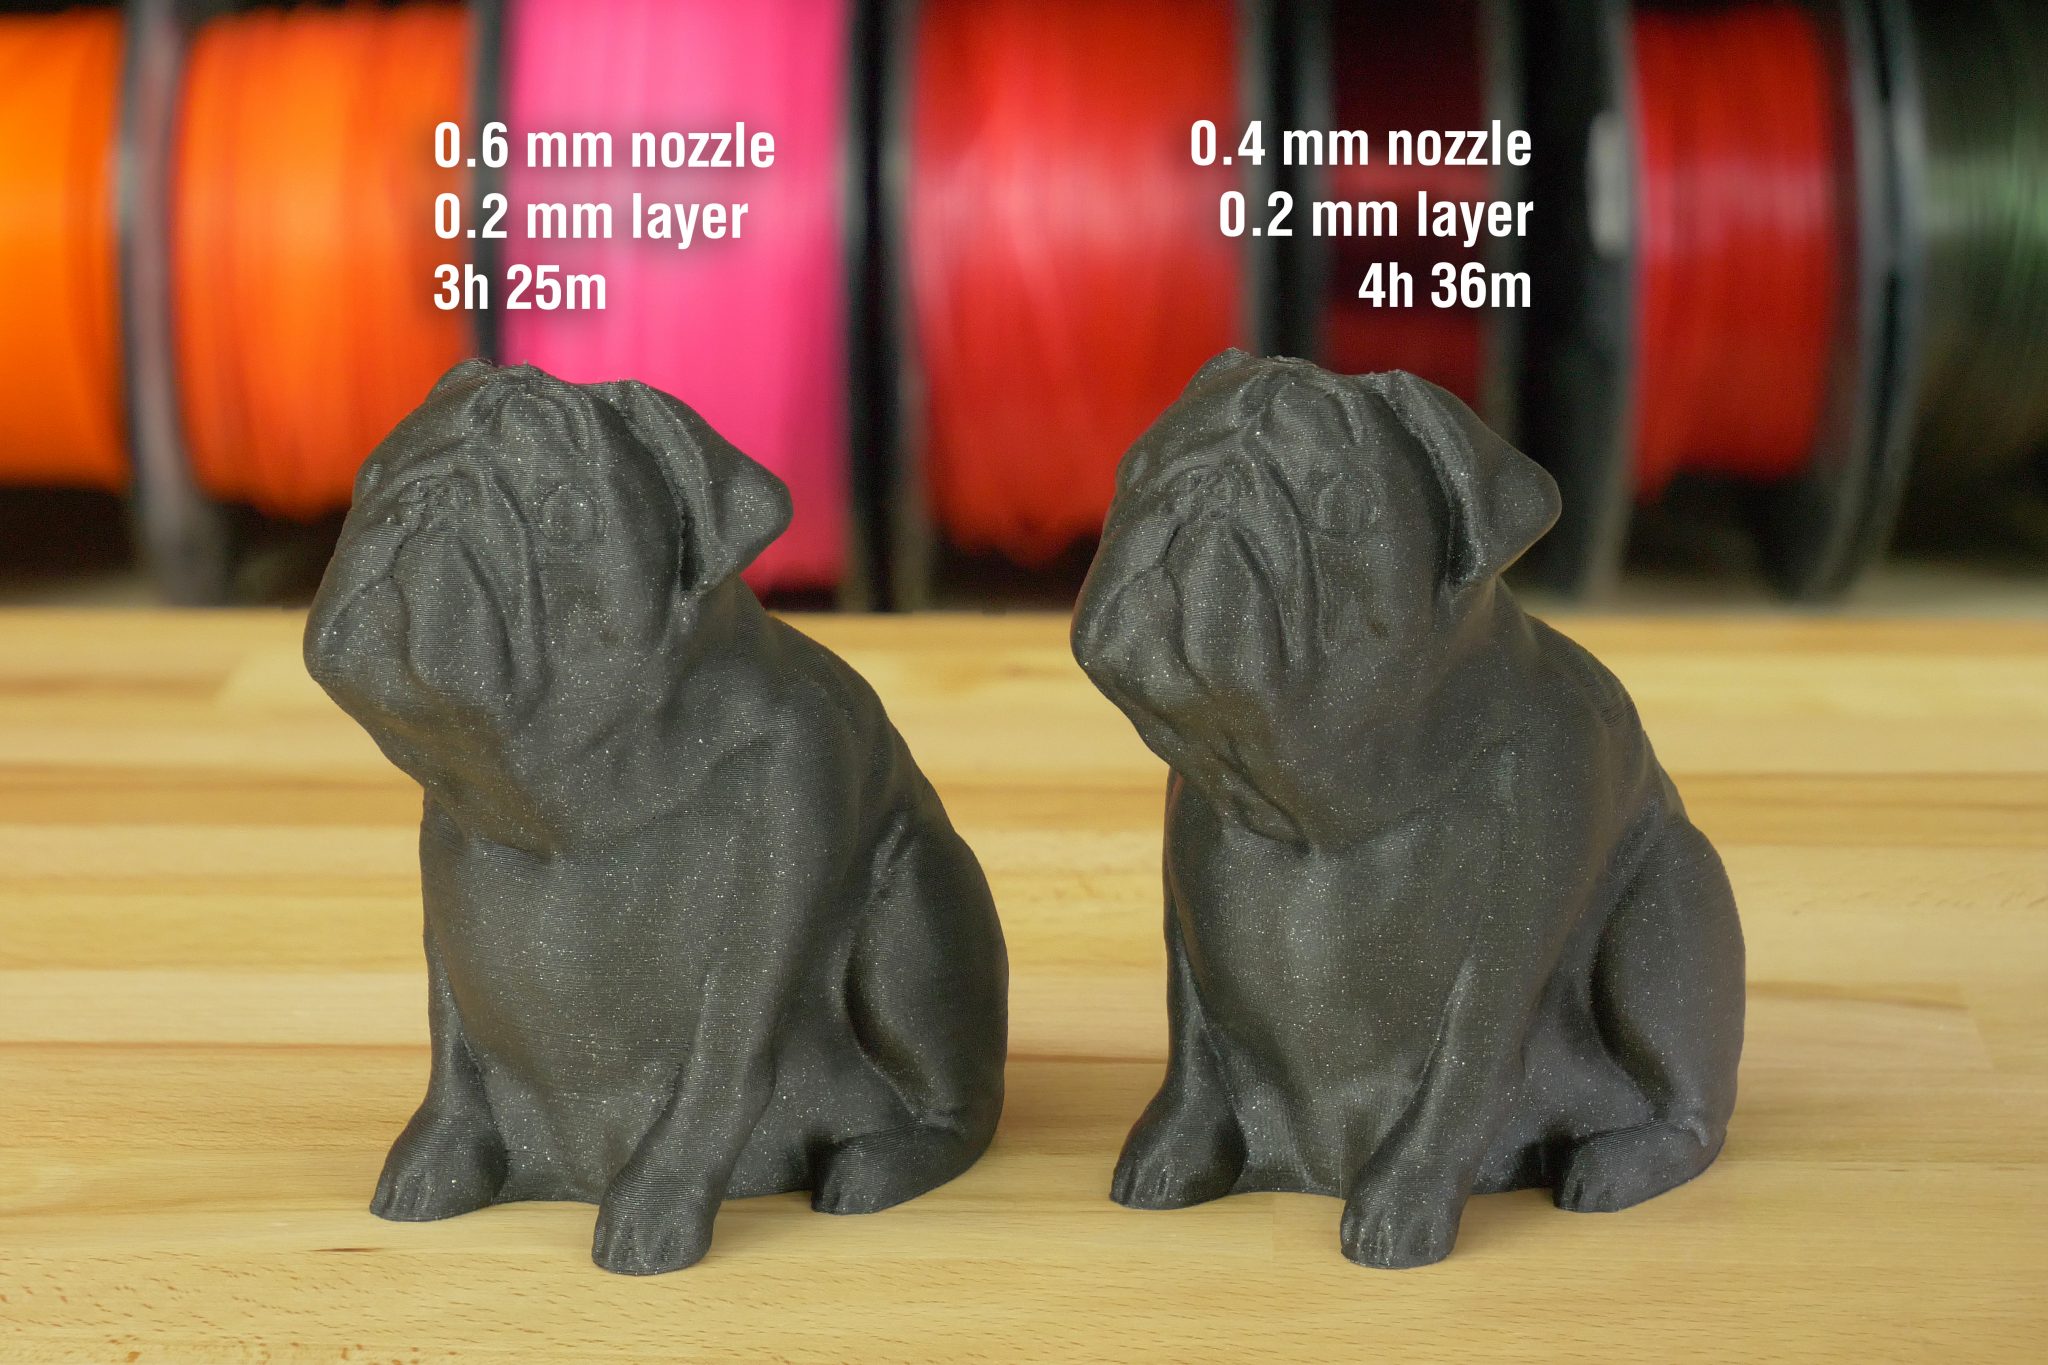
Buddy the Dog
Buddy is quite a detailed model. However, the 0.6mm nozzle has no trouble with that whatsoever at this scale.
Voroni lamp
Thanks to the shape of this lamp (large flat surfaces), almost no quality has been sacrificed. A 0.6mm nozzle requires one perimeter less to achieve the same thickness of the wall as a 0.4mm nozzle (3 perimeters with 0.4 mm vs 2 perimeters with 0.6 mm). This saved a huge amount of time with the reduction of the print time by nearly 9 hours!

1mm nozzle
One millimeter?! 0.04 inches? Yep, correct. Forget everything you think you know about 3D printing. Even prints that take dozens of hours to finish can be done in only a few hours using a 1mm nozzle. You can achieve up to 5 times faster printing speeds compared to a 0.4mm nozzle. Of course, there is a price to pay. With a 1mm nozzle, you will usually print at a layer height of 0.5 mm, but it’s possible to go even higher. Sure, the printed object’s layers will be highly visible, but sometimes that doesn’t hurt. In some cases, it can even give the model an interesting aesthetic, which could be quite challenging to achieve using other methods. We will, of course, demonstrate that on several examples below.
Pros
Extremely fast printing
Very sturdy prints
Unusual look with highly visible layers
Nearly zero risk of a clogged nozzle
Cons
Lack of detail
Visible layers
Supports very difficult to remove
Filament seems to disappear from the spool
Examples of practical use (1 mm)
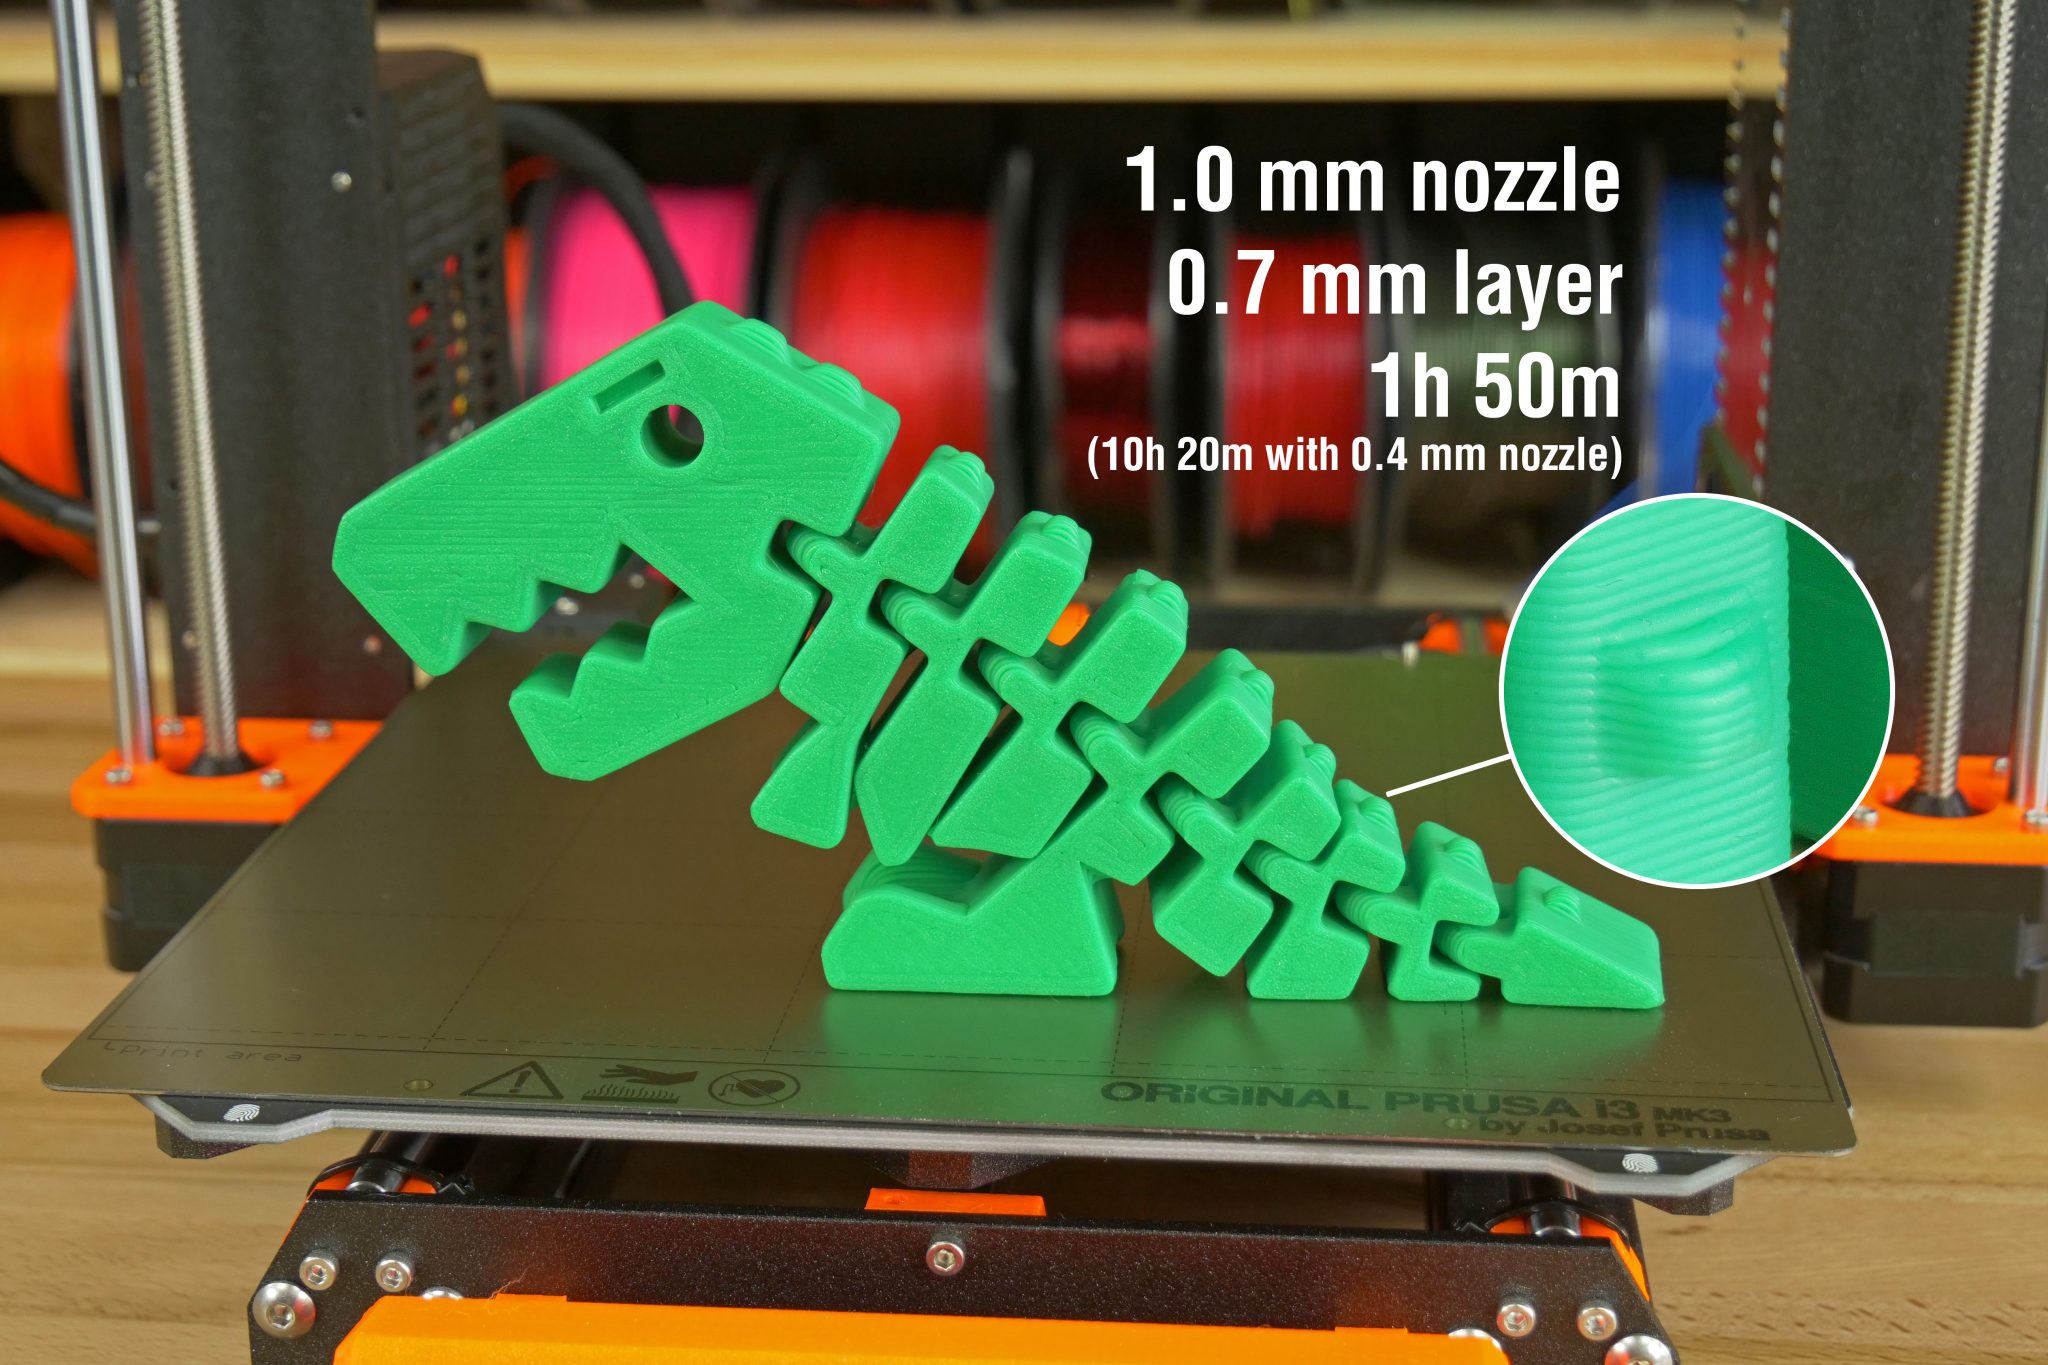
Dinosaur – a toy for children
A surprising advantage of using a 1mm nozzle is its ability to print rounded edges naturally – without any extra settings. This is great for printing toys for children because the risk of cutting one’s finger on a sharp edge is minimized. Plus, the toy was printed five times faster compared to the default 0.4mm nozzle.
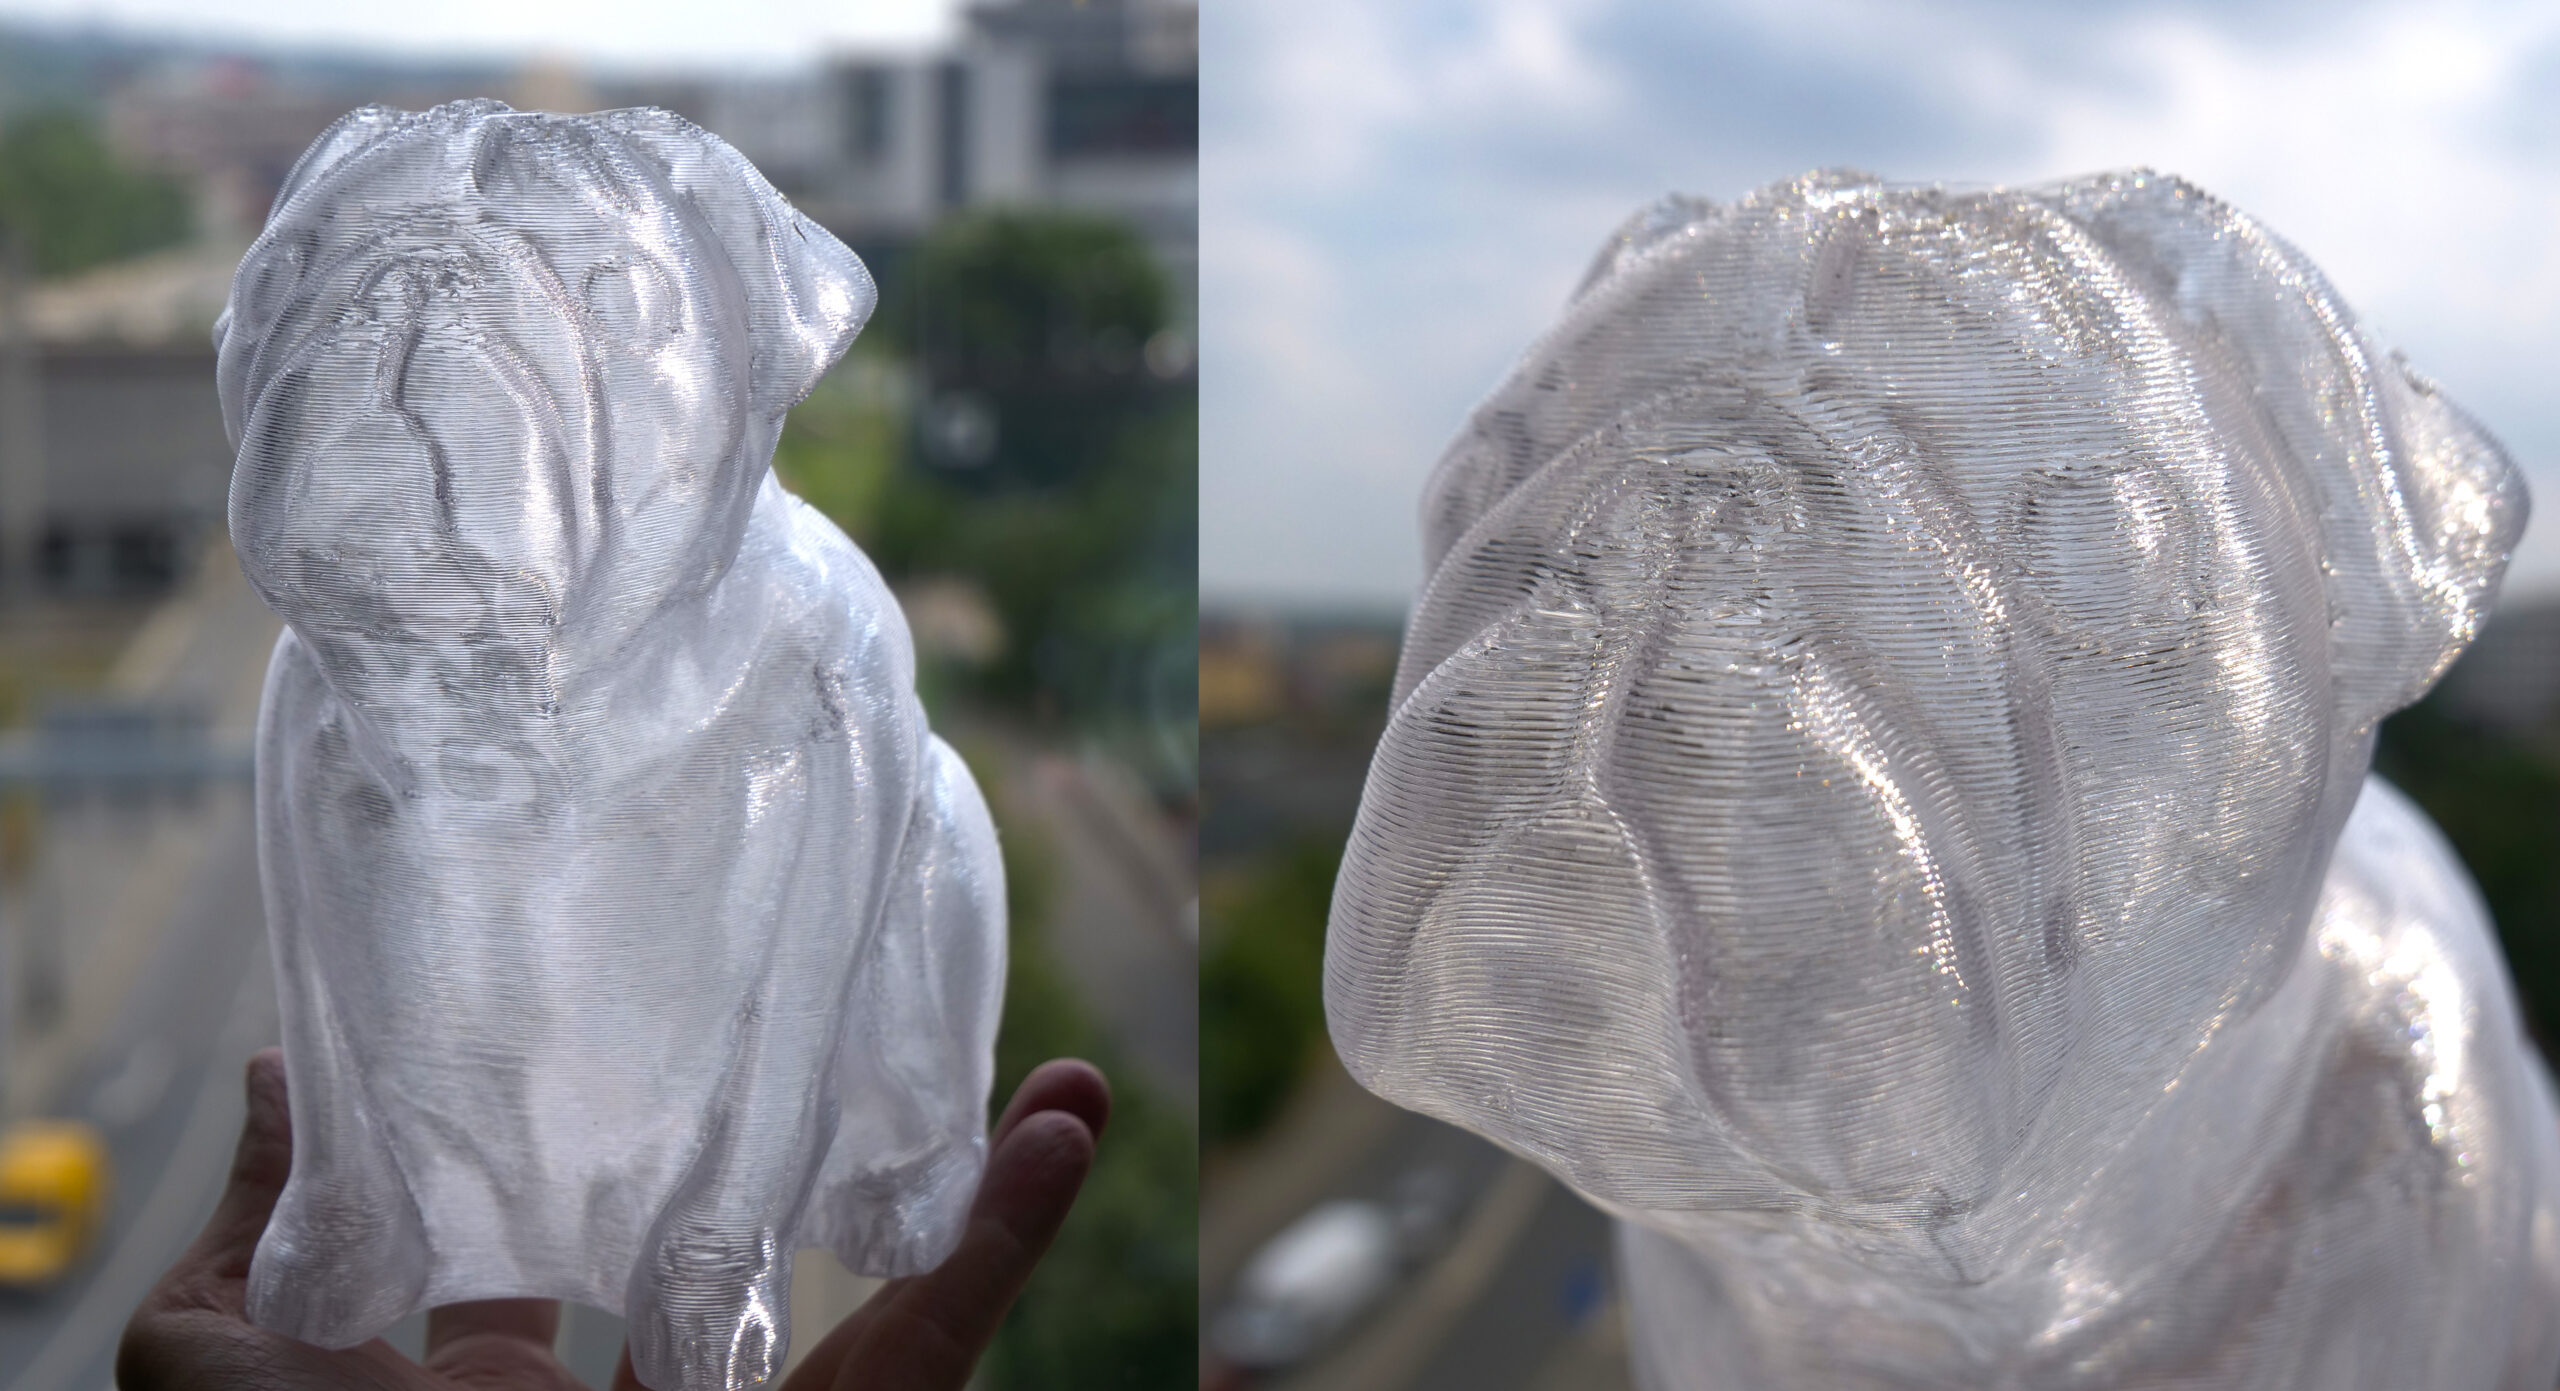
Pencil holder

Transparent prints without infill
Models printed using a transparent filament (e.g. PETG) without an infill and with a very high layer height have the ability to refract light in an interesting way. Especially, if you can print them with only one or two perimeters. Achieving a similar look would be otherwise quite challenging.
Conclusion
If we could recommend buying only one nozzle as an alternative to the 0.4mm nozzle, our vote goes to the 0.6mm option. It offers noticeably shorter printing times, but it’s still possible to print reasonably detailed models. If you usually print tiny models with texts, jewelry or logos, you should also consider the 0.25mm nozzle. The 1mm version has a limited use, but it’s still pretty fun to use. Even the original E3D nozzles, which can be purchased through our e-shop or directly from E3D, are just around 7 EUR per unit. This small investment can have a surprisingly large impact on how you print.
In Slic3r PE, the profiles for different nozzle sizes all have the same extrusion width. Is that supposed to be the case? I didn’t think so…
No, they shouldn’t. I had the same problem when I used slic3r beta from GitHub instead of the released on in the driver’s package. For some users, it loads some old presets for some reason. So if you install Slic3r using the driver’s package, it should have the correct values 🙂 Our Slic3r devs know about this and it’s something that’s being fixed.
Ah, I’m using the 1.40 beta, so that’s the problem. Thanks!
Nice post. I enjoyed it very much and I like to order a set of nozzles. Where can I buy a 1mm nozzle?
Hi, first thanks for the article. There is not much info about printing with other nozzle then 0,4. I’m interested to see the printing settings (speed, retraction…).
i downloaded the last bundle 2_1_6 for mac today, with the 1.39.2+ slic3r PE, and i have only one choice in the “printer” menu.
In “filament” and “printing settings” i can see some presets and my own ones, but in ‘Printer” only : Original Prusa i3 mk3’, nothing else..
Any idea ?
thanks
In Slic3r select Configuration – Configuration Wizard. Here you can choose to import the settings for other nozzles 🙂
Its awesome blog! (and article) JUST A DIRT! Thanks
I’m looking at the MK2 .6 nozzle profile and it has the max layer height limit at .35 . Shouldn’t it be .48 ?
This limit is for the variable layer height function. Feel free to punch it higher, the default values are rather conservative, so that the majority of users don’t have to change anything to get nice prints 🙂
interesting!
but why is there no preset for the 1mm nozzle? 🙂
In Slic3r jump to Print Settings – Advanced – Extrusion width and set the individual extrusion widths to 1.10 everywhere except Infill 1.12 and supports 0.85 and bam, you have basic settings for 1mm nozzle 🙂
Hi! excellent article, but… what about print speed? Should I use the same speed with a 0.8 nozzle that I was using with the 0.4? The only parameter to change in order to print with different nozzles are the print height?
The main thing that changes with a different nozzle is the extrusion width. Generally, it should be about 110% of the nozzle diameter. You don’t have to change the print speed, but with really big nozzles (0.8+) you might want to either – slow down to let the plastic get properly heated – or – increase the temperature a bit. For PLA it’s easy as you have a lot of heating margin, but with filaments that are printed at higher temperatures, it can start to get tricky. The ideal solution would be replacing the hotend with E3D Volcano or similar high-performance hotend that is made especially for printing fast with big nozzles.
thanks a lot! I will run my tests lowering the speed and see what I can find 🙂
I’m curious too. What is the largest practical nozzle for an i3 MK3? I’m printing mosty in PETG.
Slic3r Prusa Edition – 1.40.0 only have system preset of 0.25, 0.4 and 0.6 Nozzle
Can i ask your 1.0 mm nozzle extruder setting.
Thanks.
Yes, I would also love to get 0.8 and 1 mm nozzle presets.
Absolutely. More and more of us are experimenting with .8mm nozzles and online you can find guides on how to do the math, but no actual presets (as with .2, .4, and .6).
It’s not that we can’t cobble them together from multiple sources, but I’d be curious to see what some find is their ideal .8 nozzle profile.
Absolutely Great article!
Keep them coming.
Hi! great job, nice article 😉
The black filament you used ist cool, are there some particle inside?
And where can I buy it?
Thanks.
Thanks! 🙂 That’s our own filament – Prusament Galaxy Black, we’re still testing it, but it will be available for purchase soon.
Since you never mention it in the video, I’m guessing the z-axis calibration that occurs before each print takes care of any differences in nozzle protrusion after a change, yes? And the first layer z-offset is independent of this and also doesn’t need to be updated?
I see comments here indicating that the speedups you are reporting with the 1 mm nozzle might not be achievable with out of the box MK3.
Can you say if you can print with an MK3 and 1mm nozzle with settings that get the results show in, for example, the pencil holder picture? Reducing 11 hours to 2 hours sounds good, but we need to know if we can get that by just replacing our nozzles.
If we need to switch out our heating block, then we need to know that before we try to get these speed increases from 1mm.
Excellent items from you, man. I have be mindful your stuff prior to and you are simply extremely great. I really like what you have got here, certainly like what you are stating and the best way during which you say it. You’re making it enjoyable and you continue to care for to stay it sensible.I can’t wait to read far more from you. That is really a terrific web site.
Essayservices[dot]org
I am having a bear of a time with a 1.2mm nozzle for PETG. I have PLA figured out but I need some bigger prints that will handle outdoor heat. I am printing parts that are up to 13 kg so they are huge. However, no matter what I do the PETG clogs right at the tip of the nozzle resulting in stripping at the extrude gear. It is usually not during perimeters but while doing supports. I have ranged the temperature from 230-280 and adjusted speed from 25mm/s down to 12.5mm/s but always the same issue. Any thoughts?
The preset for Prusa Polymers PLA for Prusa MINI with 0.6 mm nozzle is missing! Or at least the “Filament Settings” > “System presets” > “Prusament PLA” preselect does not work properly with the 0.6 mm nozzle. (In the wizard I selected “Prusa MINI” and only “0.6 mm nozzle” and only “Prusament PLA”. But no preset for 0.6 mm nozzle.
I’m a girl but I was interested to read about it)
Mikolas, I think it’s time to revisit this article. Slice engineering has 0.2mm up to 1.8mm nozzles available and shipping. I’m going to start with the suggestions you made in comments, but getting from 1mm to 1.8mm may be a challenge for someone like me.
Thanks for this article, and your engagement in the comments!
Mikolas rocks!
It seems like the formula extrusion width for larger nozzles used in an earlier post is as follows:
Extrusion Width unless stated below = Nozzle Diameter *1.1
Extrusion Width for Infill = Nozzle Diameter *1.12
Extrusion Width for Supports = Nozzle Diameter *0.85
1mm nozzle would be 1.1mm, 1.12mm & 0.85mm
1.2n: 1.32mm, 1.35mm & 1.02mm
1.4n: 1.54mm, 1.57mm & 1.19mm
1.5n: 1.65mm, 1.68mm & 1.28mm
1.6n: 1.76mm, 1.79mm & 1.36mm
1.8n: 1.98mm, 2.02mm & 1.53mm
2.0n: 2.2mm, 2.24mm & 1.70mm
the impact test is biased bc you probably used different width/height
Given the new Arachne settings in Prusaslicer 2.5.0 alpha3 virtually increasing the resolution of all nozzles, might it be time to revisit this article?
I’m thinking 0.6mm with Arachne might be my default. Lots of YouTube videos are showing how it is performing the same as or better than 0.4mm classic.
Xo’sh, bukmekerlar keladi va ketadi, lekin siz doimo o’zingizga va daromadingizga g’amxo’rlik qilishingiz kerak. Men mostbet har doim onlayn tikish bo’yicha eng yaxshi koeffitsientlarni topishni tavsiya qilaman. Ulardan foydalaning va siz tikish uchun sport turini topishda hech qachon muammoga duch kelmaysiz. Tikishingizga omad tilaymiz!
Mostbet https://mostbet.info.tr/ bahis şirketi ile Türkiye’de online casino ve toplayıcı oynayabilirsiniz. Bu güvenilir bir hizmettir. Kayıt, web sitesinde ve mobil uygulamada herkes tarafından kullanılabilir. Her oyuncu, kazanma şansını artırmak için para iadesi, ücretsiz bahisler, ücretsiz dönüşler ve diğer bonuslar alır. Şimdi Katıl!
If you find yourself in need of transporting your vehicle to or from Tuscumbia, Alabama, car shipping services can provide a reliable and efficient solution. https://www.youtube.com/watch?v=SggC4fq7Nwg
Great article! But everyone talks about layer height and I can't find info on layer width. When I switch the nozzle profile in Orca or Bambu studio the heights change but the widths stay at .45.
I'm trying to figure out how to print fine text…the main reason I got the .2mm nozzle.
Mostbet je populární platforma pro online sázení, která nabízí mnoho možností pro ty, kteří se zajímají o sport. Na stránkách Mostbetu najdete široký výběr sportovních událostí, včetně fotbalu, tenisu, basketbalu a mnoha dalších. Díky spolehlivé práci a pohodlnému rozhraní si Mostbet získala reputaci jednoho z lídrů v oblasti online sázení. Klikněte nyní na odkaz a získejte lukrativní bonus k zahájení hry: <a href="http://rssystem.cz/">http://rssystem.cz/</a>