


Probably everyone involved in practical 3D printing has been thinking about improving the physical and mechanical properties of their prints. You could try out some special materials, but those are usually both expensive and hard to print. The only other obvious option is to tweak your print settings, which has its own limitations. Surely there must be a better way! Well… of course there is, otherwise this article would end right here. 🙂
Annealing is a process of increasing temperature to improve firmness, tensile strength and a heat resistance of a given object. It’s a well-known procedure when creating metal or injected plastic parts. With 3D prints it’s just less known – it’s applicable nonetheless. Let’s look right into it.
How does it work?
In a nutshell, we are talking about heating plastic to a point when its molecules are able to rearrange, thus making their structure more firm, stable, and with lesser inner tension. We want to achieve a so-called “glass transition temperature”. At such temperature, a printed object still retains its shape but is softened and there are ongoing changes on the molecular level, improving its structural stability.
In the following chapter, we will explain the basic nature of this process from a physics point of view. This will help us understand why exactly annealing helps to improve mechanical and heat resistance, and why it’s so important to find the optimal temperature.
If you are not much into theory, feel free to skip it and go right to the practical part, where we present actual results of annealing, using various materials at different temperatures.
Macromolecular structure
Most of the commonly used 3D printing materials are polymers, i.e. long, repetitive molecular chains. Polymers have two types of molecular structures: amorphous (chaotic) or semi-crystalline (partially organized). There is no exact dividing line, though, molecules could have various levels of arrangement. Crystalline structures are usually harder and more rigid (similar to a diamond, even though that’s not a polymer), amorphous polymers are more elastic and flexible.
If you heat up a plastic polymer inside a nozzle, its structure is likely to be amorphous. Imagine spaghetti, but with polymer chains instead of pasta dough. The plastic is then rapidly cooled down to room temperature, therefore its structure remains the same. Because a 3D printed part is mostly amorphous, its heat resistance, firmness, and tensile strength are inferior to crystalline materials with organized molecular chains.
Glass transition temperature
To improve the qualities of our prints we need to rearrange their molecular chains to make them more arranged, ergo, more similar to crystalline polymers. The higher level of arrangement could be reached by heating, or more precisely, by reaching the correct glass-transition temperature. “Okay, so I melt that plastic a bit and it crystallizes, right?” Well, yes… But actually no. If we heat up crystalline materials, at a certain point they just liquefy (i.e. reach liquefaction, or simply a melting point). But there is a difference between a melting point and glass transition temperature. Amorphous polymers don’t have an exact melting point. Instead of liquefying right away, they soften gradually. This range between a completely solid-state and a liquid state is called the glass transition temperature.
![]()
Material Glass transition temperature Printing (~melting) temperature
PLA 65 °C (149 °F) 215 °C (419 °F)
PET(G) 75 °C (167 °F) 230 °C (446 °F)
ABS 105 °C (221 °F) 255 °C (491 °F)
Transformation of amorphous polymers into the semi-crystalline structure
Forming of crystals (i.e. molecular organization) inside polymers could only occur when the temperature reaches the glass transition, but also stays below the melting point. For amorphous polymers, their melting point is when the glass transition ends. At that point, the molecular structure shatters and the molecules start to move freely. On the contrary, at temperatures below the glass transition, the molecules are too “numb” to move sufficiently.
How to choose the right temperature?
Usually, amorphous polymers have quite a wide margin between the beginning of the glass transition and the melting point. For example, with PLA we are talking about a range of 65 to 170 °C (149 to 338 °F). But what exact temperature should we choose for optimal results?
It’s quite simple. The higher the temperature, the more the individual layers merge together, thus increasing the firmness of the object. However, the material also shrinks, warps and at a certain point, it softens so much the object just collapses. Obviously, to get the best result we have to find a sweet spot between keeping the dimensions and shape correct and making the object as firm as possible. Proper annealing time depends on the size and shape of the object. For example, samples we used for testing were heated for 30 minutes using an electric oven.

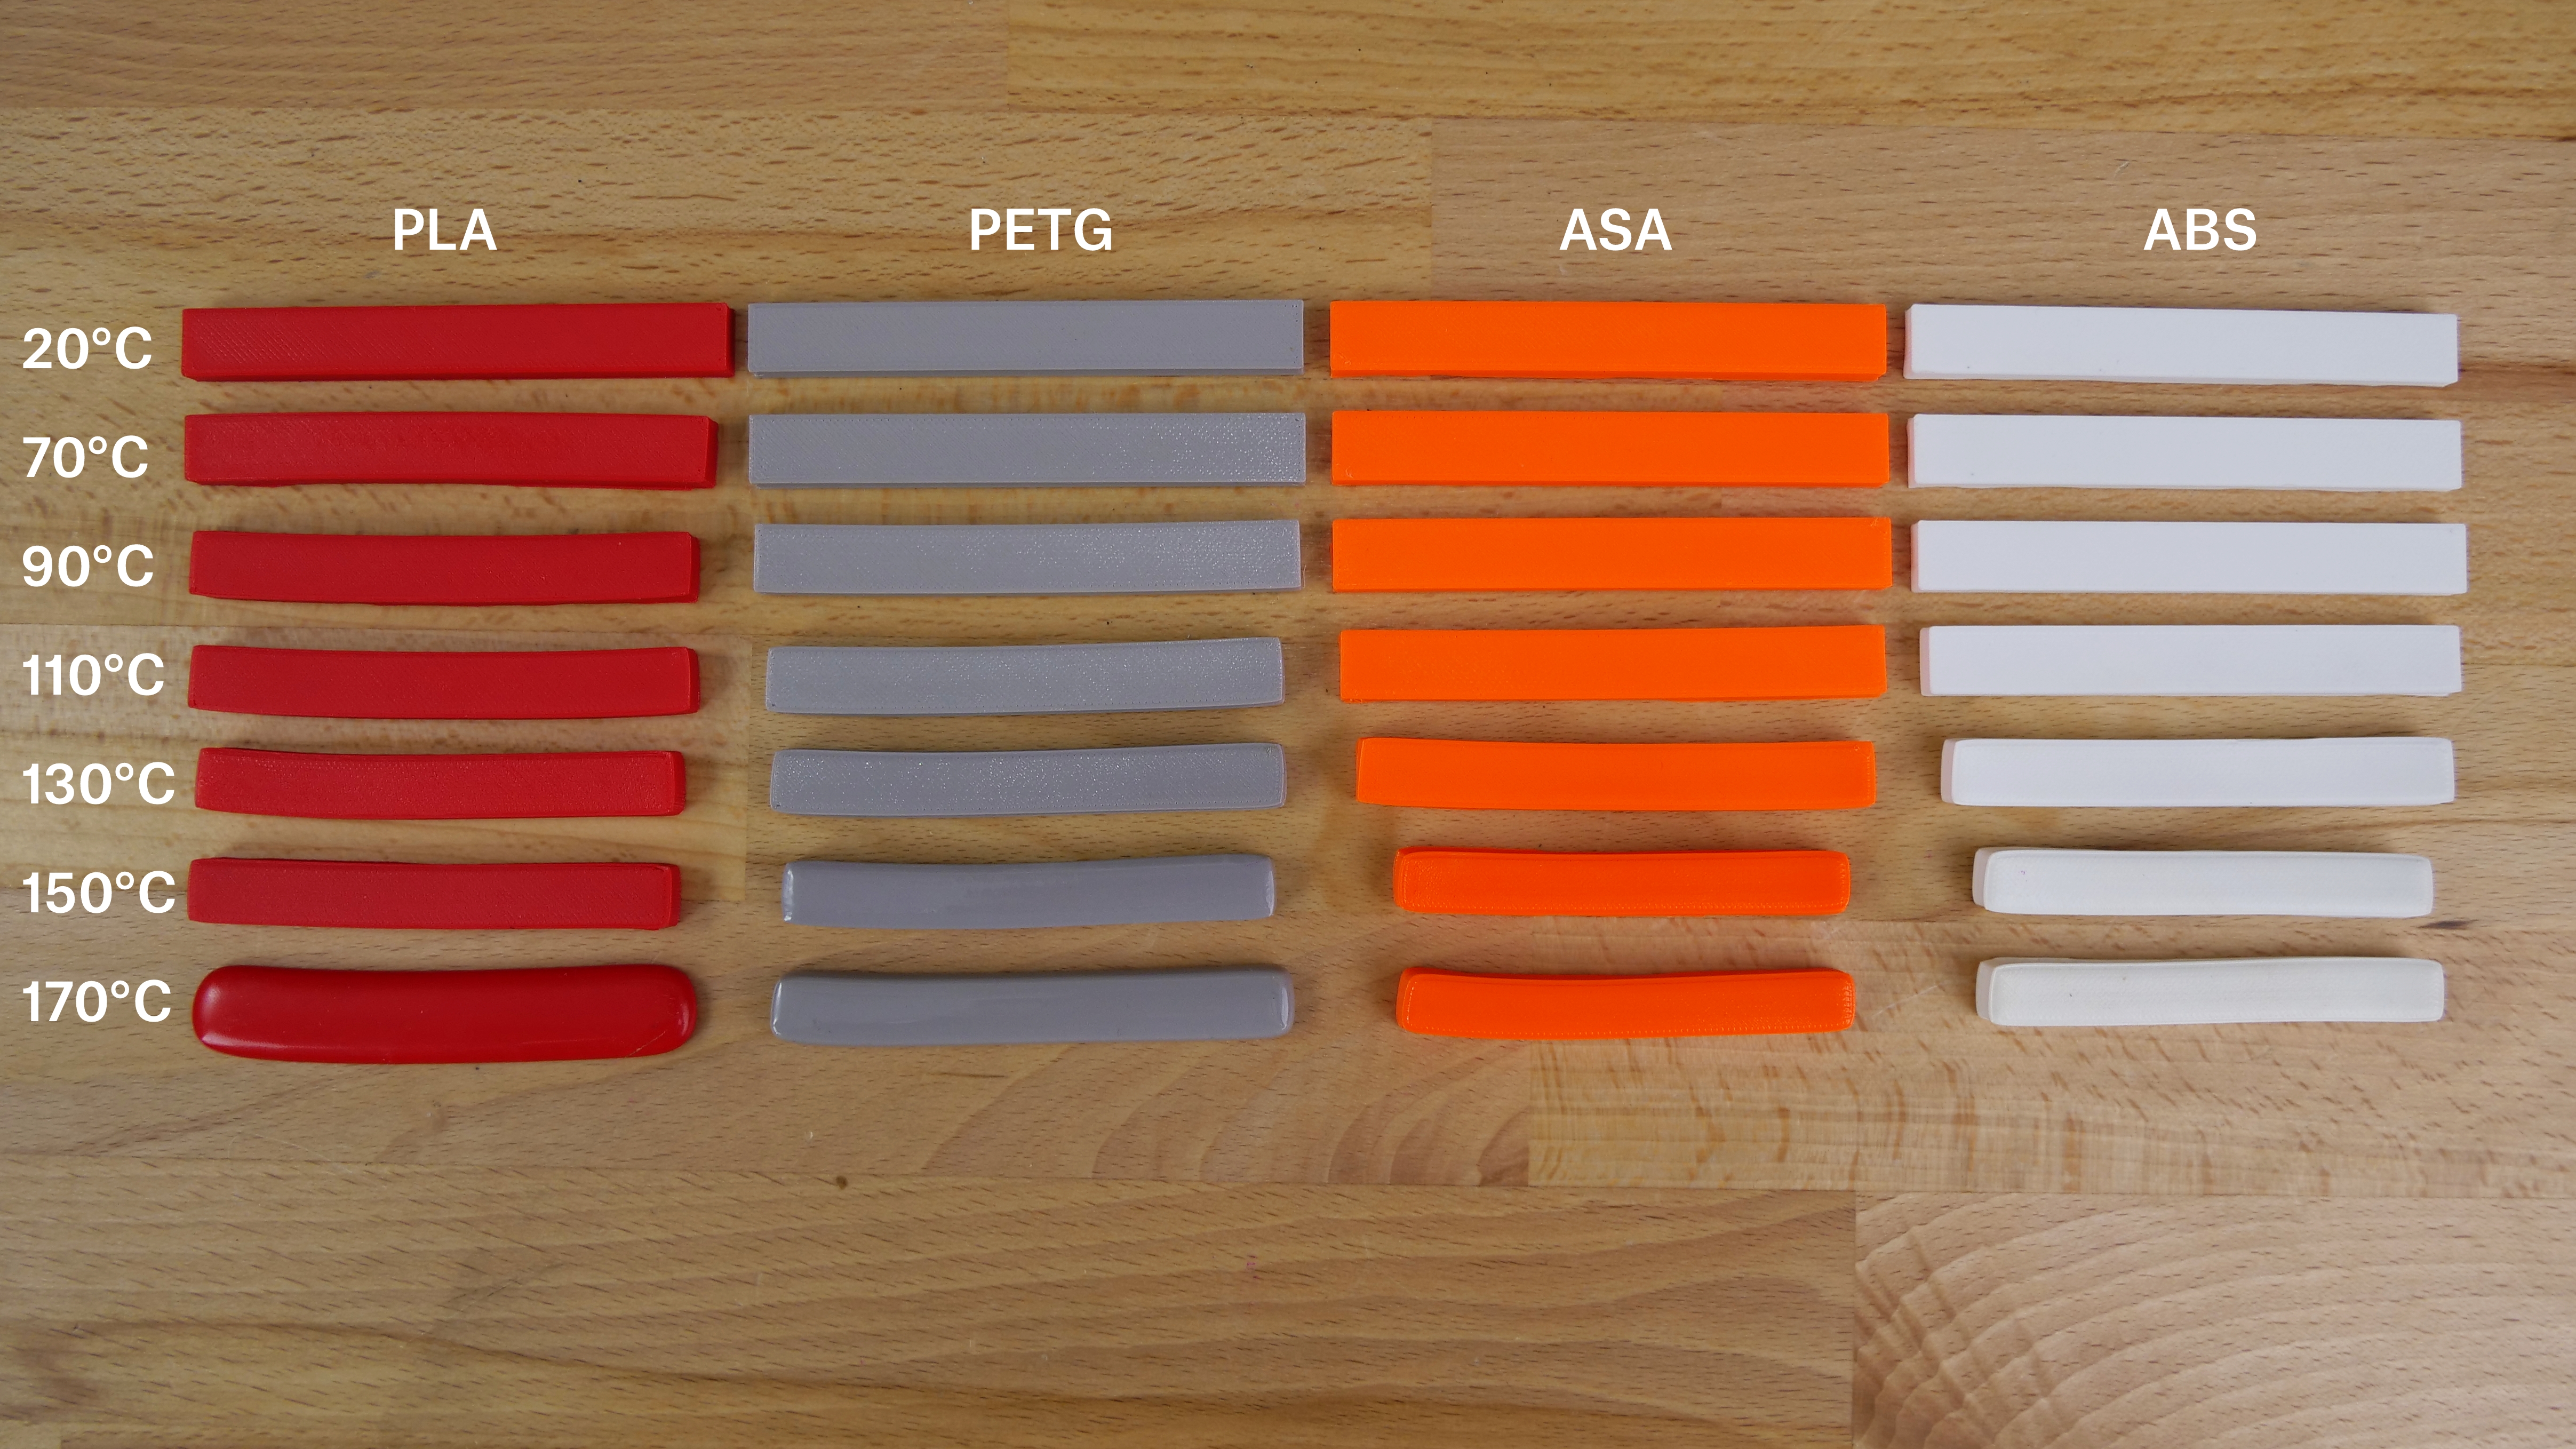
Annealed samples
How different filaments react to annealing?
We decided to test 4 different materials (PLA, PETG, ASA, ABS), 3 of them coming from our own production lines (see our website). We printed everything with a 100% infill (this is important for preserving dimensional stability). There were 4 different experimental setups, to find the best material and temperature for annealing:
Comparison of the untreated and annealed sample of PLA; Author: Jiří Kmošek. Method: Scanning electron microscope. Laboratory of chemical-technological faculty of restoration, University of Pardubice
Comparison of an untreated and annealed sample of PETG; Author: Jiří Kmošek. Method: Scanning electron microscope. Laboratory of chemical-technological faculty of restoration, University of Pardubice
1) Dimensional changes – We prepared a total of 560 prisms shaped objects, each sized 80×10×4mm, which we annealed using various temperatures. More precisely, these objects were split into 4 batches (one for each material), divided by 20 pieces for each temperature level. 20 pieces were left at room temperature, others were heated at 70, 90, 110, 130, 150 and 170 °C (158, 194, 230, 266, 302 and 338 °F) and left to cool down slowly. Subsequently, we measured all dimensions and determined the average change of each axis at different temperatures, to quantify the impact on the object shape.
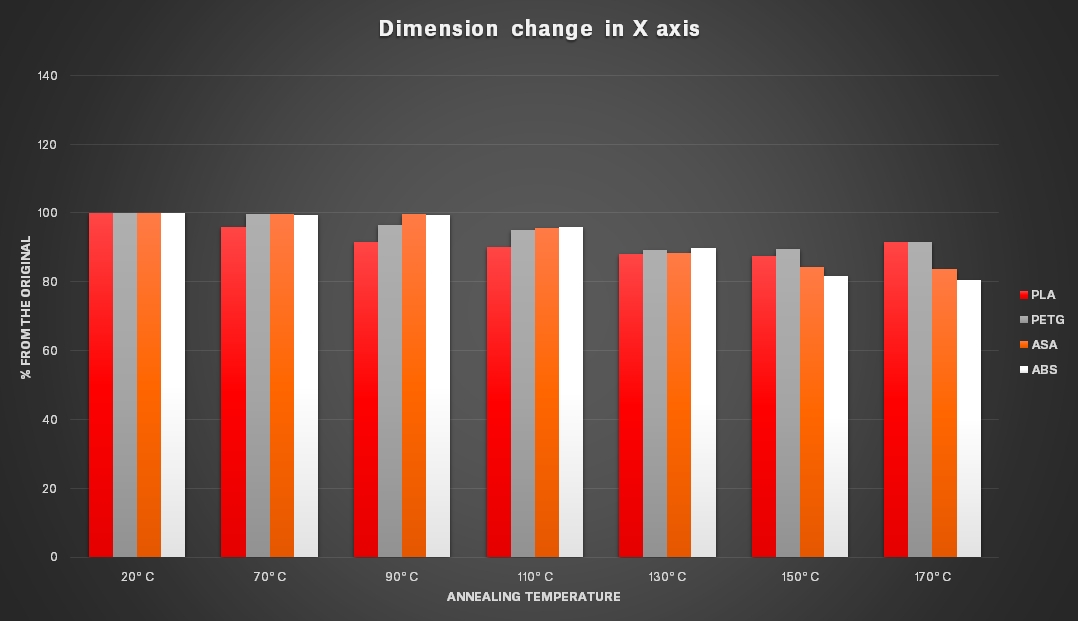
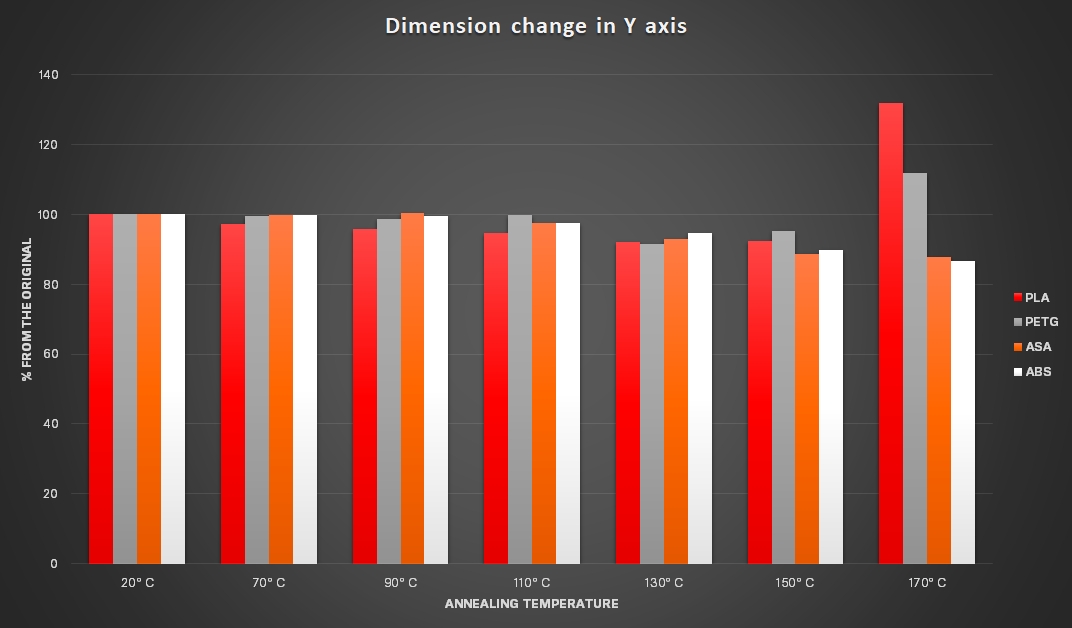
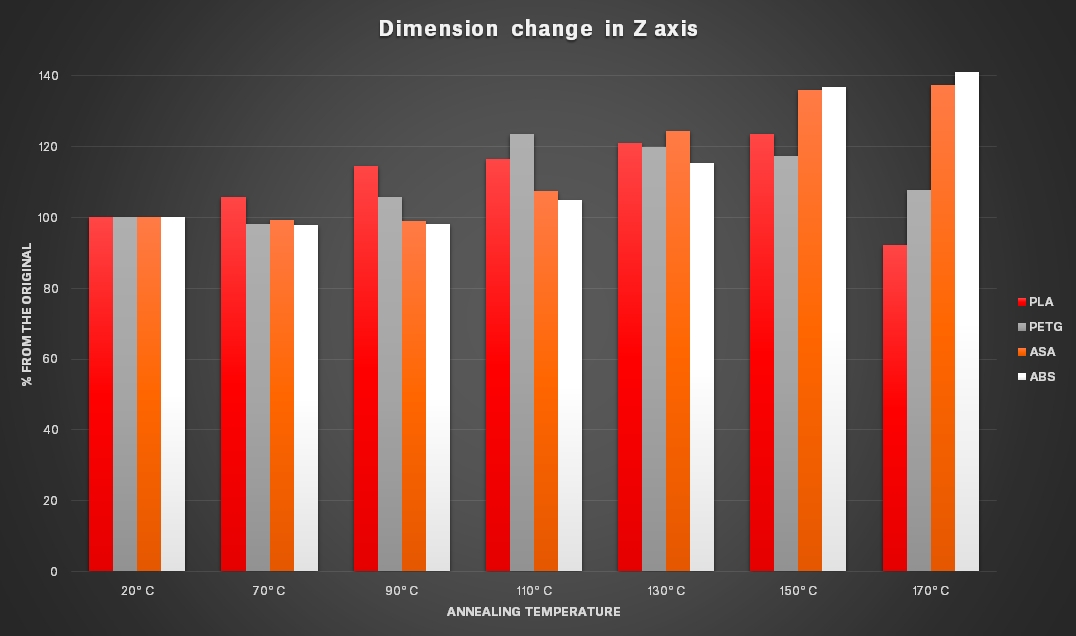
The charts above show that all samples shrink the most in the X-axis (i.e. in their longest dimension). Y-axis dimension also shrunk, but usually to a much lesser extent. On the contrary, in the Z-axis the dimensions actually extended. As for various materials, PLA undergoes quite significant dimensional changes even at 70 °C (158 °F). Higher temperatures caused warping and at 170 °C (338 °F) the object completely collapsed (melted). For PETG, the suitable temperature is about 90-110 °C (194-230 °F). In this range, neither the warping or dimensional changes are too significant. At higher temperatures, PETG deforms gradually, up to 170 °C (338 °F), when it melts just like the PLA. Both ASA and ABS turned out to be unsuitable for annealing (more on this later). As for dimensional changes, these materials warped more than the others, even at low temperatures.
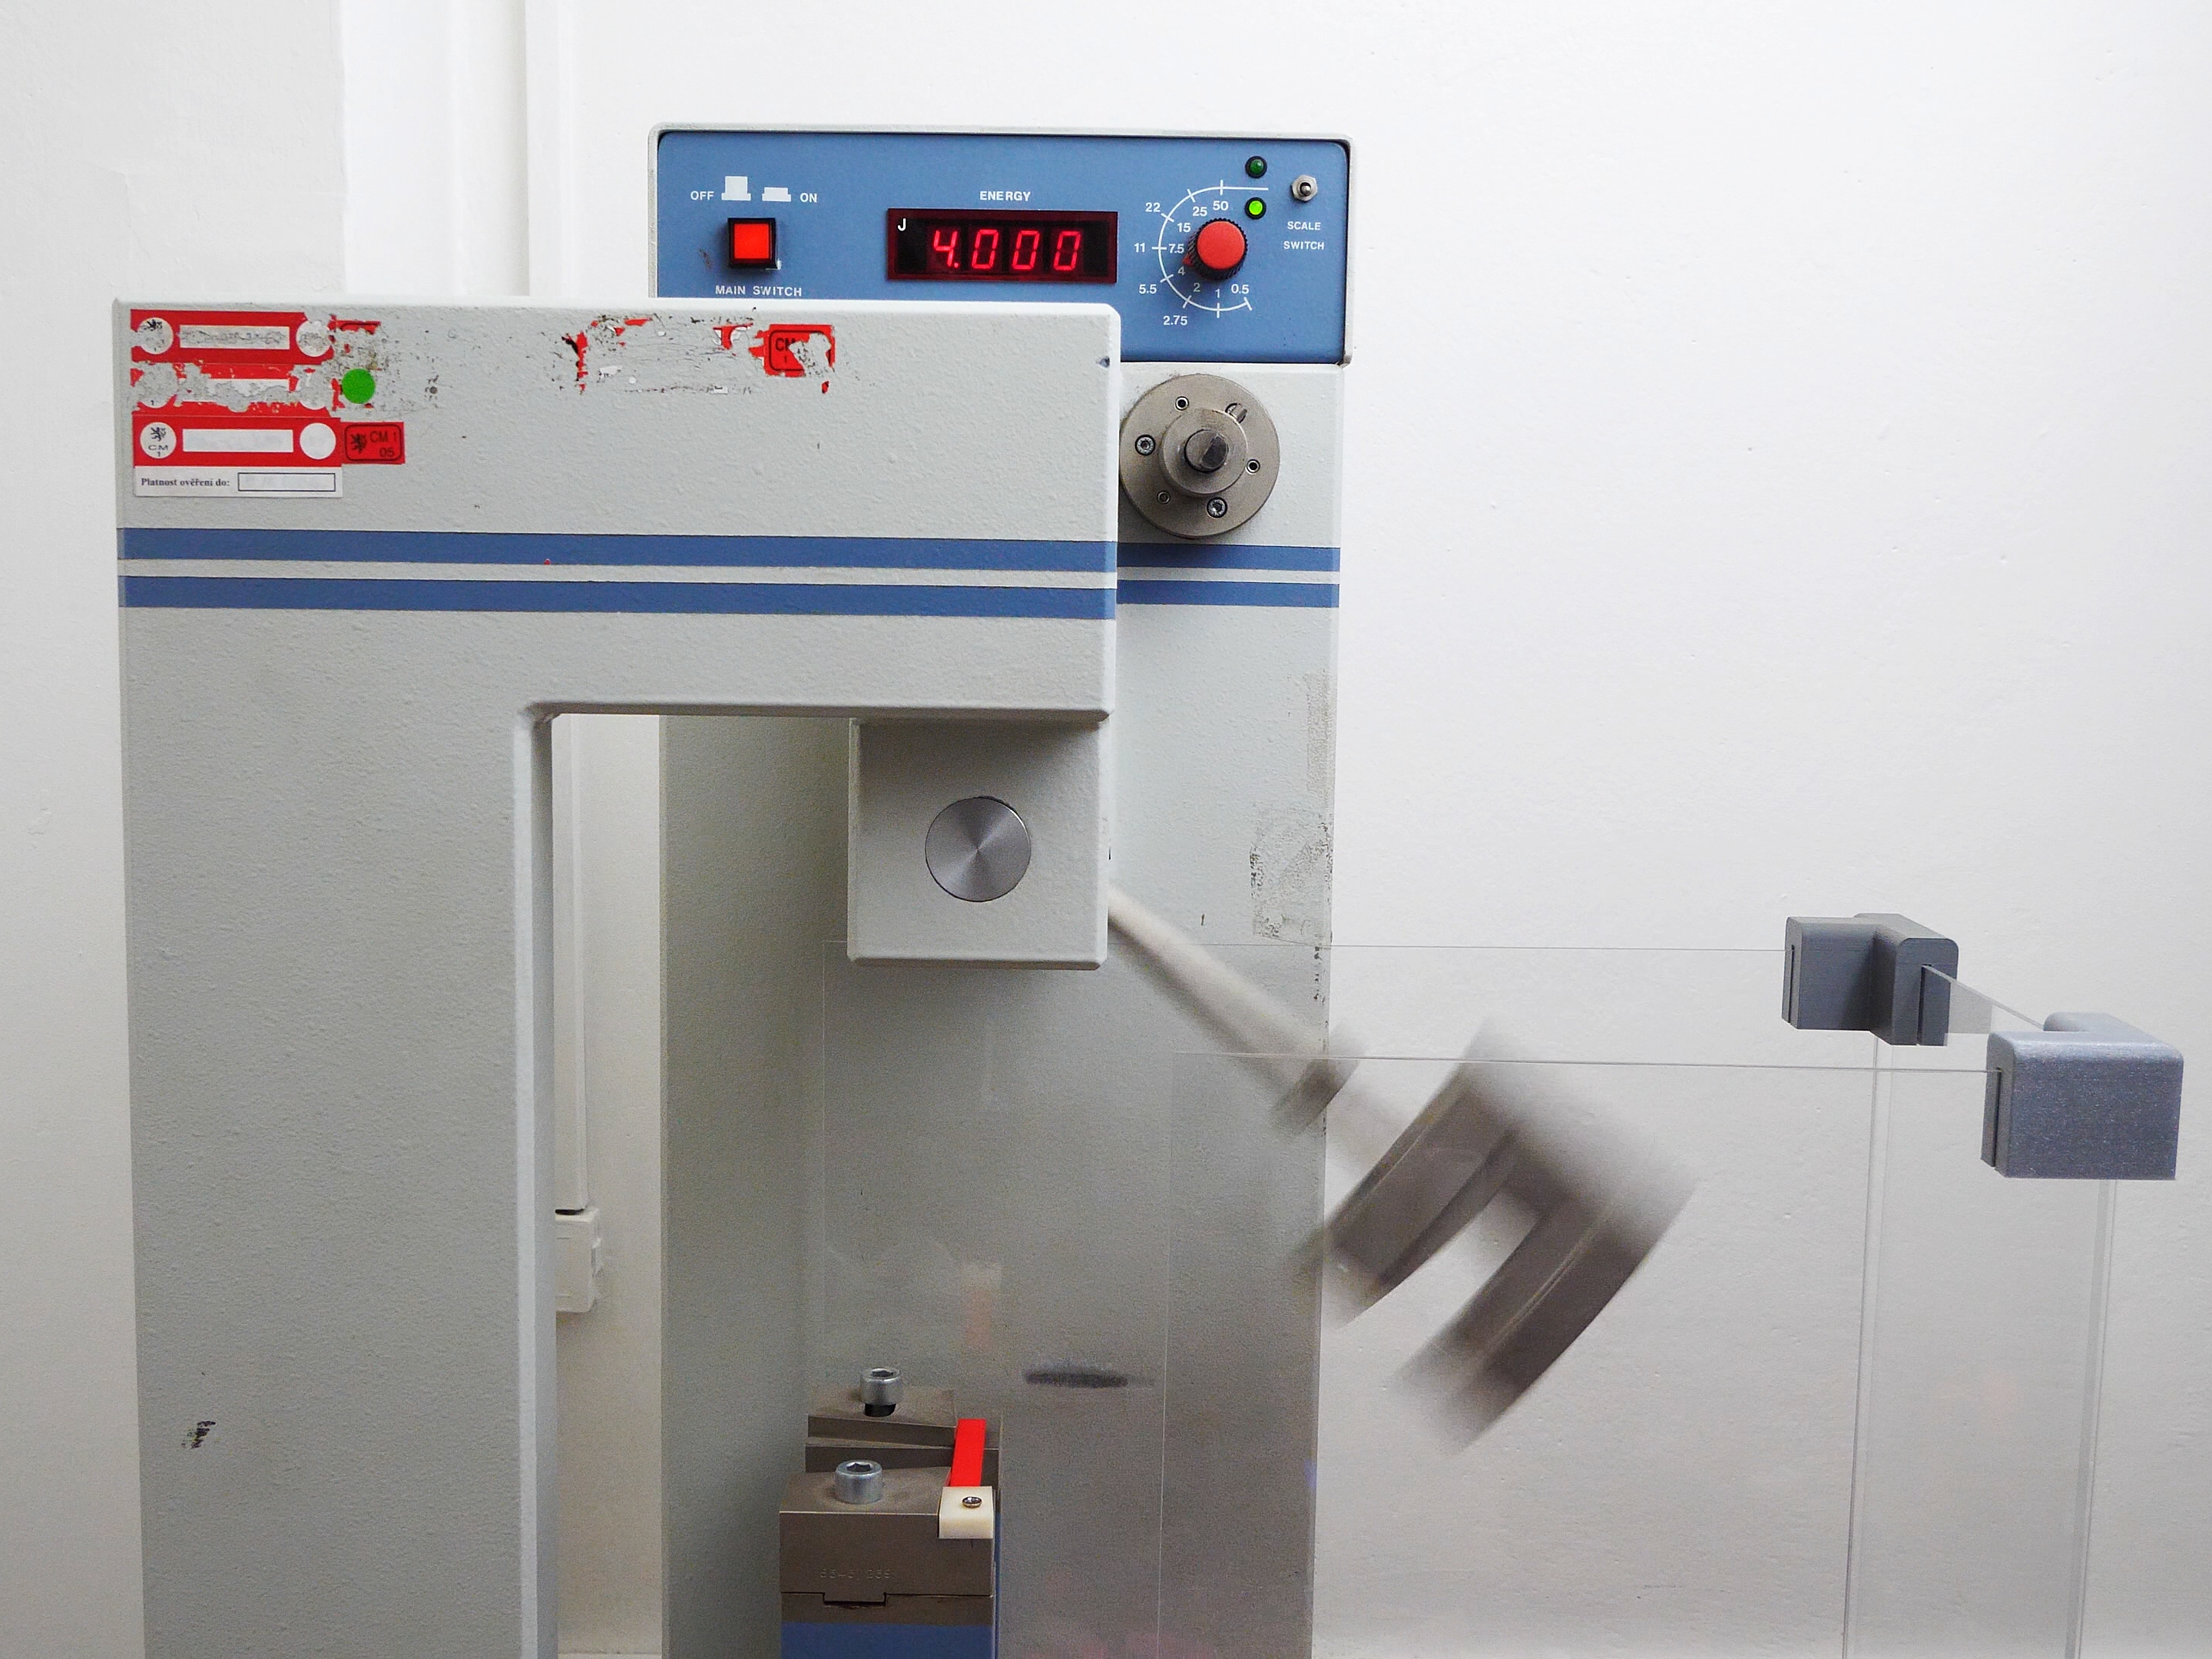
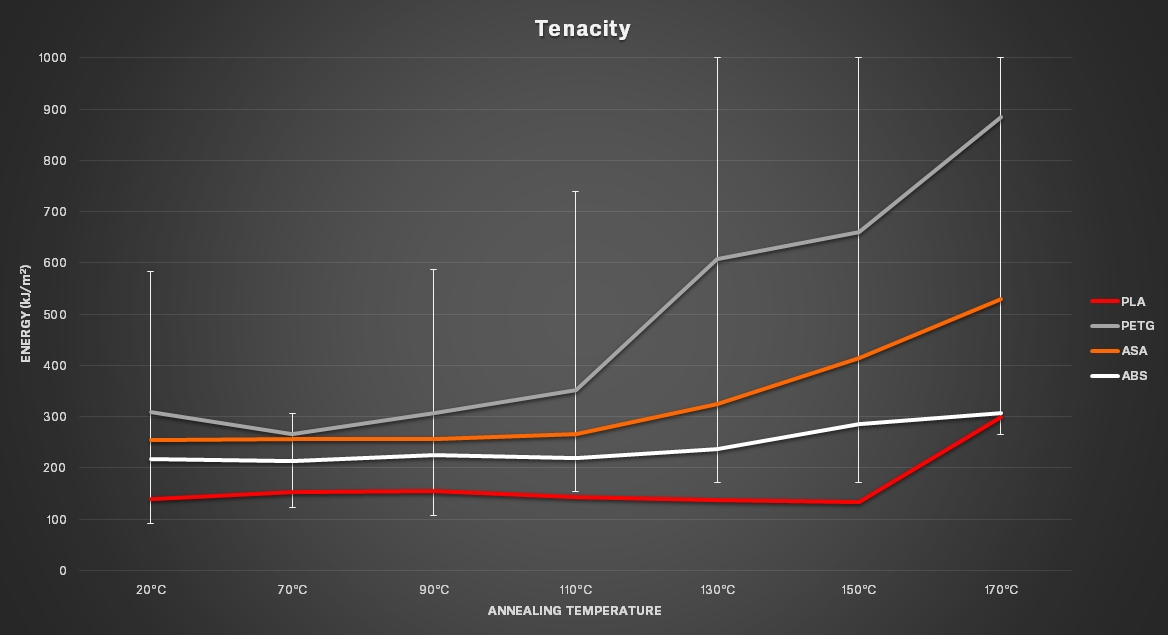
2) Charpy impact test, also known as “4J, not great, not terrible” – The main reason why we prepared so many objects was to use them later for the Charpy impact test. In this experiment we used a Charpy pendulum to measure the amount of energy needed to break each object, comparing various materials at different annealing temperatures. At this point it’s important to mention our pendulum couldn’t measure a higher amount of energy than 4J, therefore some of the results are under-measured. Regarding mechanical durability, PETG is the clear winner. When annealed above 130 °C (266 °F), these were the only samples that could repeatedly withstand 4J. This test further reinforces our assumptions about suitable annealing temperature for PETG, which is probably higher than 90 °C (194 °F). Both ASA and ABS basically remain unchanged up to a point when they start to warp badly (110 °C [230 °F] and above). PLA turned out to be too brittle at any temperature. At 170 °C (338 °F) its durability resembled that of the other materials, but only at a cost of unacceptable shape deformations.
Naturally, such a test brings quite significant measuring deviations (you can see the maximums in the PETG chart). This is why we used 20 samples of each material and temperature to achieve a reasonable level of objectivity.
This deviation is probably caused by variations in the printing quality of the individual pieces. Above 130 °C (266 °F), in the same batch we could observe both samples which could withstand the 4J (maximum energy we could measure), and also outright inferior samples (for example, PETG sample annealed at 150 °C [302 °F], withstanding just 0,688J). Mechanical durability could be affected by some tiny air bubbles or other internal defects that survive the annealing process. When aiming for durable mechanical parts, we advise taking these deviations into account.
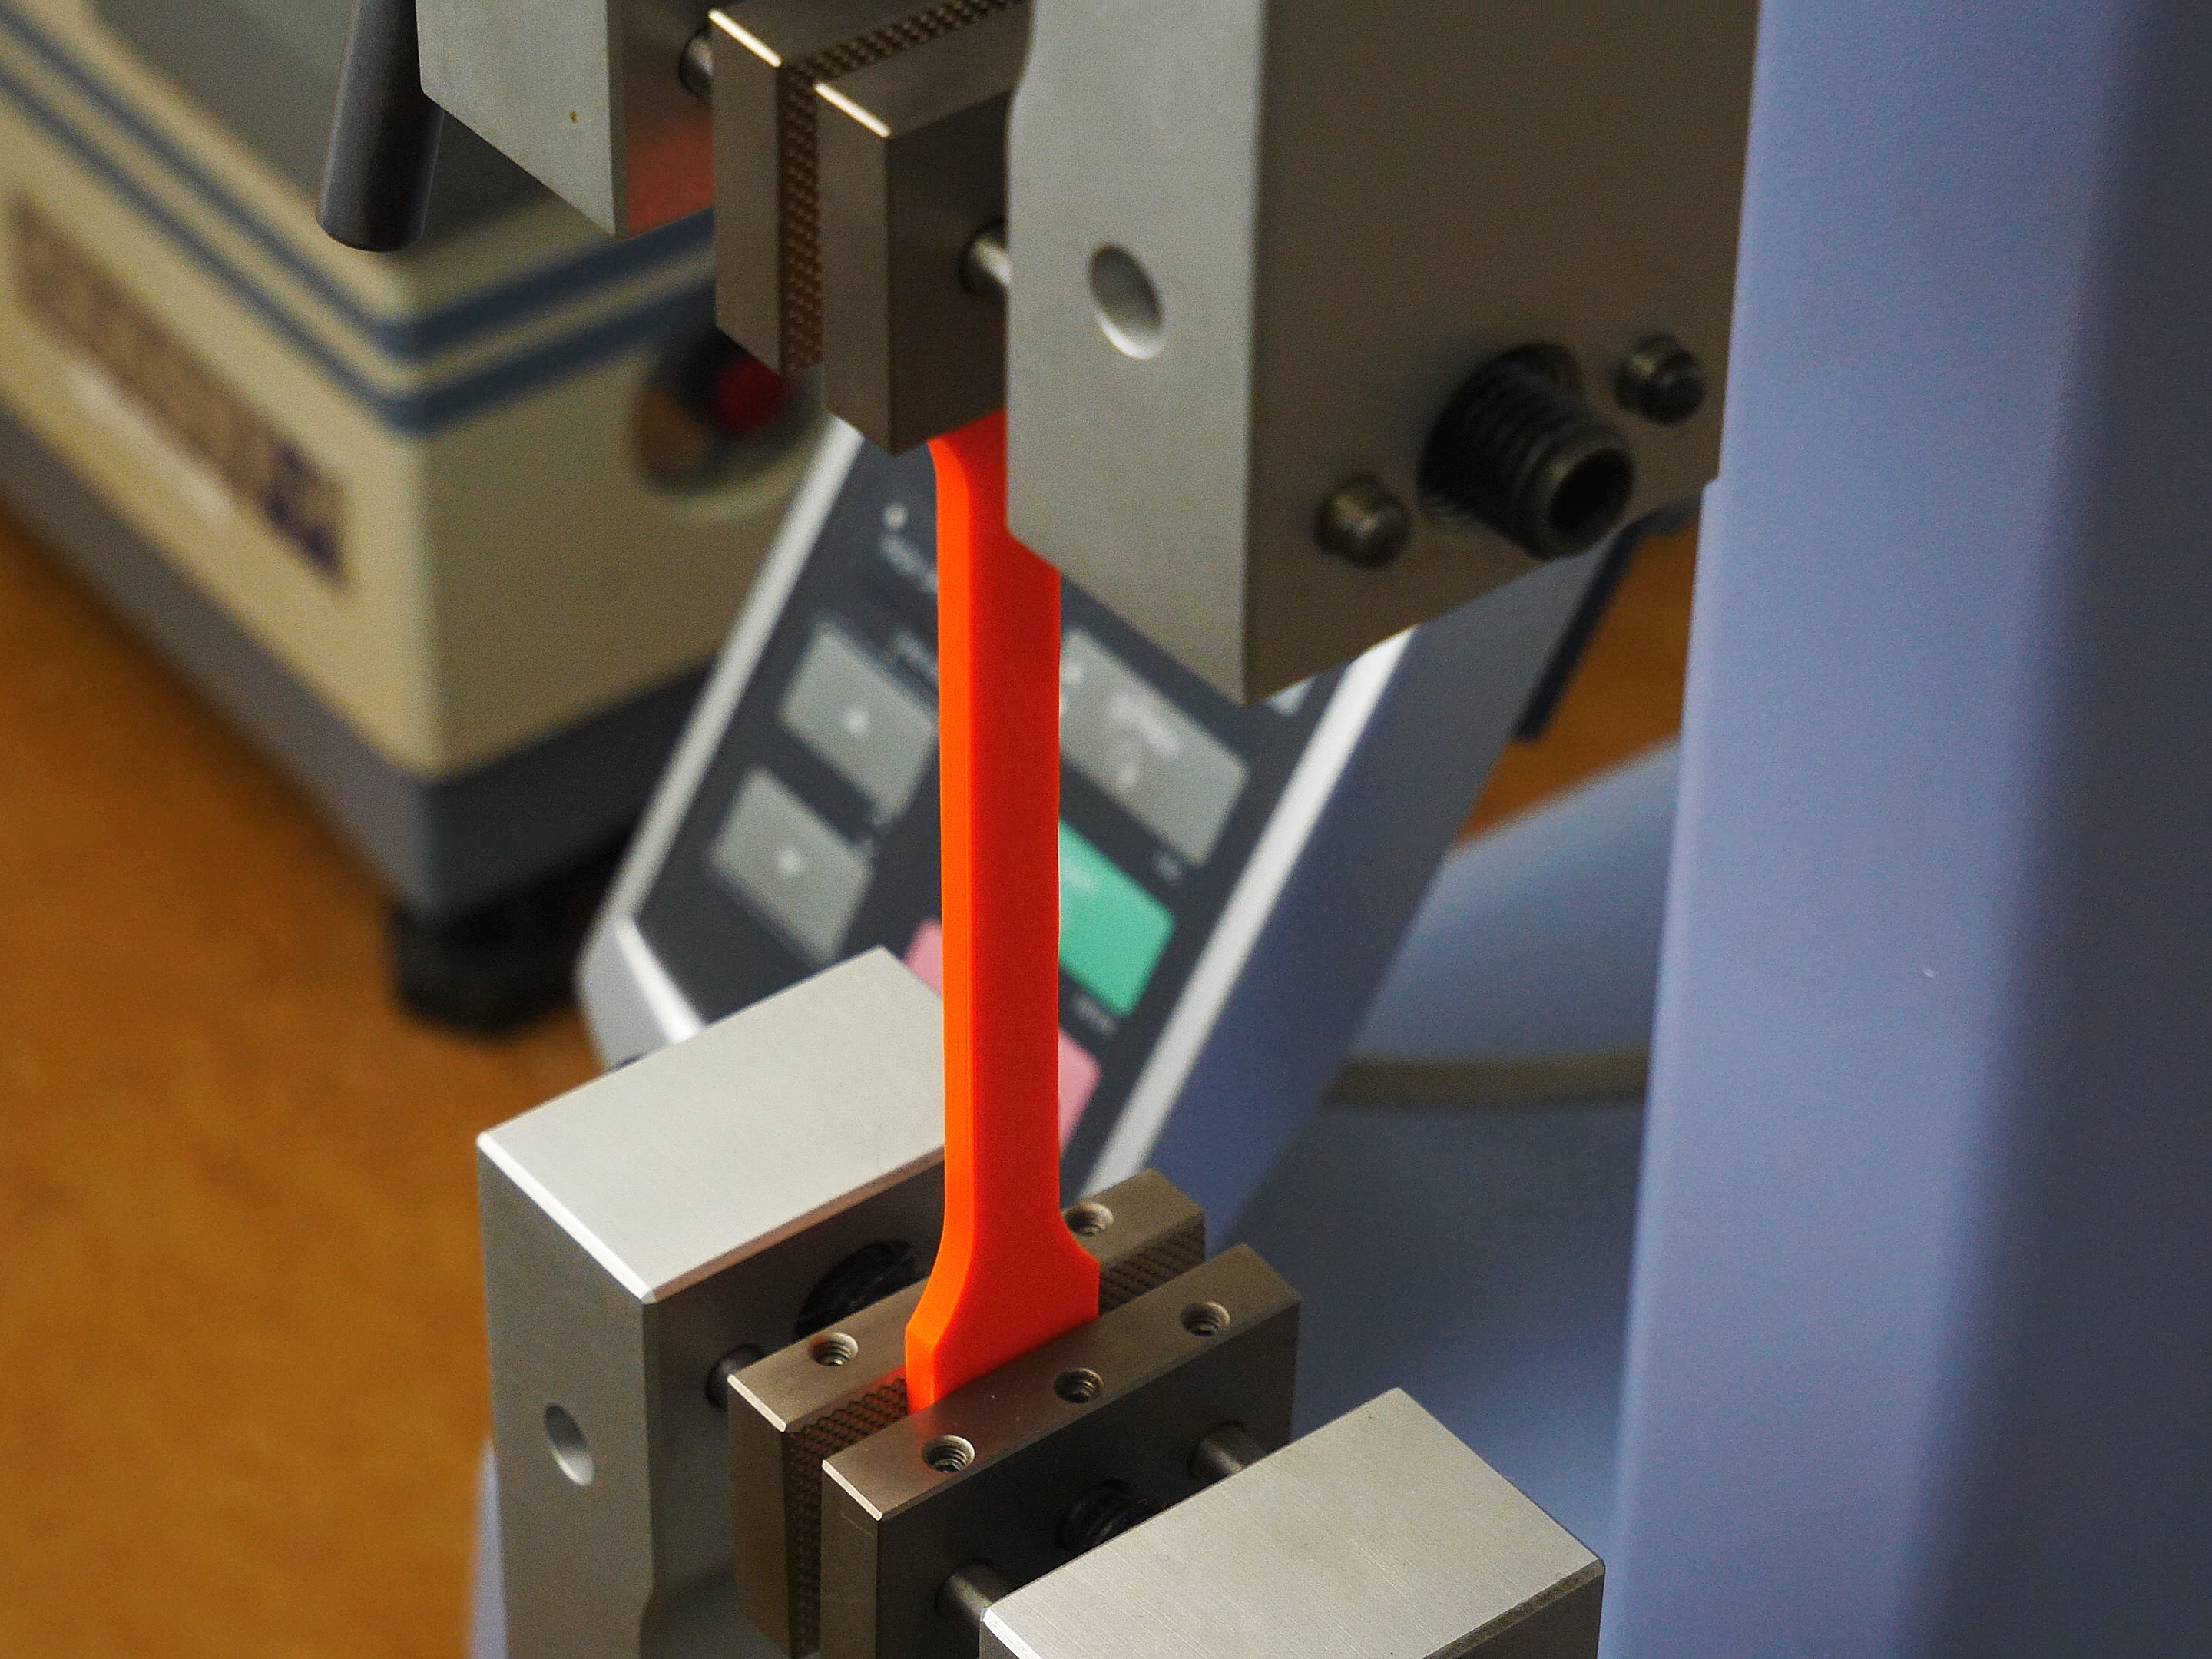
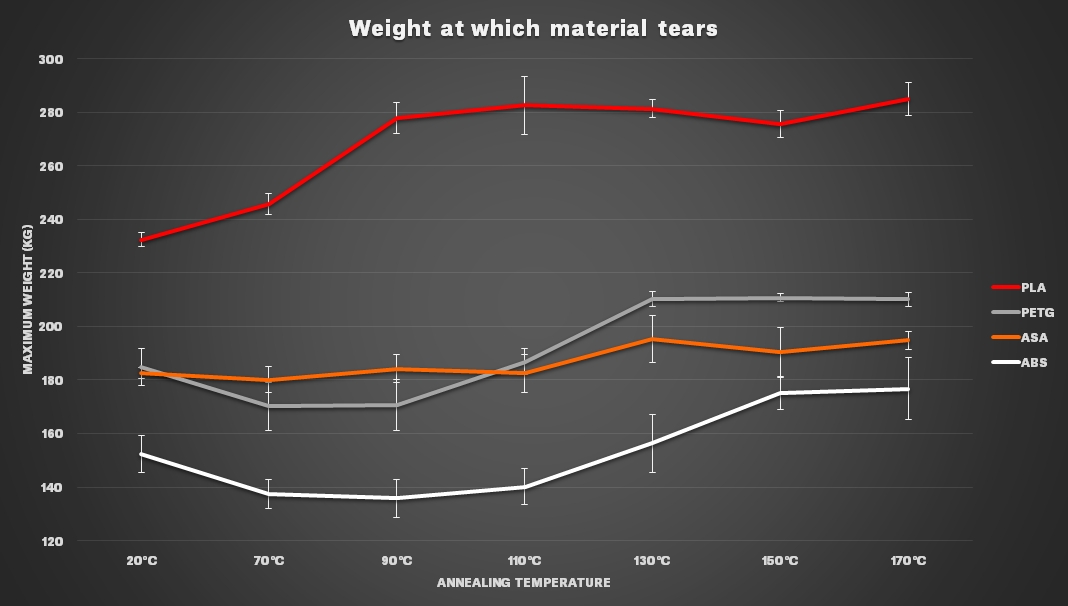
3) Tensile strength test – For this test, we printed standardized samples for an EZ-LX tensile tester. We used batches of 6 pieces each, again, one left untreated, others annealed at 70, 90, 110, 130, 150 and 170 °C (158, 194, 230, 266, 302 and 338 °F), then allowed to cool down slowly. We measured the force needed for ripping each sample apart and then calculated an average for each temperature level. We converted force expressed in newtons (N) to kilograms, to give you a better idea of what values we are talking about. Without any doubt, PLA was the strongest, when annealed at 90 °C (194 °F) and above. PETG was the second best, improving at levels above 110 °C (230 °F). Oddly though, annealing at 70-90 °C (158-194 °F) had the opposite, degrading effect. Similar behavior could be observed with ABS as well, although its breaking point is about 30 kg lower. Untreated ASA (without annealing) has values similar to PETG, although, unlike PETG, ASA shows virtually no improvement with increased temperatures.
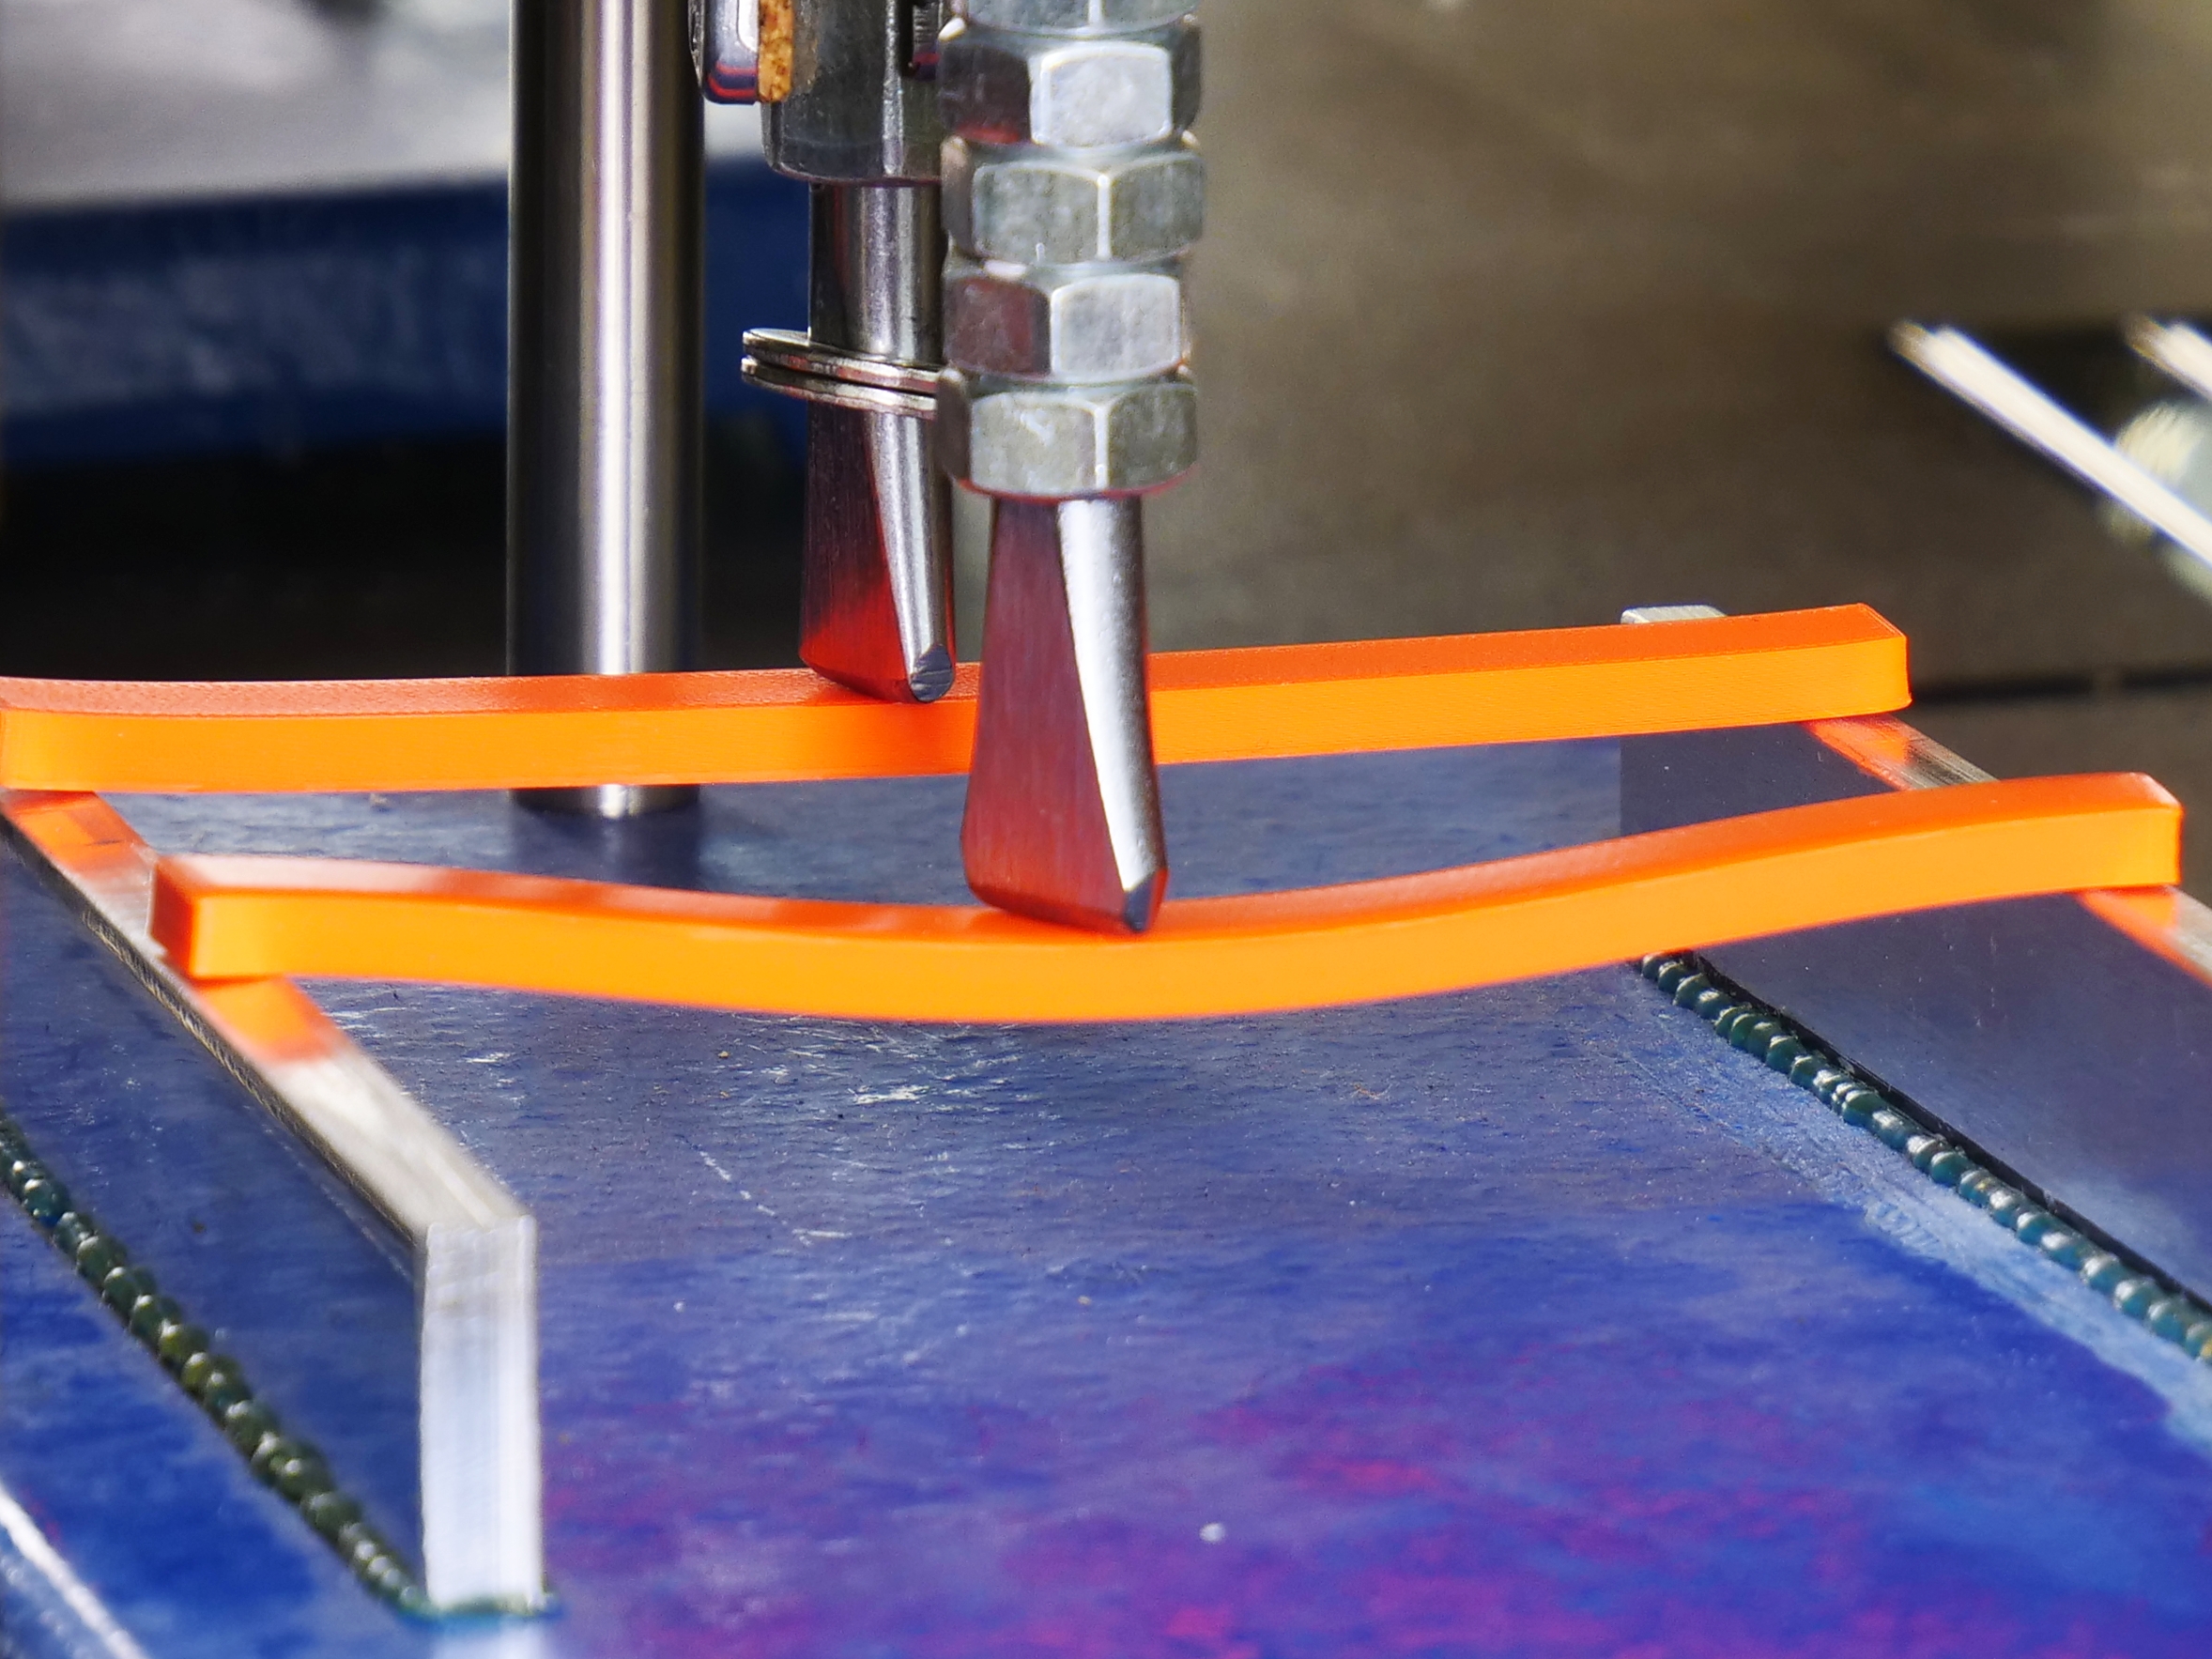
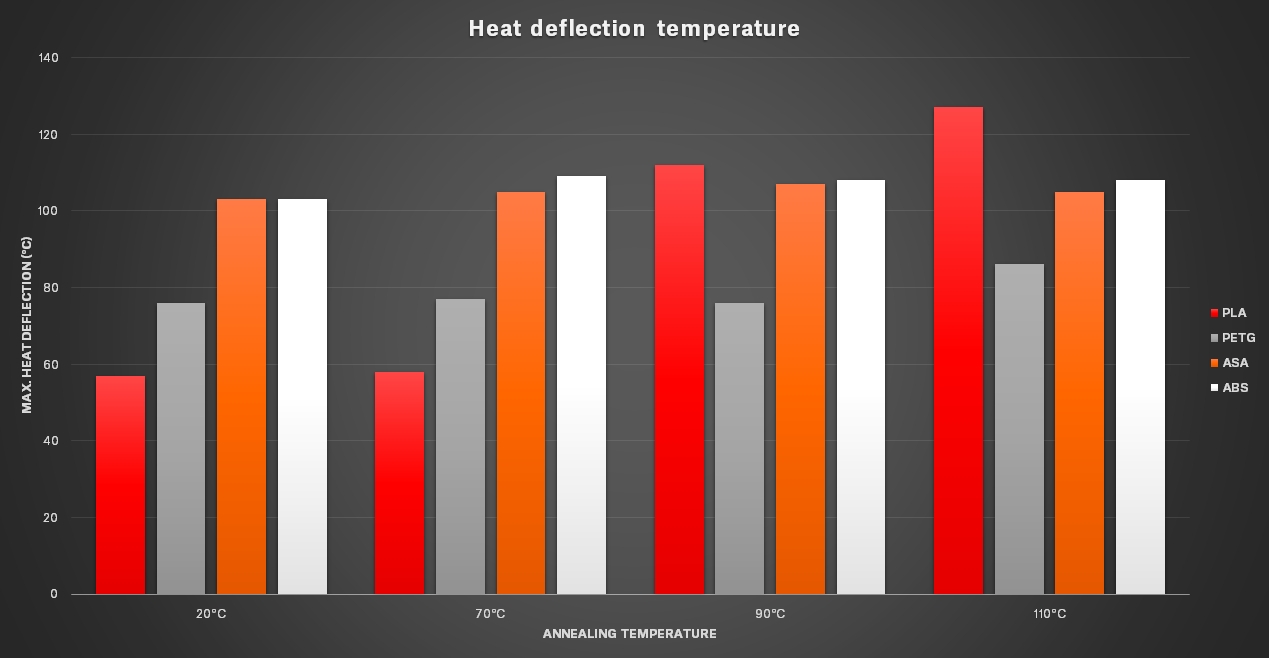
4) Heat resistance test – Together with parts for the tensile strength test, we also annealed batches of two standardized samples each, for a heat resistance test. Precisely speaking, we tested a heat deflection temperature (HDT). We examined at what temperature an annealed part softens and bends by a given value (circa 2 mm), while stressed either by a 25g or a 100g weight. Because of warping and dimensional changes occurring at higher temperatures, we tested only batches annealed at a maximum of 110 °C (230 °F). There was no point in testing the higher temperature batches which were already deformed, with some samples even being too short for the standardized tester. We slowly heated the whole setup and monitored at which temperature each sample bent by 2 mm.
Again, both ASA and ABS did not change its characteristics almost at all, while PETG values didn’t start to improve until 110 °C (230 °F). Heat resistance of PLA dramatically increased at annealing temperatures of 90 °C (194 °F) and above.
After performing all these tests, we evaluated our results and determined the most suitable material and temperature for optimal results. The best performer is PLA annealed at 90 °C (194 °F) and above. PLA at the same temperature wins the tensile strength test as well. PETG excels in the impact test, mainly at 110 °C (230 °F) and higher. However, PLA samples were warping badly at temperatures higher than 70 °C (158 °F). This is why we prefer PETG annealed at 110 °C (230 °F) as an overall winner. At this temperature, there is still a reasonable shape and dimension stability, while durability already exceeds that of an untreated sample.
While durability and tensile strength dramatically increases with higher temperatures, it’s not worth all the deformation issues.
We classify the ASA and ABS as outright unsuitable for annealing – in every test they consistently scored worse than PETG.
Annealing transparent materials
Wait, our series of tests are actually not over yet. Annealing basically merges the individual print layers together, right? So, if you anneal a transparent material, do you actually make it perfectly clear? We asked this question ourselves. And the answer is, in theory, yes, but practically… not quite.
We tried to anneal a small circular shape made of PETG, at 70-170 °C (158-338 °F). By the time you reach (almost) a total clarity, a few tiny bubbles away from perfection, it all collapses and melts completely. If you use lower temperatures, clarity remains the same as on an untreated model, just with added warping.
If you dreamed about creating complicated sculptures and then annealing them to look like made of ice, you have to choose a different path. ASA or ABS smoothed with acetone, slow printing with low layers, etc. More on this topic here.
![]()
Practical examples
Now we understand the annealing basics, knowing both its advantages and disadvantages. We learned how to increase the mechanical and thermal durability and how to avoid warping and dimensional changes. Let’s try to print out something useful and improve it with annealing. It won’t be applicable in each case, so let us demonstrate what works and what does not.
Our first example are spare parts for our Original Prusa i3 MK3S printers. The same as with all the previous tests, all parts were printed with a 100% infill. We already know that PETG at 110 °C (230 °F) performs best, but out of curiosity we also printed a second set from Prusament Lipstick Red PLA.
PETG was annealed at 110 °C (230 °F), PLA at 90 °C (194 °F), both for 45 minutes this time, to make sure even the bigger parts warm thoroughly. We aimed for a tougher, heat resistant extruder. Sadly, we found out that the level of warping makes both materials completely unusable for such parts with complicated shapes and relatively precise dimensions.
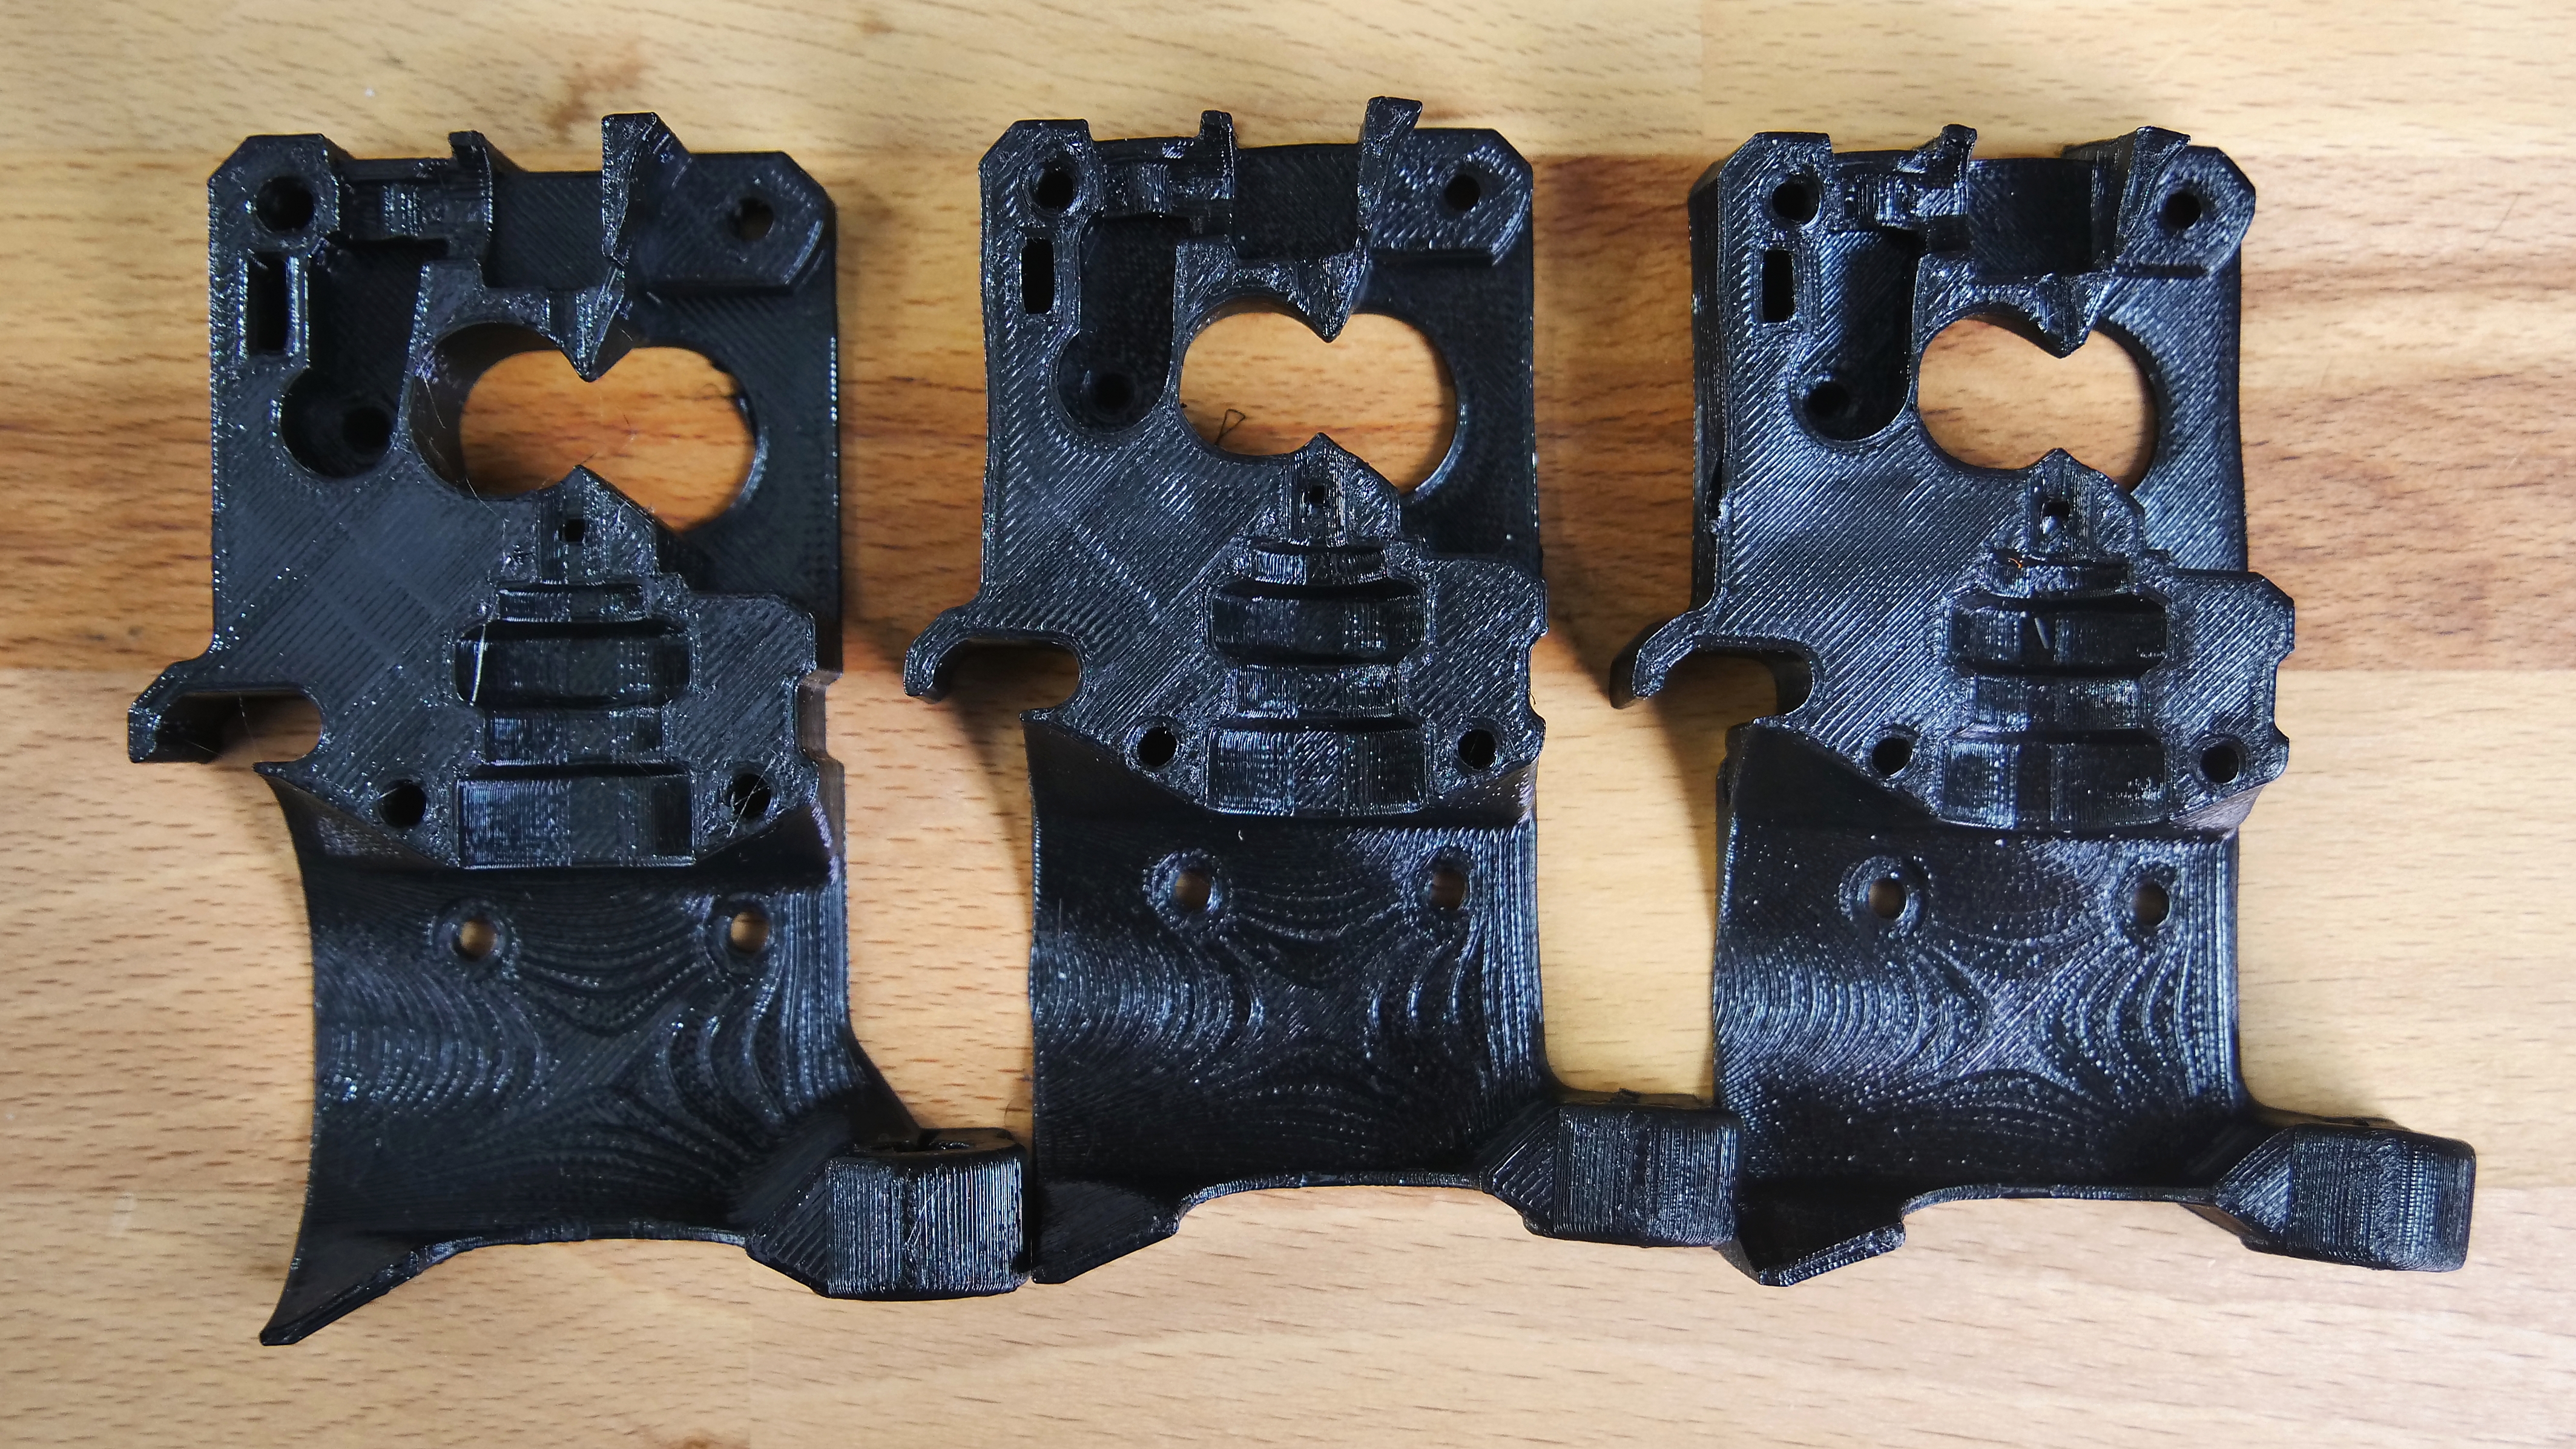
Annealing the Original Prusa i3 MK3S extruder cover: untreated part on the left, annealed parts on the right.
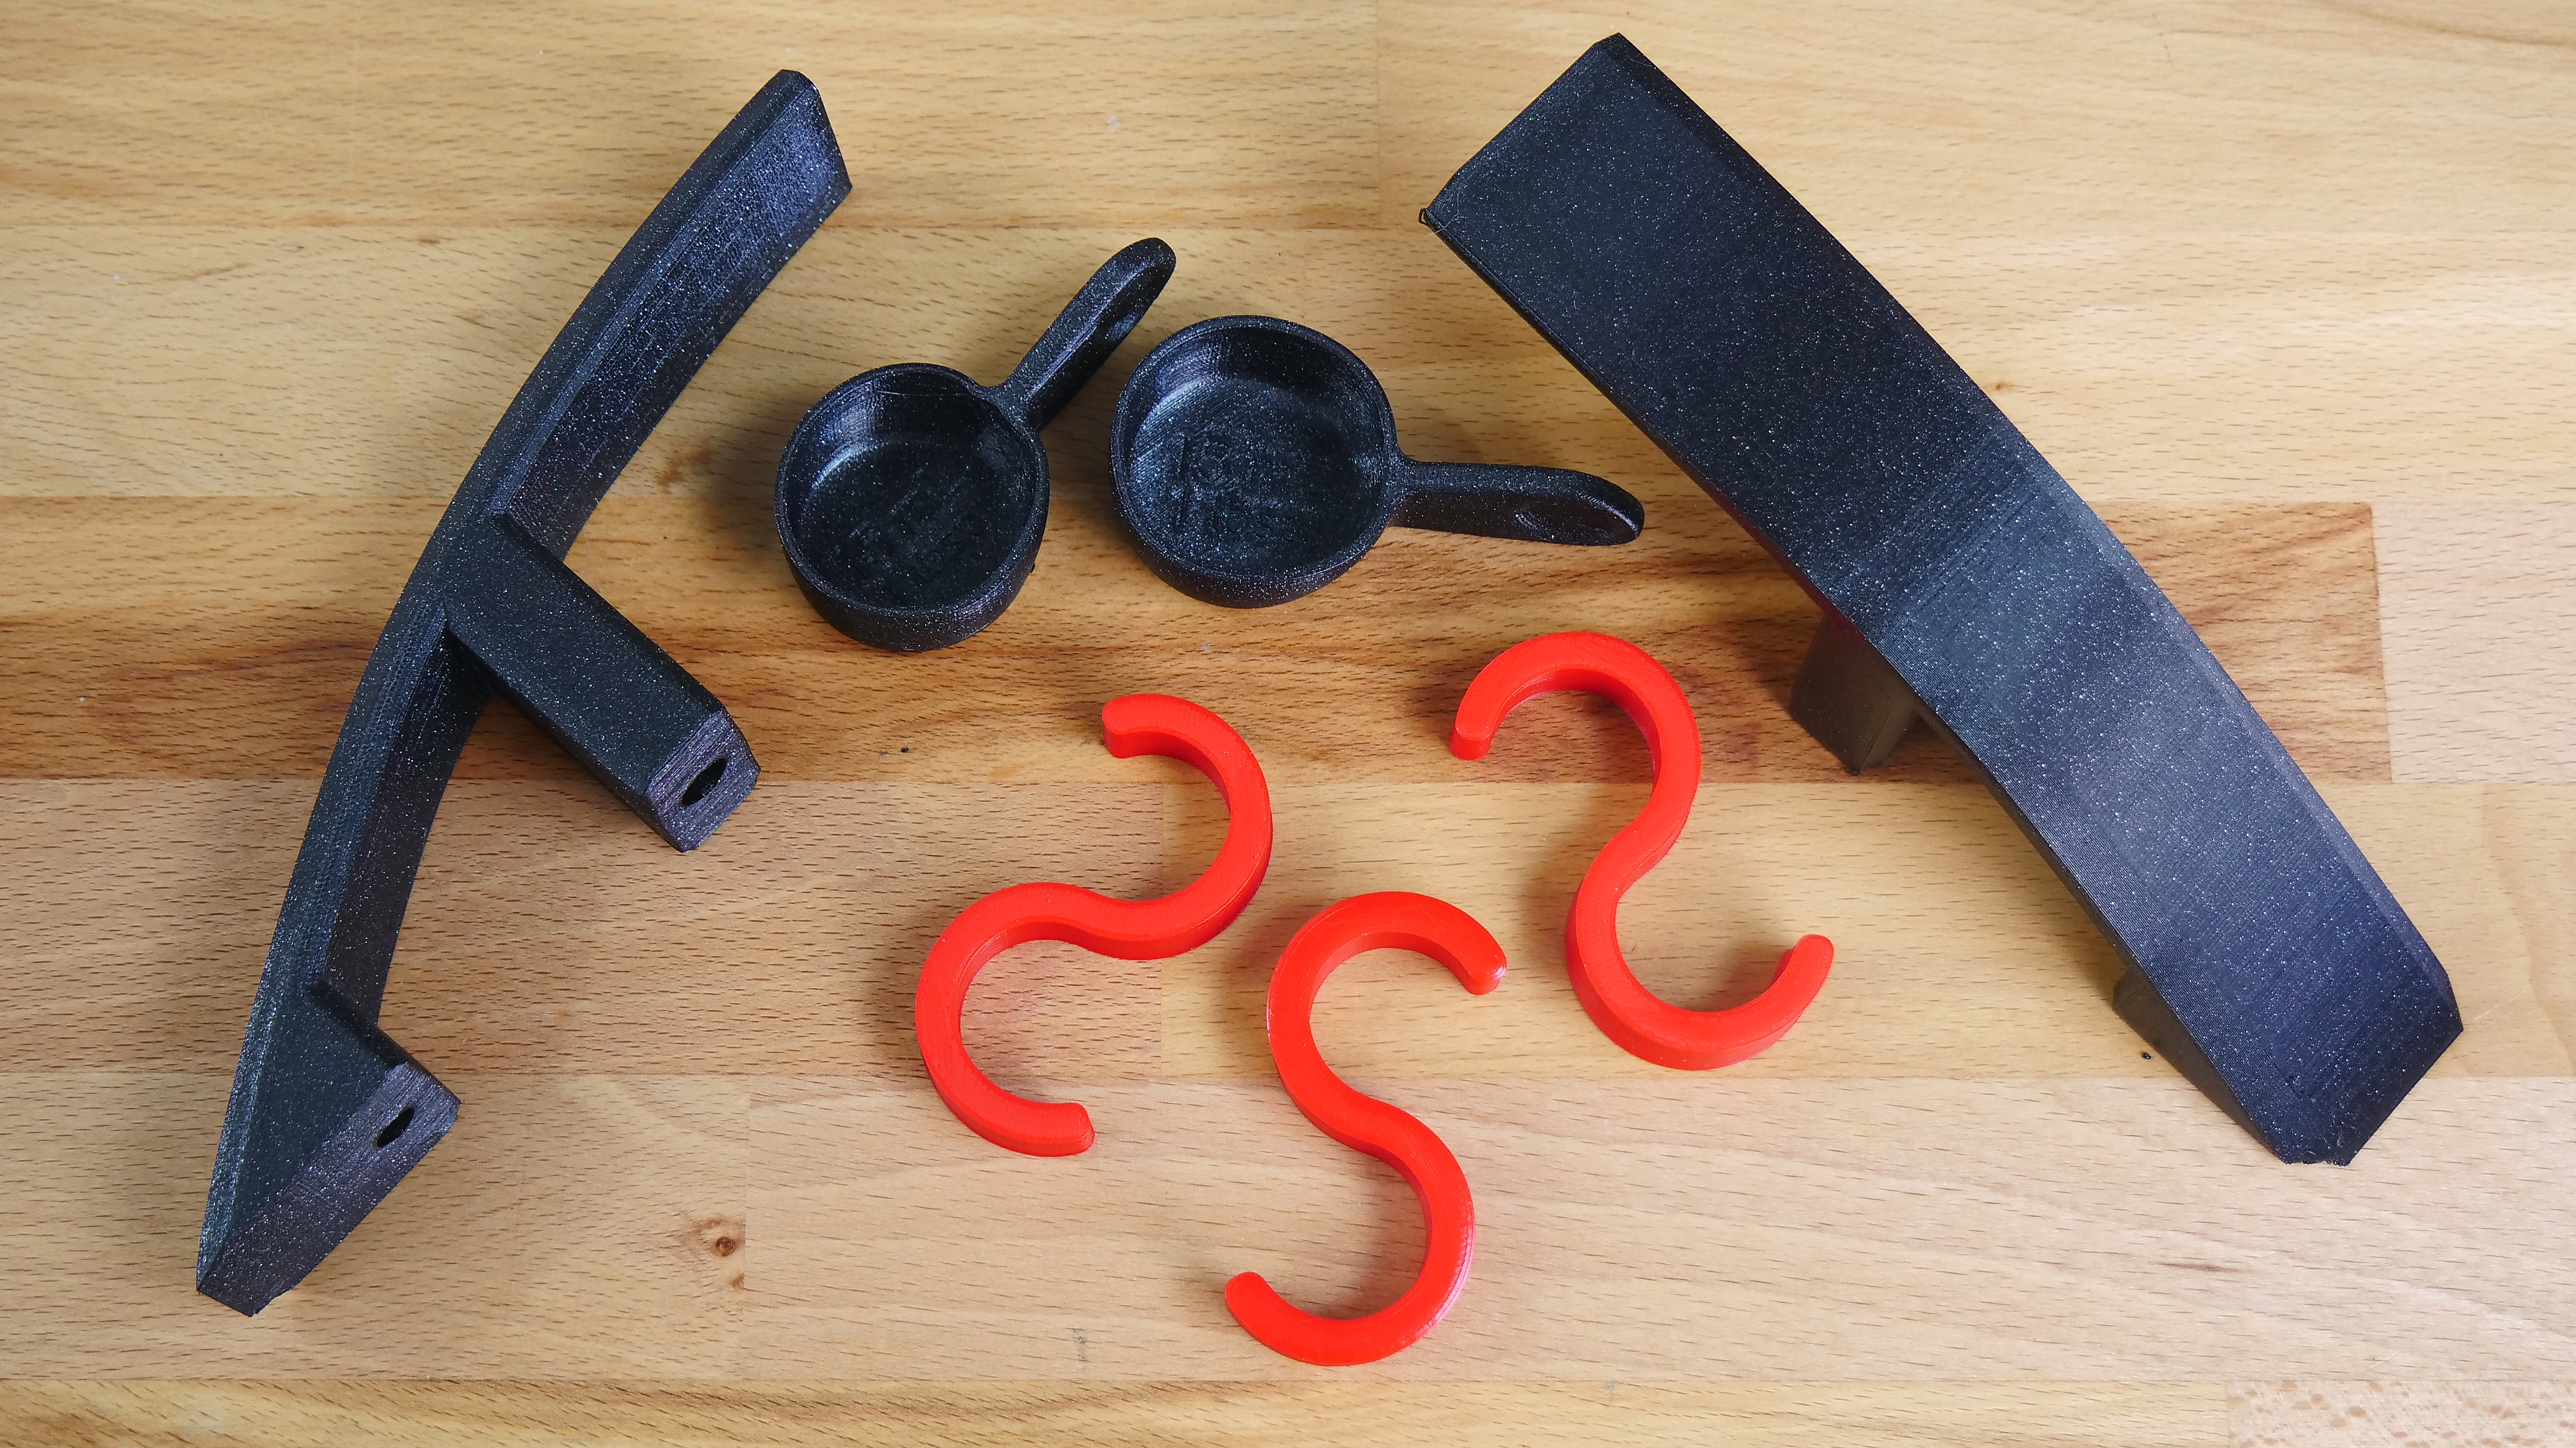
What is annealing good for, then? It does its job with simple parts, which need to improve their mechanical durability and tensile strength. As an example, we annealed simple hooks, which could use some more tensile strength. We printed them from PLA and annealed at 90 °C (194 °F) for 30 minutes. Another example is two PETG prints: a cupboard handle and a simple measuring cup, again, annealed at 110 °C (230 °F) for 30 minutes.
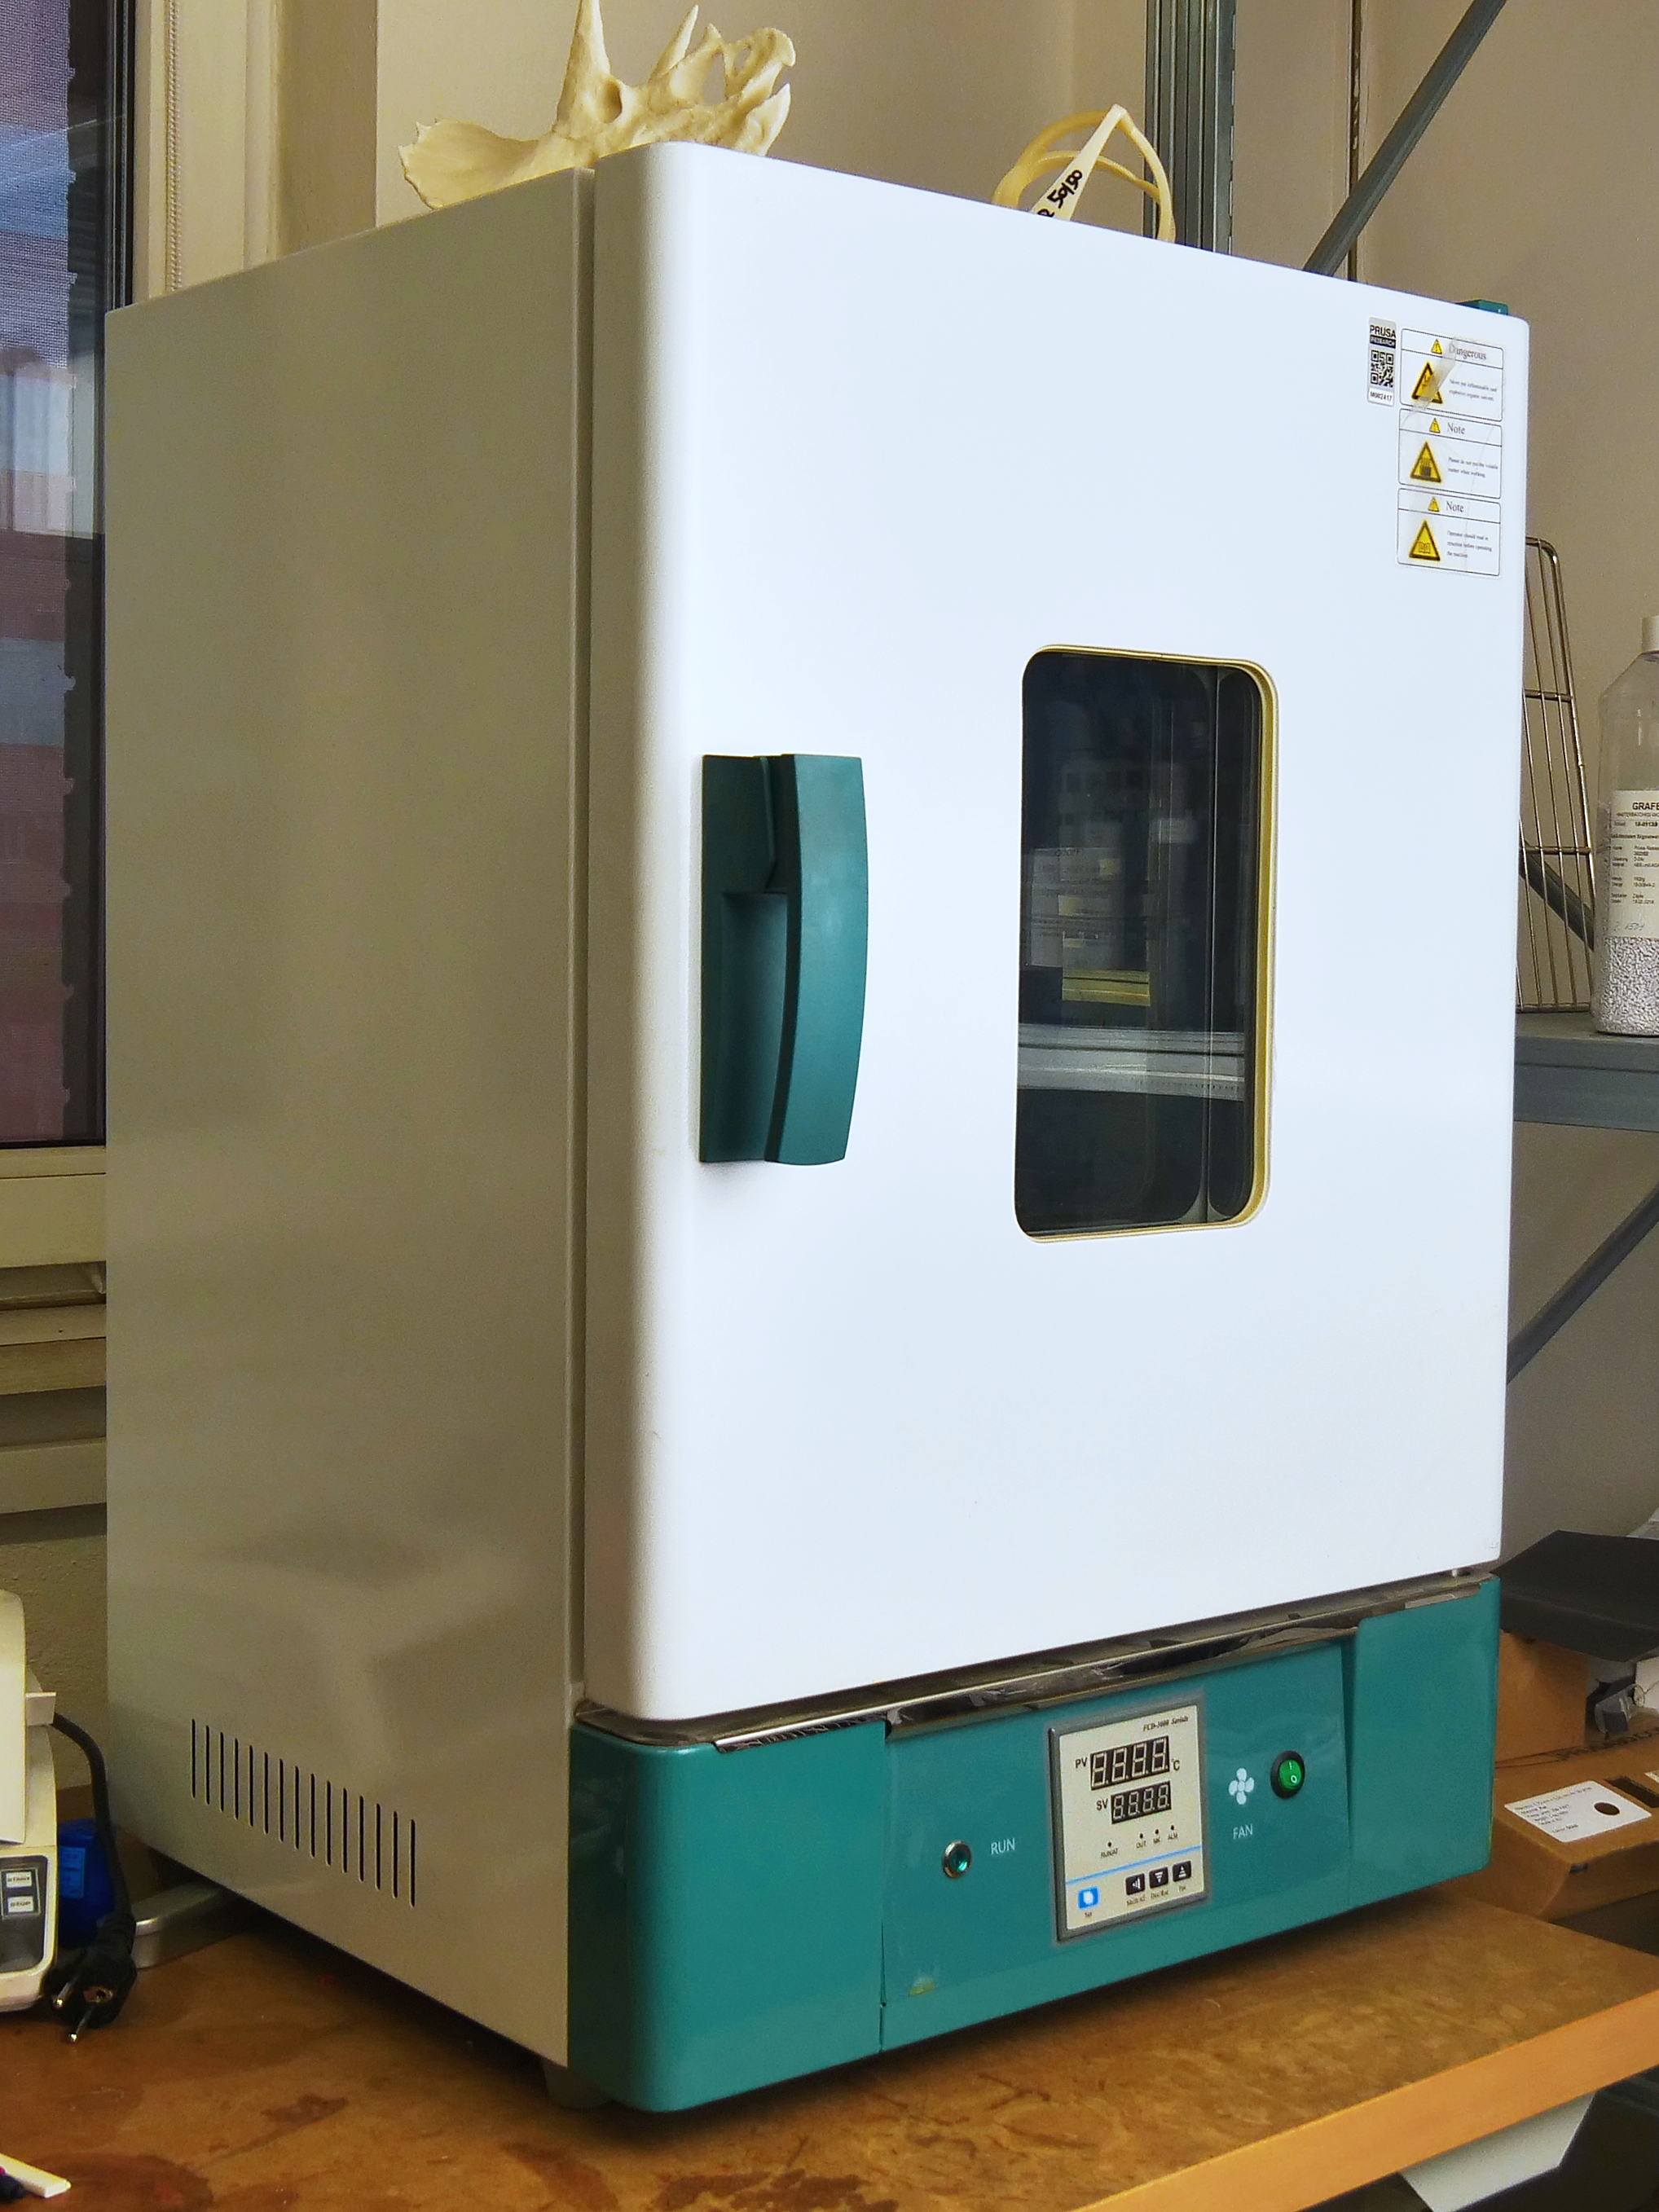
Annealing at home
You don’t need a lab or any dedicated tools for successful annealing. A simple hot air oven will do. Use an electric oven, though, not a gas one! Gas ovens are less safe, also they don’t provide an even level of heat, often the real local temperature could be higher than what you read from the thermometer. Place the objects on a plate (you can use a chopping board), so they don’t warp or stick to your tools or to the oven. Keep your eye on the process all the time! Imagine a burned pizza – well, burned plastic also doesn’t smell like victory. We take no responsibility for your burned prints (or pizzas)! 30 minutes might be a good rule of thumb, but make sure you adjust the time according to size, shape, and material of the particular object. If you need precise dimensions, anneal the first batch, measure the amount of shrinking, then print a second batch scaled up accordingly.
Conclusion
We experimented with annealing of 4 different materials. While for PLA and PETG this method is usable and has its merits (to an extent), for ASA and ABS the advantages are negligible, while warping and deformations reach unacceptable levels.
On the other hand, it’s almost incredible how dramatically could annealing improves the characteristics of PLA or PETG. Shape and dimensional changes still present a major disadvantage, but in this case, it’s outweighed by the benefits. In particular, PLA has vastly improved tensile strength, PETG excels in impact durability. Annealing is an effective technique, but not for complicated and detailed prints. For example, you could begin with improving the tensile strength of PLA coat hangers. Or make your PLA prints more heat resistant (untreated PLA already softens at 60° C [140° F]). Do you expect your print to often hit the ground? Use annealed PETG to improve its impact durability.
Let us remind you that common 3D printing materials show the shape and dimensional changes at relatively low temperatures (70 °C [158 °F]). If you want to keep a precise shape and size, anneal your print, measure the changes, scale it up and print again. Then you get an object both with improved characteristics and correct size. Keep in mind that if you use printed parts in machinery, which could have an operating temperature of 80 °C (176 °F), some deformations will occur over time.
Do you have any experience with annealing? Feel free to share it with us! We would love to learn about new methods and interesting projects, which could be improved by this simple trick.
What would happen if you anneal them while they’re packed in dirt, salt, or sugar? Would that prevent the deformations and make it easier to get to the higher temperatures? What if you dissolve the salt/sugar and let it recrystalize before annealing?
Hello, we haven’t tried these methods but CNC kitchen did anneal benchy burrowed in sand and it didn’t seem to help much:
https://www.youtube.com/watch?v=dOzVuoBP9gY
True, because the grains of sand are not bound to each other and can move around. Howerver, since then CNC Kitchen has successfully annealed PLA firmly trapped inside a solid plaster envelope: https://www.youtube.com/watch?v=bG8dlxTX3AI
I wonder if using something like a nylon sheath to support a low-temp material like PLA could help. Easy enough in most CAD to turn a model into a mold, scale it up by a small amount, add some indexing points…
There are different grades of PLA, each respond to heat treating differently. I don’t know about PETG, ABS, or ASA but I would imagine the same is probably true of them.
I’ve re-printed all my extruder parts in ProtoPasta’s HTPLA-CF and the finish and post annealing dimensions seem to be on point compared to the Prusa printed extruder parts on my MK3S. I did print with ProtoPasta’s suggested x/y scaling of 100.6% (they have a chart with different x/y scaling amounts, the carbon filled was the least of the materials listed) and z scaling of 99% to pre-correct for the x/y shrinking and z expansion of the annealing process. The surface of the parts are harder so the filament sensor arm seems to move smoother and the extruder heatsink rotates easier.
I’m still in the process of mounting the extruder assembly to my printer so I haven’t done any prints yet. Once I’m (hopefully) happy with the results I’ll probably be posting in the Awesome Prints section of the forums.
The reason for doing this is I needed to print the two R5 updates due to warping on the bottom of the heatsink airflow duct exit and I was noticing that the bottom surface of my PINDA wasn’t parallel to the bed indicating a very slight droop. But because the surface finish of the annealed HTPLA-CF was so different to the original PETG I decided to print all the parts to avoid having a fender a different color than the rest of the car. 😉
carbon fiber (when the proper amount and consistent shapes are used), will greatly help any filament maintain better dimensional accuracy, increase rigidity, and reduce overall weight (though layer adhesion can decrease a little). I’m interested in how the carbon fibers affect the annealing process at a molecular level. But for sure the carbon fiber structure will help any material maintain better dimensional accuracy during annealing than the material just on its own. The other interesting thing is that carbon fibers can also increase the temp and UV resistance of most materials. The trick first is in the filament manufacturing process (reinforcing with Carbon Fiber is not cut and dry and it can produce worse results, so choose your manufacturer wisel). Also, when printing there are many benefits to gain as far as reducing warping and such, but you will also need to watch for increased wear and tear. Yes, using hardened nozzles and extruder gears addresses a good bit, but depending on which material you work with, you may have to reach higher temps, such that the hardening of the nozzle is almost negated. Enter in ruby tips or NozzleX. With the exception of PLA+CF materials, most carbon fiber materials seem to have an increased hygrophoia and paying a lot more attention to keeping these filaments dry from storage all the way to the hotend is recommended for best results and as close to zero stringing as you can get.
To your point, there are so many variables involved with annealing 3D prints, it is hard to draw conclusions. And especially when only one brand of each material is used in the testing. Even the printing settings can greatly affect all of the outcomes and thus the conclusions that can be drawn.
So I always take these findings as a good starting point, but then take my own materials, printing settings, etc and apply to my own testing and then draw my conclusions from those findings. If I change any of the variables in that formula later (change filament, change printer settings, different usage requirements of the parts, etc), I redo the test with the new variables and then draw conclusions from those. Over time you can build up a collection of these “recipes” of success. Have a great day!
I’ve had excellent luck annealing HTPLA with much less warping or shrinkage that you’ve seen with your testing. When I wish to use an annealed structural part, I’ll print two, and anneal one, and compare. Here are my annealing procedures: https://github.com/PrusaMK2Users/MK2_Tips_and_Tricks/wiki/Annealing-HTPLA
I’d love to see you do your tests with a good HTPLA.
Awesome stuff!
Especially for PLA, I would suggest trying to anneal for much longer at lower temperatures. The process would need to last much longer, so something like a cheap sous vide immersion cooker would probably work best.
This works because such molecular scale changes can happen at much lower temperatures, just a lot slower.
Would love to see you add your Prusament PC Blend + Carbon Fiber (PC+CF). Also, was curious about printer settings and their affect on the results. Though arguably, you likely stuck to the default profiles for the filament and printer. However, the printing settings (especially around layer height, width, etc) could affect the results significantly. Even different nozzle sizes both lower and higher than 0.4mm.
Much appreciated though, this is a good start for me. Now to perform a bunch of tests myself with PC+CF under the conditions I print in. Have a great day!
Assuming you had a good enclosure: could you just leave it on the bed and set the temperature to 90c for 1/2 hour?
It makes no sense that the X and Y directions deformed differently. Did you ever test the effects of your nozzle fans on the results? That is, I think the deformation should be identical in the X and Y directions, assuming identical airflow.