


Creating a 3D model just by taking lots of pictures of a real object? Yes! Photogrammetry is back – and it’s easier to use, gives better results and it is still completely free!
You’ve read our first article about Photogrammetry, right? A quick recap – using many pictures taken from all possible directions, photogrammetry software tries to find the same features present on multiple pictures. You end up with a so-called point cloud, a bunch of 3D points that resemble the object. To get a printable mesh we have to triangulate the data. This can be tricky because we have to discard points that belong to the background and other objects in the scene. We clean the model a bit, patch all the holes, slice it and we are ready to print!
Well, all of this sounds nice and simple, but in reality, our original tutorial was quite complex. Luckily for us, things have changed and a new player has entered the photogrammetry ring: meet Meshroom!
Meshroom/AliceVision
Meshroom is free, open-source photogrammetry software with a beautiful UI. It’s built on top of an underlying framework called AliceVision, which is the result of cooperation between multiple Universities & Labs (Czech Technical University, IMAGINE, INPT, Simula Research Laboratory, and Quine) and Mikros Image, a French post-production company.
Meshroom UI
The basic interaction is about as simple as it gets. Drag and drop pictures into the Meshroom window, hit START and wait for the finished model. However, with Meshroom you can also peform Augmented reconstruction. That means you can add more pictures to a half-finished solution in case you notice (in the preview) that some areas could use more detail.
And even better, with Meshroom you can do Live Reconstruction! In this mode, you repeatedly take sets of pictures, upload them to a folder and they are automatically processed. A preview is displayed and you can decide which part of the model needs more detail. Then, you take more pictures and the whole process repeats until you’ve captured the model from all angles.
But before we get to play with Meshroom, let’s go over several important steps that you should follow when taking pictures for photogrammetry.
How to take pictures for photogrammetry
Camera & settings
A smartphone camera will work just fine, but if you have a DSLR, it’s even better. If you’ll be using DSLR, crank the aperture to at least 5-6 so that the whole model you’re trying to capture is in focus.
Consider shooting in RAW if your camera supports it. JPEGs are usually perfectly fine, but the RAW file format brings some better options for tweaking image settings – such as brightness. If you’re developing RAW pictures or editing JPGs, make sure you do not apply lens correction effects or similar filters.
Taking the pictures
You’ll want to capture at least 30 pictures. During our testing, we often shot 50, 100 or even more pictures to capture every detail. It doesn’t take nearly as long as you’d expect. Keep in mind, that some pictures might be discarded if the program doesn’t find enough similarities with other pictures or if they are blurry.
- Move around the target object in circles. Do not move the object or its surroundings between pictures.
- Overlap! You want to have each part of the model captured by at least 2 pictures. Ideally, you’d have about 60-80% overlap in succeeding pictures.
- Avoid hard shadows, use diffuse lighting or take the pictures outside on a semi-cloudy day.
- The object should occupy a significant portion of each image.
- Avoid very glossy or transparent targets.
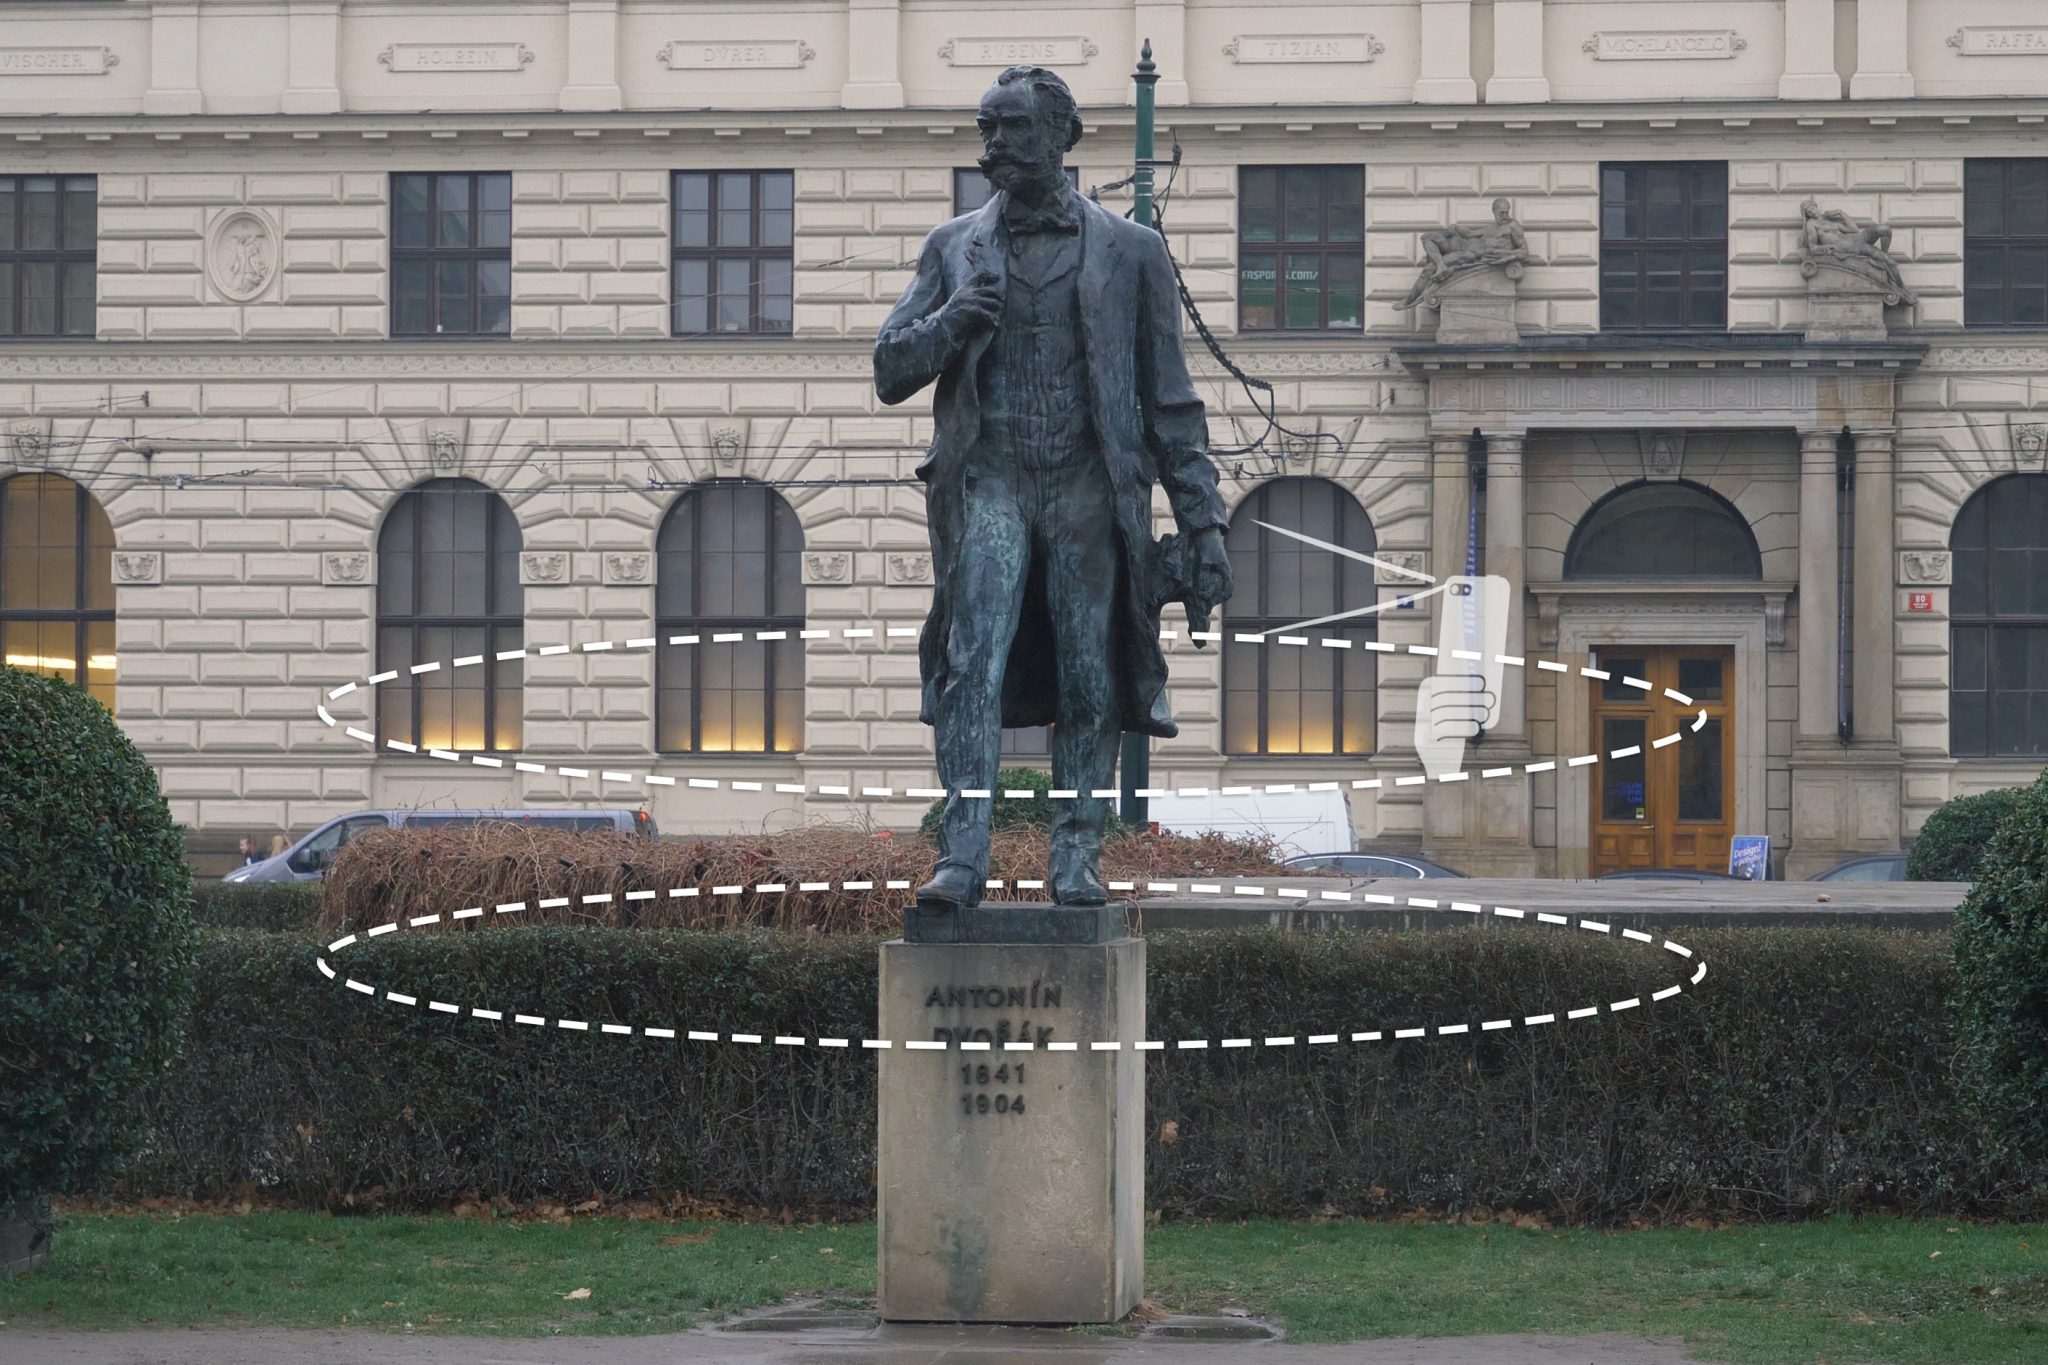
Anontin Dvorak’s statue – STL link
You can use camera zoom or even mix pictures from totally different cameras, Meshroom is really great in this regard. However, don’t change the zoom unnecessarily after each picture just because you can. It is good to have a lot of images taken with the same camera and the same zoom (focal length), since this creates needed limits for the internal camera calibration process – which is what we want.
Can you make a video instead? Yes… but don’t do it. Although, technically, it’s possible to use video rendered into individual images as an input for Meshroom, but the quality is much lower compared to a standard still image. The camera’s metadata will be missing (sensor size, lens) and you’ll be importing hundreds of images. Which means the processing will take forever to complete.
What if you took the pictures in front of a perfectly white background and rotated the model between the pictures? This works… sort of. The results will inferior. We will only have points on the object which represent a small sub-part of the image, so the camera parameters are less constrained which leads to less precise results.
Ideal targets for photogrammetry are textured or rough items (e.g. statues). If it’s an option, you can cover glossy or transparent objects with powder (flour/chalk spray) to avoid reflections. Or cover the glossy surface with a painters tape.
Standard reconstruction
You’re most likely going to use the standard reconstruction when processing photos previously taken outside and you can’t simply take more of them. We assume you already took all of the required pictures, got home and now you want to reconstruct the 3D model. The workflow is really simple:
- Copy all of the pictures to a folder on your hard drive
- Drag and drop the folder (or the individual images) into Meshroom window
- Save the project using File – Save to a destination of your liking (otherwise the reconstruction will be stored in a temporary folder)
- Hit Start or Right-click the Structure from motion (SFM) node and hit Compute
- It’s better to compute the SFM because you’ll see the preview within minutes
- Grab a coffee and wait – this make take some time 🙂
- The nodes at the bottom will turn green one by one as they complete
- You may hit Stop at any time and resume the reconstruction later
As soon as the Structure from motion node completes, you’ll be presented with a preview (double-click the node to load the preview if it doesn’t load automatically). All pictures successfully used in the reconstruction will have a green tick next to them.

Discarded photos are marked with a red minus sign
If you notice that a significant number of pictures was discarded and the preview has just a few cameras in it, there is little to no point in continuing the reconstruction. You’ll either have to take better pictures, augment the reconstruction with more pictures (explained in next chapter), or play with the settings.
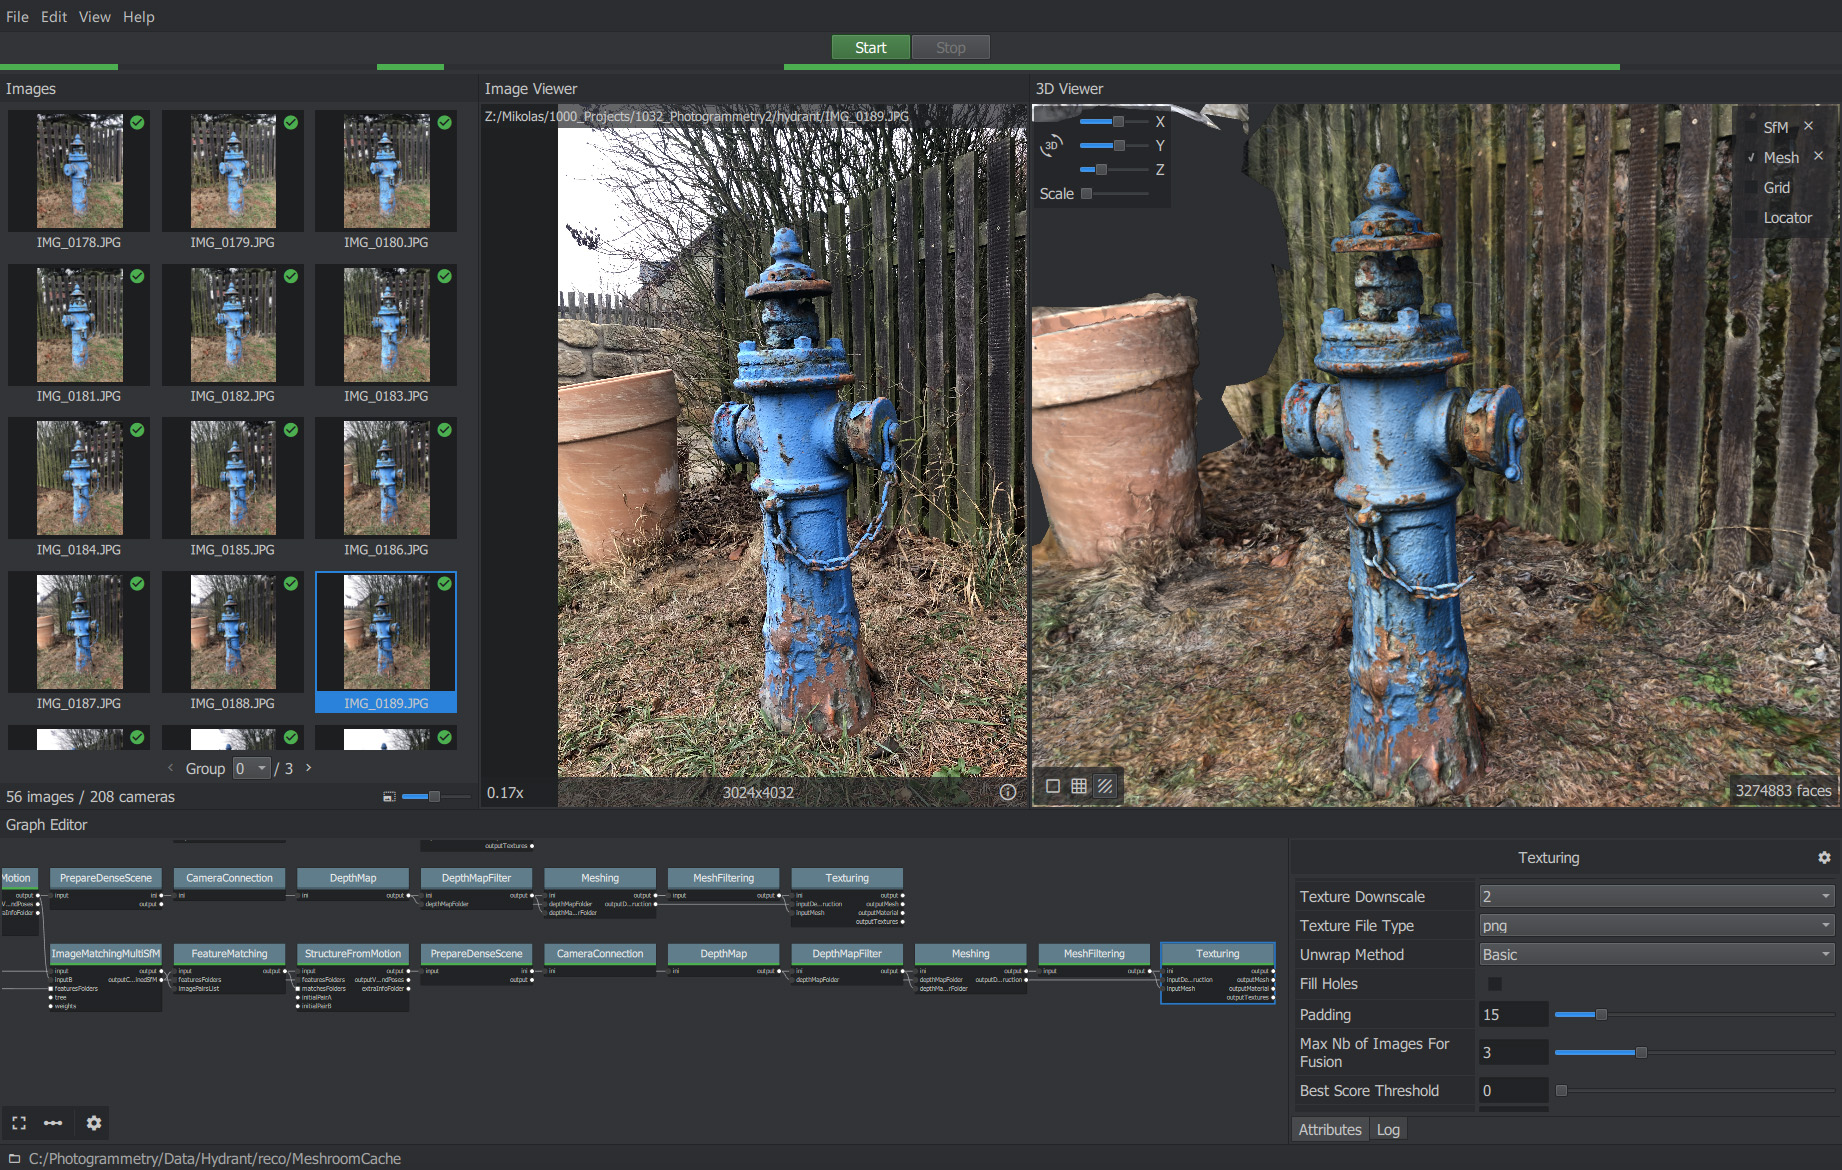
Once the full reconstruction finishes you can double-click the Texturing node to preview the final mesh.
You can right-click any of the completed nodes and select Open folder. Open the Texturing or MeshFiltering folder to find the output file in a commonly used Wavefront .obj format.
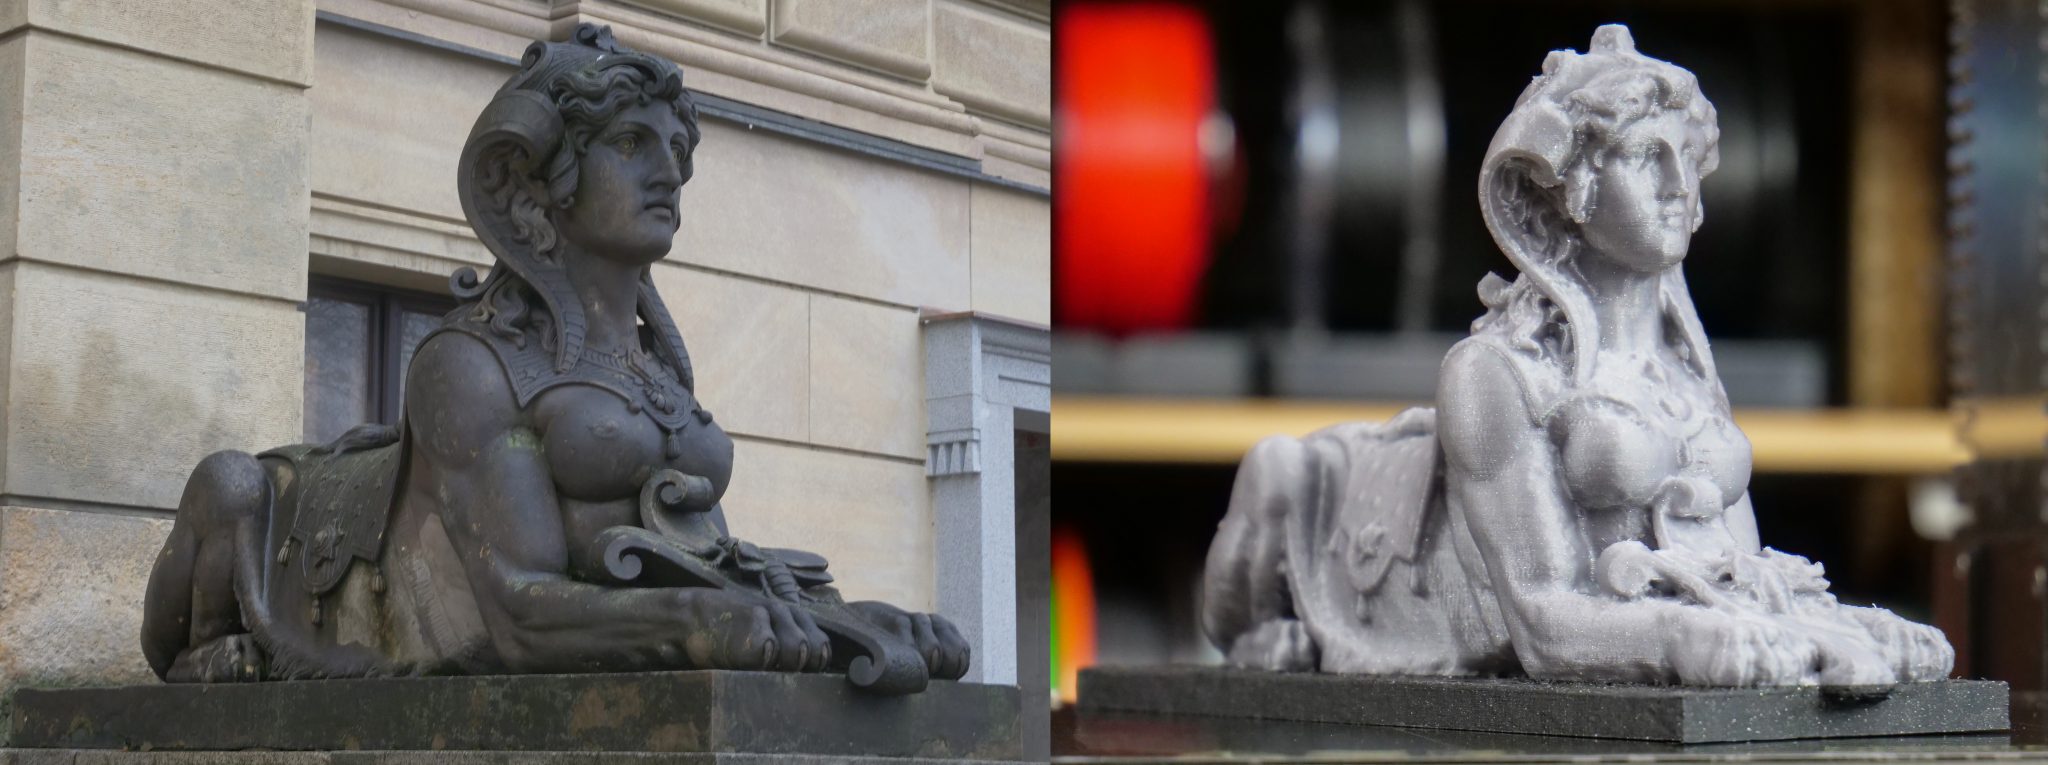
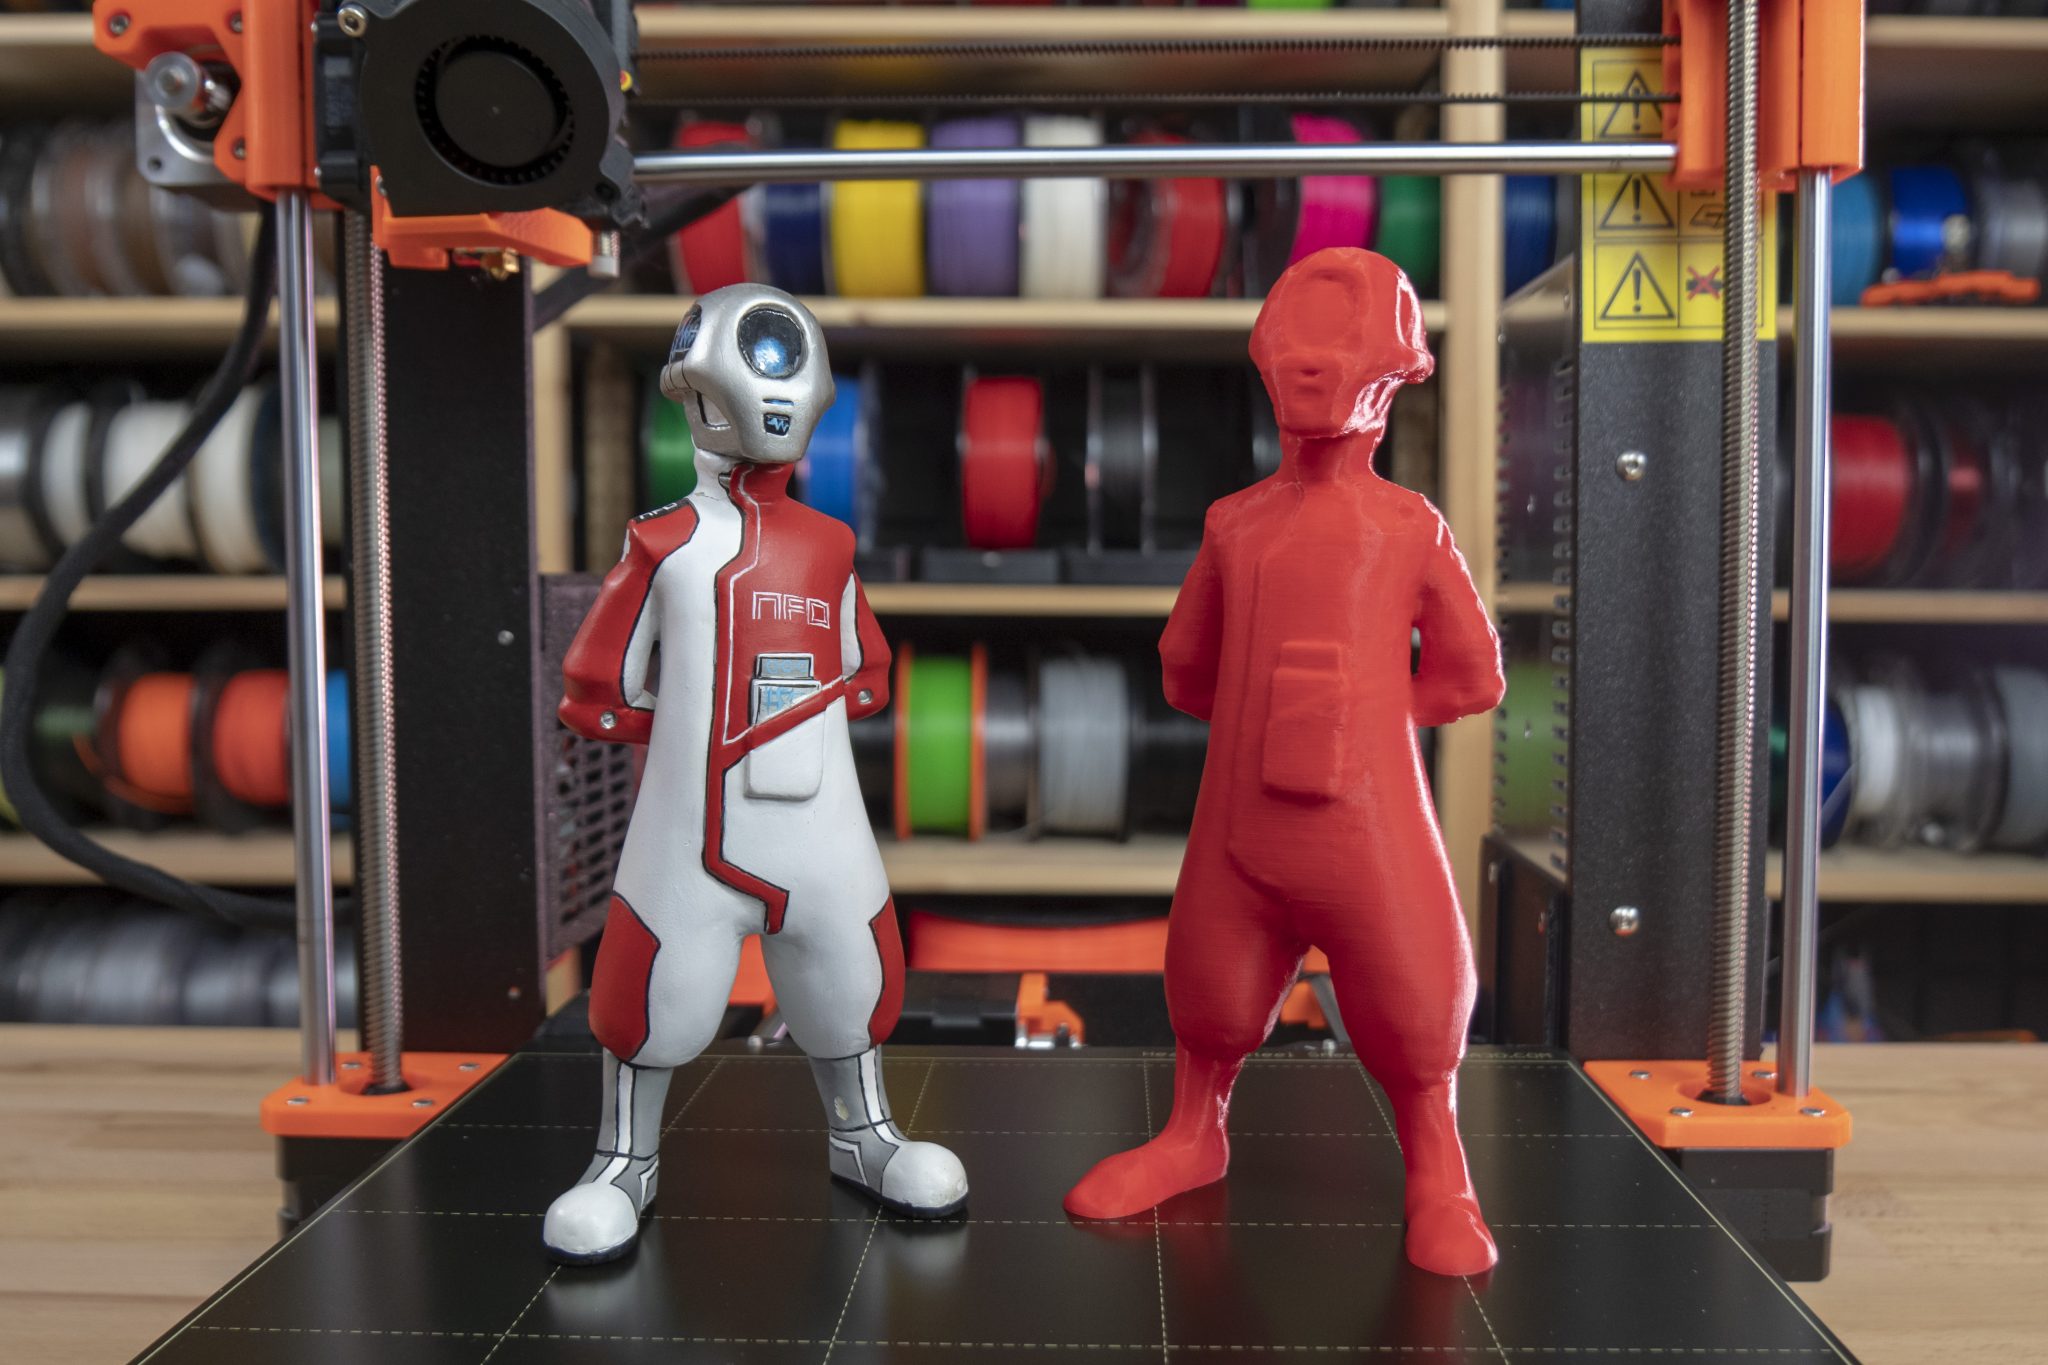
The real Spinx statue and a finished print, download the model here
Even though the output file can be imported directly to Slic3r PE, you’ll most likely want to do at least some very basic clean-up of the model before printing it.
Augmented reconstruction
Let’s say you’re scanning something at home – a cute clay dinosaur created by your kid, your favorite action figure or your guitar. You took about 60 pictures and the reconstruction is going well. Except for one area, which you didn’t capture well, some pictures got discarded and that part of the model is now missing many details.
With Meshroom, you can simply take more pictures and add them to existing reconstruction! We can’t emphasize enough how useful this feature is. It saved us a great amount of time during our testing.
It’s essential that you have not moved the object between the individual series of pictures. If you have moved it, you can’t augment the reconstruction anymore.
When you need to take pictures in order to fill a poorly captured area, we suggest taking about 5 to 10 photos. And you can try to fill multiple areas at once. New pictures are matched with the original set of photos. This means that adding new pictures may even cause previously discarded images to be matched successfully with the new series.
Whenever you add a series of pictures to an existing reconstruction, a new branch will appear in the Graph editor. You only need to compute everything up to the StructureFromMotion node (right click on it and select Compute), which is usually pretty fast. As soon as it turns green, you can double-click the node to update the preview in the 3D Viewer window.

When you think you have enough pictures for the final reconstruction, right-click the bottom rightmost node (Texturing) and hit Compute. This can be very time consuming, so it’s really beneficial to only run the full reconstruction on the final branch with all of the pictures included.
An action figure re-created with Augmented reconstruction
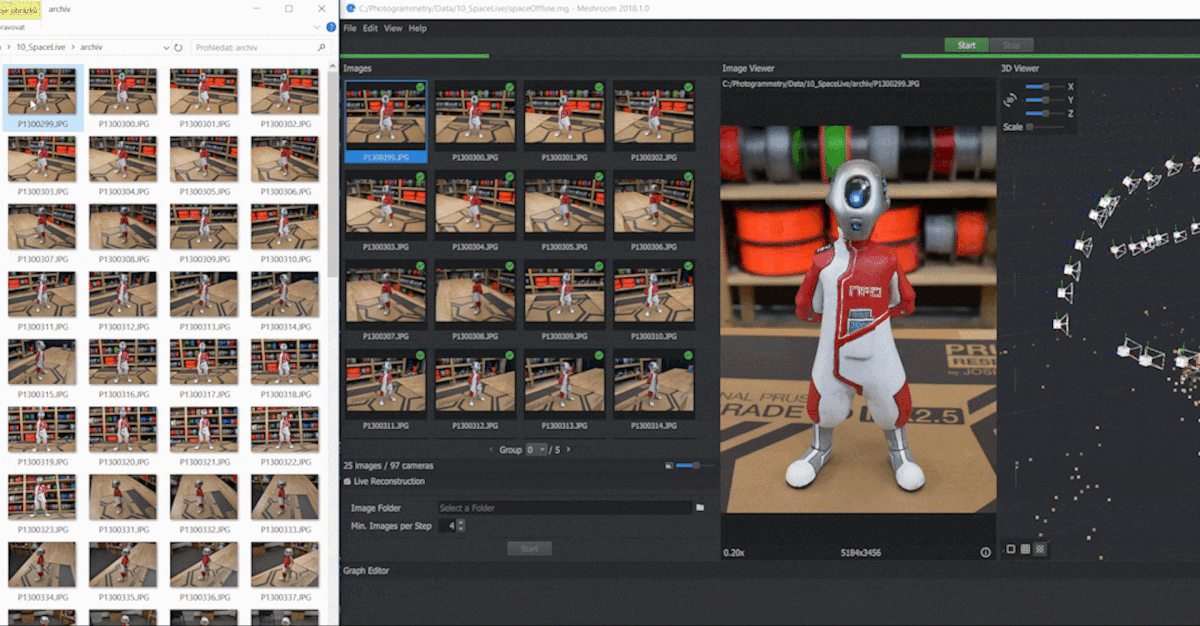
Live Reconstruction
The most fun way to work with photogrammetry! You set up a folder, which will be monitored by Meshroom. Whenever you copy images into this folder, they will be automatically processed and added to the reconstruction. Keep taking more pictures progressively and watch how the model improves. In the end, you can finally let Meshroom compute the full textured model.
The first series of pictures should include at least 10-20 images and should focus on the general shape of the object. If you capture the whole front side of the object and then the whole back side of it, it’s likely you’ll have to create a bridge between these series of pictures. You can do that by taking pictures that transition from the front to the back with small increments.
Setup
- Select View – Live Reconstruction
- Set the Image folder and the minimum number of images that will be processed during each step (keep this above 4)
- Hit Start in the Live Reconstruction panel
- Start copying pictures into the image folder
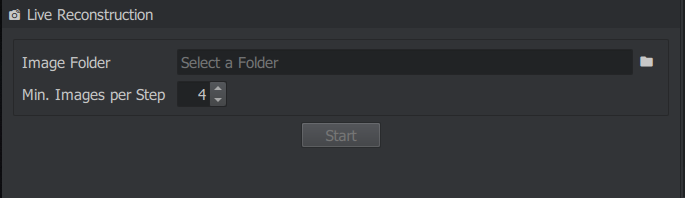
The minimum number of images is set to 4 by default, but we suggest to take even more pictures in each series.
There is a small catch at the end. To generate the textured model, you’ll have re-link the last StructureFromMotion node to the PrepareDenseScene node.
- Right-click the link between the first StructureFromMotion and PrepareDenseScene node
- Choose Remove
- Drag a new link from the bottom-most StructureFromMotion output to the PrepareDenseScene input
- Right-click Texturing and hit Compute
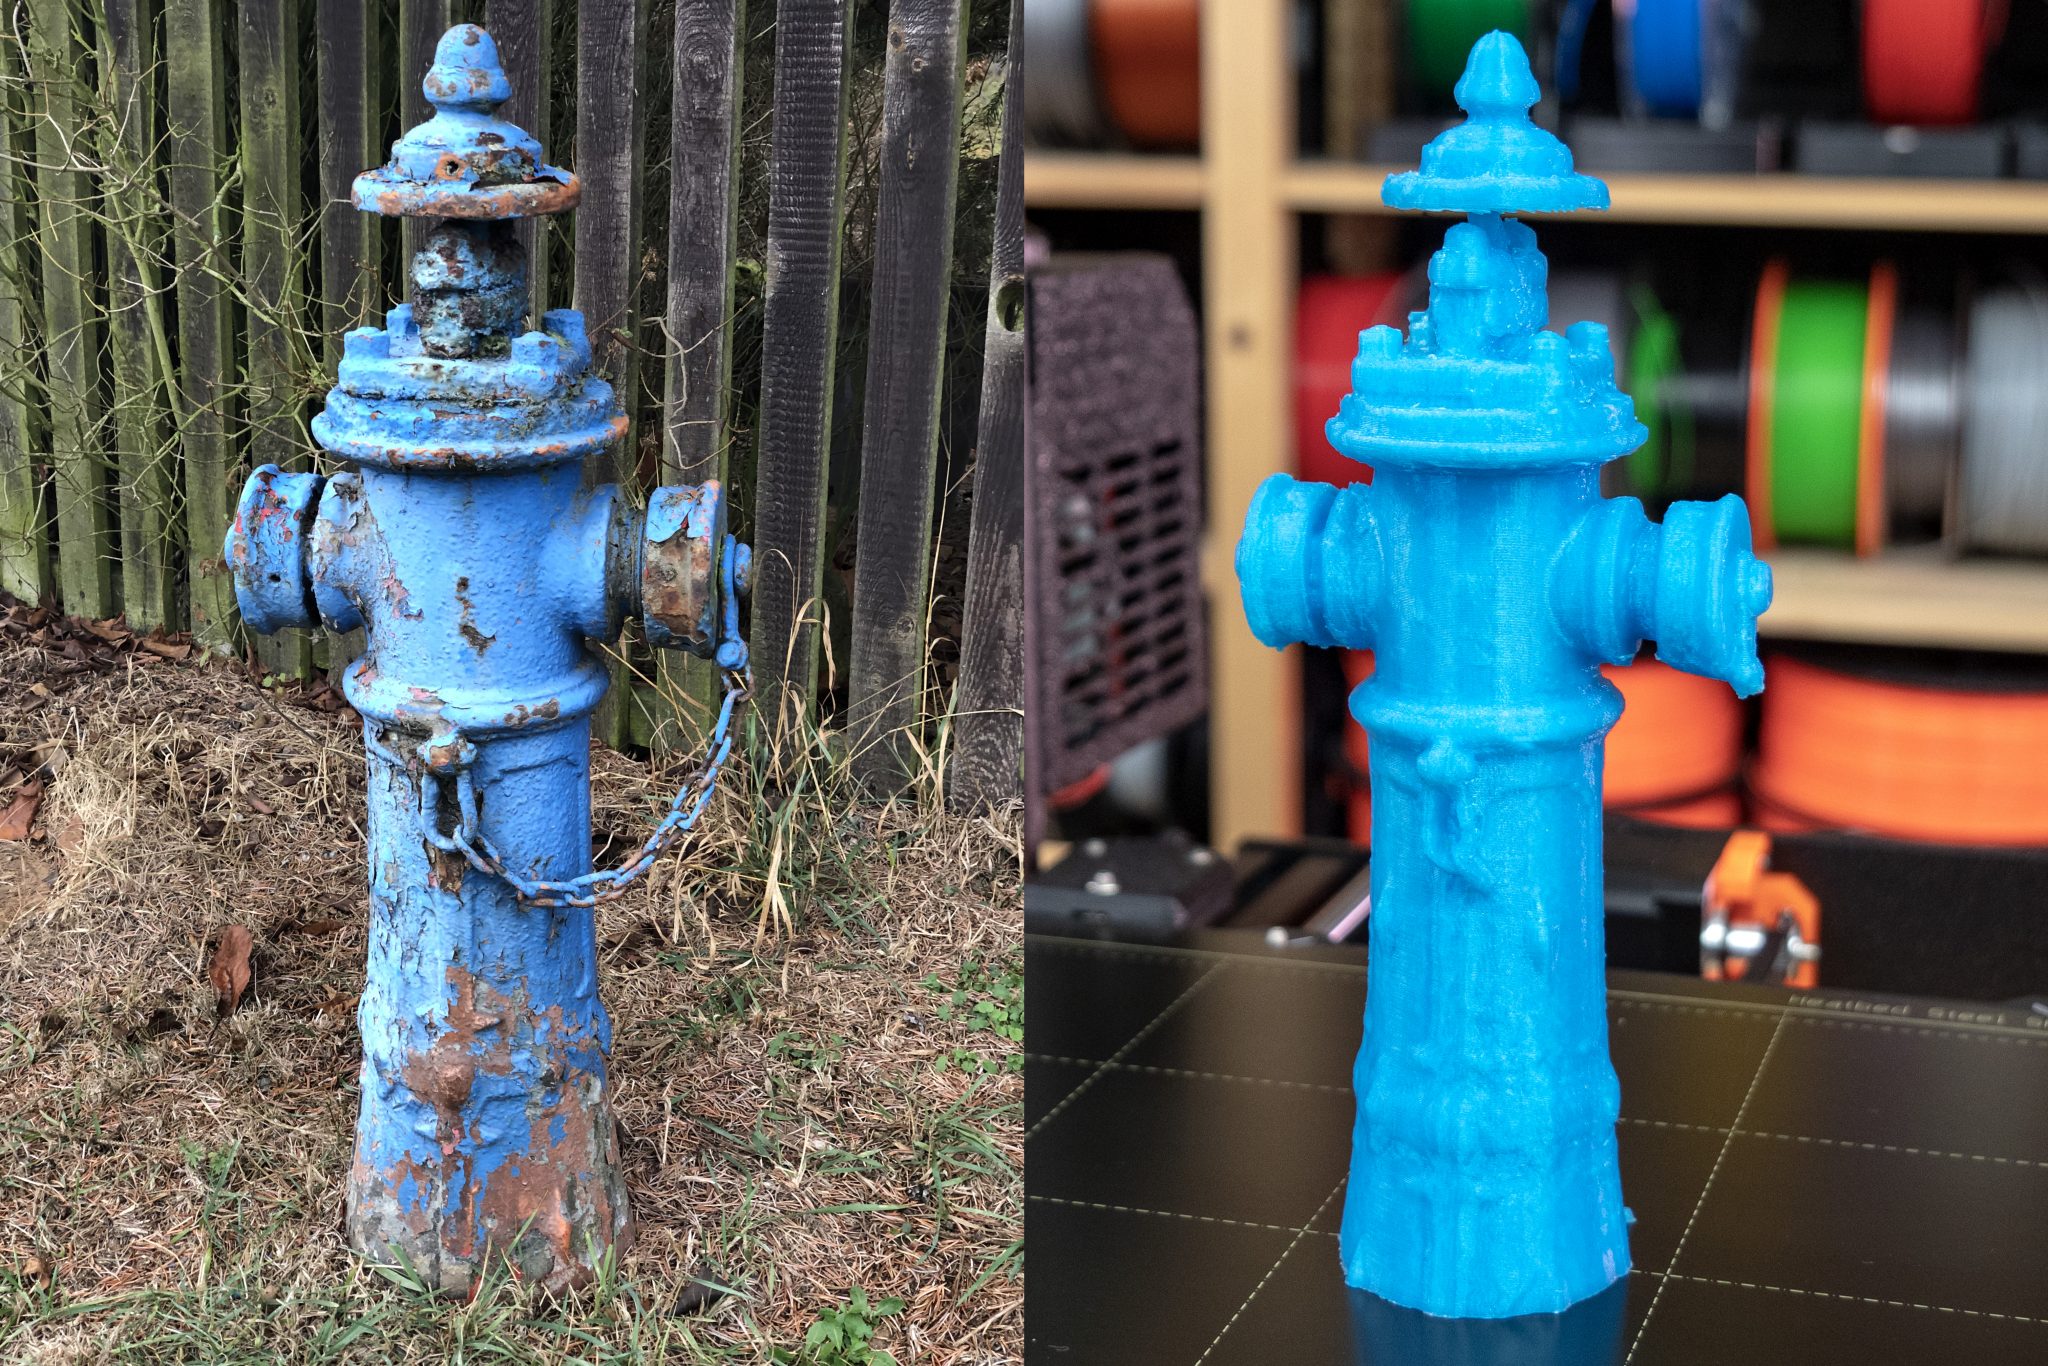
Hydrant – Live reconstruction
Preparing models for print – closing holes & repairing
Almost all meshes created by 3D scanning or photogrammetry have a hole at the bottom. Luckily for us, we need a flat base that could be easily placed on the print bed anyway, so a simple plane cut in Meshmixer, Blender, 3D builder (or any other program that you prefer) will do.
Also, the scale of the model will be pretty much random, so don’t be surprised when the model is really tiny after import. Just scale it up.
There is one technique in particular that makes a perfect combo with photogrammetry and that’s sculpting. We will write a separate article about it in the future, but in the meantime feel free to check existing tutorials, like this one.
We strongly recommend to check the Meshroom wiki. There’s a lot of information about how to solve some errors you might encounter and what parameters are worth playing with. And if you want to contribute, that’s even better, submit a pull request or contact the developers via email.
Photogrammetry print gallery
Conclusion
Thanks to Meshroom, photogrammetry is now easier than ever. The output meshes are not ready to print straight away, but with some minor edits, you can get absolutely stunning results for both 3D printing or game/animation industry. And the whole thing is open-source! So we can expect updates or even 3D printing-specific improvements. Especially if we, as a community, support the development in even the smallest ways – such as documenting errors or by sharing good settings.
So are you convinced it’s time to give photogrammetry another chance? What are you waiting for, go and scan the world! 🙂
Great! But only works for computers with Nvidia CUDA!?
That’s a dealbreaker for most users.
Unfortunately yes. It’s open-source so there’s a possibility to re-write the CUDA dependent code to use something like OpenCL, but who knows it will ever happen.
yeah. saw the same thing. i was very hopeful until that point.
You can run on a Google cloud service. They offer a virtual Linux system with a very powerful Nvidia GPU. Amazon has similar offerings.
Or just buy a low-end Nvidia card. Everyone working in this area or in AI or ML has an Nvidia GPU setup.
Great but not for Mac OS… compiling is very complicated.
For Mac and non-CUDA, take at look at->
https://demuc.de/colmap/
and
https://www.youtube.com/watch?v=Zm1mkOi9_1c
Better solution for me , imho.
Our first photogrammetry tutorial used Colmap 😉
Video: https://www.youtube.com/watch?v=ye-C-OOFsX8
Article: https://blog.prusa3d.com/photogrammetry-3d-scanning-just-phone-camera/
Hello Mikolas,
Your views on the growing trend of 3d scanning is very informative and explains in depth about the development in this industry, 3d scanning is helping people around different sectors to integrate themselves to the virtual reality which is future of entertainment and information.
we are also working in this aspect to give the potential users the power to make objects come live in 3d form using 3d scanner latest technology.
Visit our site: https://www.einscan.com
Thanks
I was really excited about this whole possibility, until I saw something about a camera list for parsing whether or not Meshroom would accept photographs.
I saw the potential of an array of scanned renders from a 3D program being the foundation for creating the mesh, because the 3D program only has limited 3D object export choices (collada is one, as I recall).
It occurred to me that I could take the round-about way of using the scan array instead, for the photos for Meshroom, but now I do not know if this is feasible.
Anyone know enough about the possible acceptable range of Meshroom photo sources to comment?
Yes, I have posed a similar question at the Meshroom Google group there, too.
I needed to make a 3D model of photos for one of my school projects and it was really hard to find the right printer. Even more hard was to write a paragraph for the work I’ve done, so I turned to https://edubirdie.com/write-my-paragraph-for-me for assistance and was happy when I got great results. Now, I have 3D printer at home and thinking about taking a course of how to make pictures for printing.