


3D printing provides the opportunity to make things that are not easily produced by other technologies, and literally change our possibilities. Thanks to the ingenuity and creativity of the community surrounding 3D printing, there are many interesting projects that use this technology for various purposes. Today, we would like to highlight one of these projects! We have previously shown you how to prepare and print 3D maps and terrains from anywhere in the world. The article was well-received, perhaps because we gave you an option to create and print a model of your city or a mountain pass model where you were on holidays.
This article will be a guide on how to make something of your own again in the form of puzzles, 3D puzzles! Classic jigsaw puzzles have been known for centuries. These classic puzzles were created by painting the picture on a piece of wooden board and then cutting it into regular or irregular pieces. Currently, puzzles are mostly made of hard paper and cardboard. Solving puzzles is fun that improves imagination and logical thinking. And this applies to 3D puzzles even more!
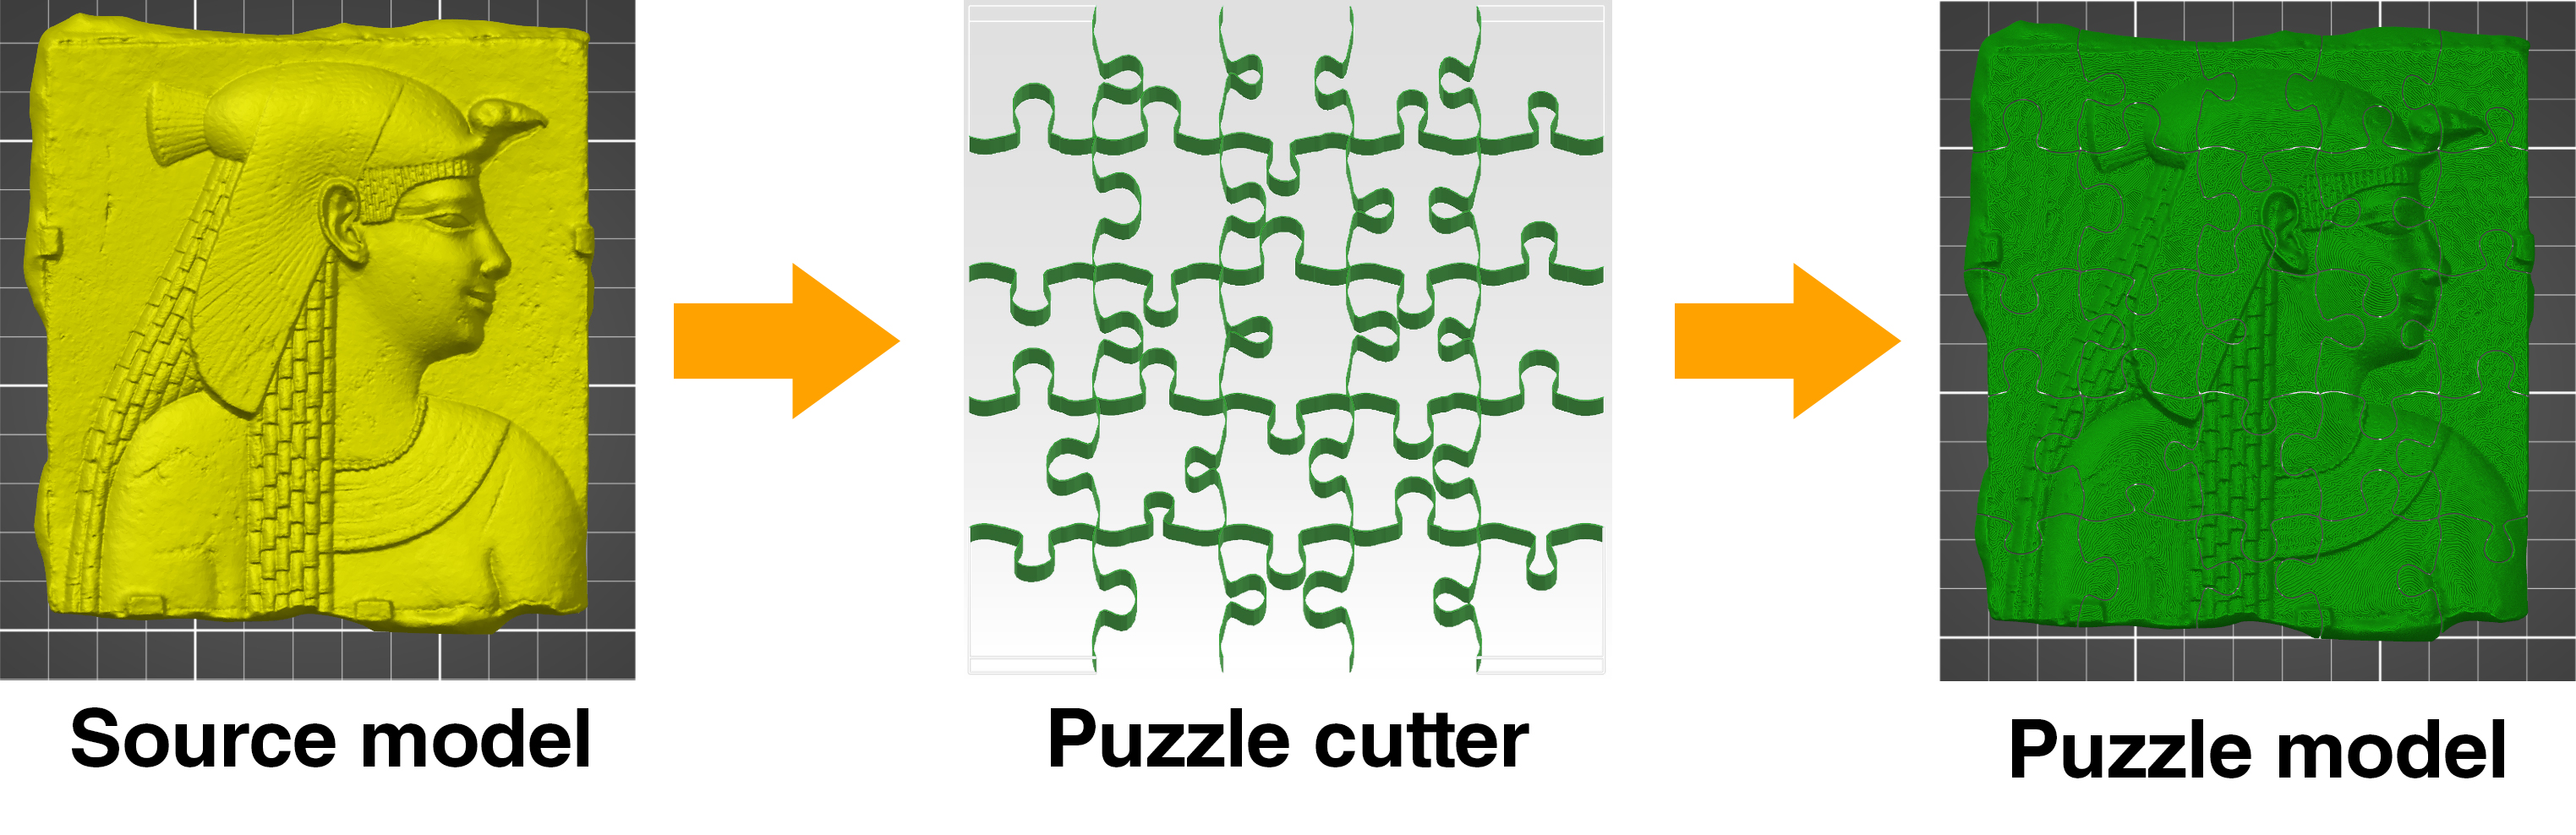
3D puzzles are created by cutting a 3D model perpendicular to the XY plane (a plane parallel to the print pad) using a 2D sketch of the puzzles with locks. Preparing such a model can be difficult at first glance. If you are an advanced user of one of the popular tools for 3D modeling (Fusion 360, Inventor, etc.), you can certainly perform this task easily. There are plenty of ways to accomplish this. But we will show you the easiest way that’s suitable for everyone. You will not need any knowledge of modeling tools. Most of the operations can be done in the Slic3r PE. This is a great opportunity to discover a few of the new features in the beta version we’ve prepared for you. The final version is coming soon!
Programs needed:
To create a puzzle model, follow these steps:
1. Select and prepare a suitable source model
Almost any 3D model is suitable as a source model for puzzles. However, models that are already flat in shape are ideal.
Source model examples:
- 3D terrain map obtained as described in the article: How to print maps, terrains and landscapes on a 3D printer. TIP: You can improve the model using filament color change for snowy mountain peaks, etc. You can easily do that in Slic3r PE in preview mode after slicing. Use the slider on the right side of the screen to set the layer, where you want to change the color. You can add any number of these changes.
- Any black and white SVG image converted to a 3D model in the Tinkercad web tool. Suitable for logos and signs.
- Convert a suitable image to a 3D model using the Selva tool. For instructions, see: From 2D to 3D. How to turn a picture or a photo into a 3D model?
- Convert a cartoon image using the lithophane tool. The source image should have a limited number of solid colors. This is the only way to achieve a satisfactory result after processing. Alternatively, you can pre-process your photo in your favorite photo editor. It is not appropriate to use the unmodified photo because you will hardly see anything on the printed image. The depth of the lithophane picture is adapted to make the picture clear when the light is passing through. It is important to note that a lithophane is not the same as a real 3D model. The depth of each point in lithophanes depends on its “darkness”, which is not equivalent to the depth of a point in real 3D space.
- Relief Plaque – you can find plenty of these models on the internet.
You can see examples of puzzle models at the end of the article.
2. Import the source model into Slic3r PE
Open Slic3r PE and turn on the Advanced mode (Configuration -> Mode -> Advanced).
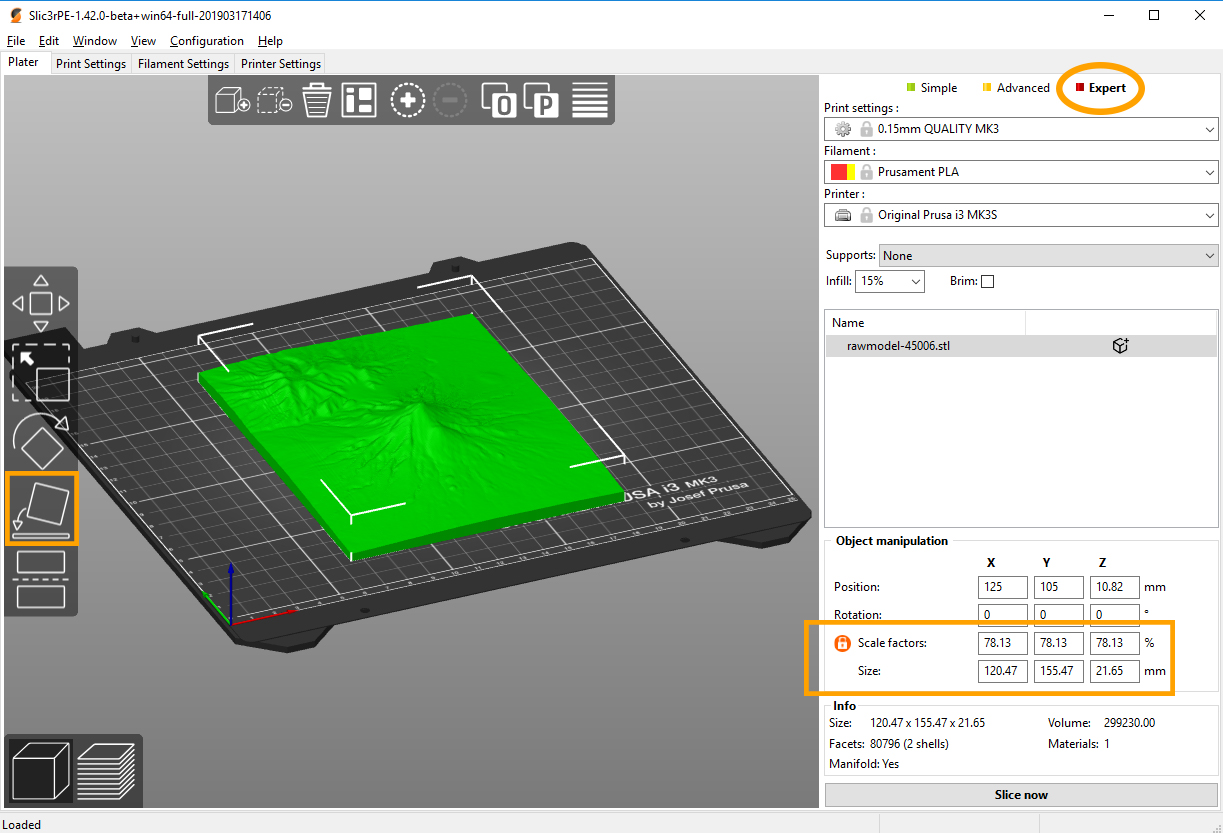
Import the selected source model into Slic3r PE (File -> Import -> Import STL / OBJ /… or simply drag and drop the STL file into the slicer window). Ideally, you should place the model in the center of the print area. Use the Place on face function for easy orientation of the model. If necessary, you can change the model’s dimensions using isotropic scaling (evenly resizing all three axes). Once you are satisfied with the model dimensions in the X and Y axes, you can enlarge the model by 5 to 30% in the Z-axis. To change only the Z-axis dimension, click the lock icon next to the Scale factors symbol. This unlocks the aspect ratio.
Focus on the size of the model at the bottom right corner. Make a note of these dimensions. You will need them more than once during the course of this project.
3. Generate a puzzle cutter
The rectangular or square base model needs to be divided into individual puzzle pieces. To do this, we use a puzzle-shaped cutter model. The cutter is made up of curved lines that are extruded to the third dimension. This creates a solid body that is subtracted from the source model we are cutting.
Unfortunately, you cannot use one universal puzzle cutter template. This is due to the different sizes and ratios of the source model bases. It can easily happen, that the source model ends in the middle of puzzle pieces. It does not look nice and small parts do not hold in place with the rest of the puzzle pieces.
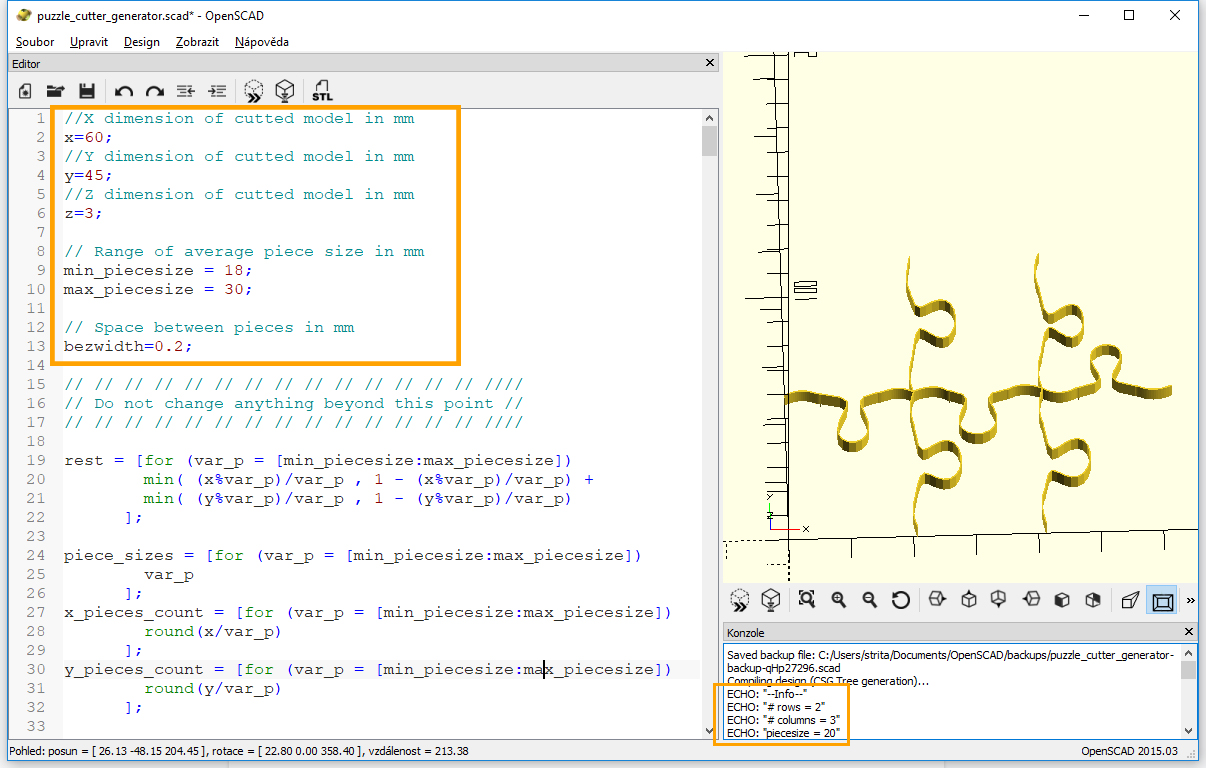
How to download the OpenSCAD script and how to edit parameters:
- Download and install OpenSCAD (choose the installer according to your operating system).
- Download the script to create puzzle cutters.
- Open the downloaded script in the OpenSCAD app.
- On the 2nd line after “=”, type the size of the source model in the X-axis (do not delete the semicolon at the end of the line)
- On the 4th line after “=”, type the size of the source model in the Y-axis (do not delete the semicolon at the end of the line)
- On the 6th line after “=” type the height of the source model in the Z-axis (do not delete the semicolon at the end of the line)
- On lines 9 and 10, set the range of a single puzzle piece size. The optimal cutting solution will be found within this range.
- On line 13, you can change the space between puzzle pieces. In our experience, the best is 0.2 mm.
- Press F6. It may seem like nothing is happening for a long time. Please be patient. The processing may take several minutes. In the console at the bottom right corner you can see the size of the puzzle piece and the final number of rows and columns). When the processing is complete, you will see the generated “puzzle cutter” in the top right corner of the screen.
- Look at the generated shapes. Sometimes, the puzzle locks are attached by a very narrow part. In this case, press F6 again to generate a new model.
- Select: File -> Export -> Export as STL and save your puzzle-cutter model.
- You can close OpenSCAD.
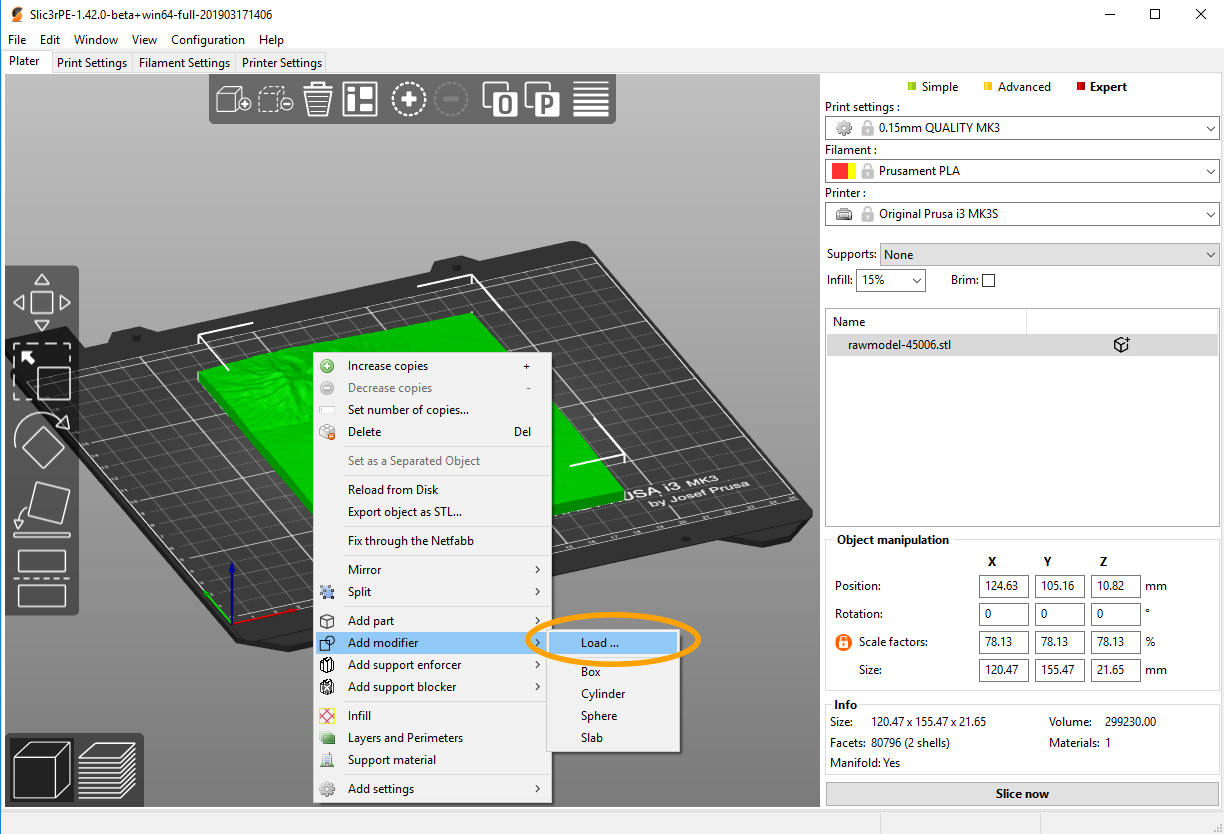
4. Cut the source model in Slic3r PE using the puzzle-cutter
Within the second step, your source model has already been imported into Slic3r PE. Now, using the custom modifier, we perform the cutting process. The modifier will subtract the puzzle-cutter model from the source model.
- Right-click on the source model and select Add modifier -> Load and select the STL file with the puzzle-cutter.
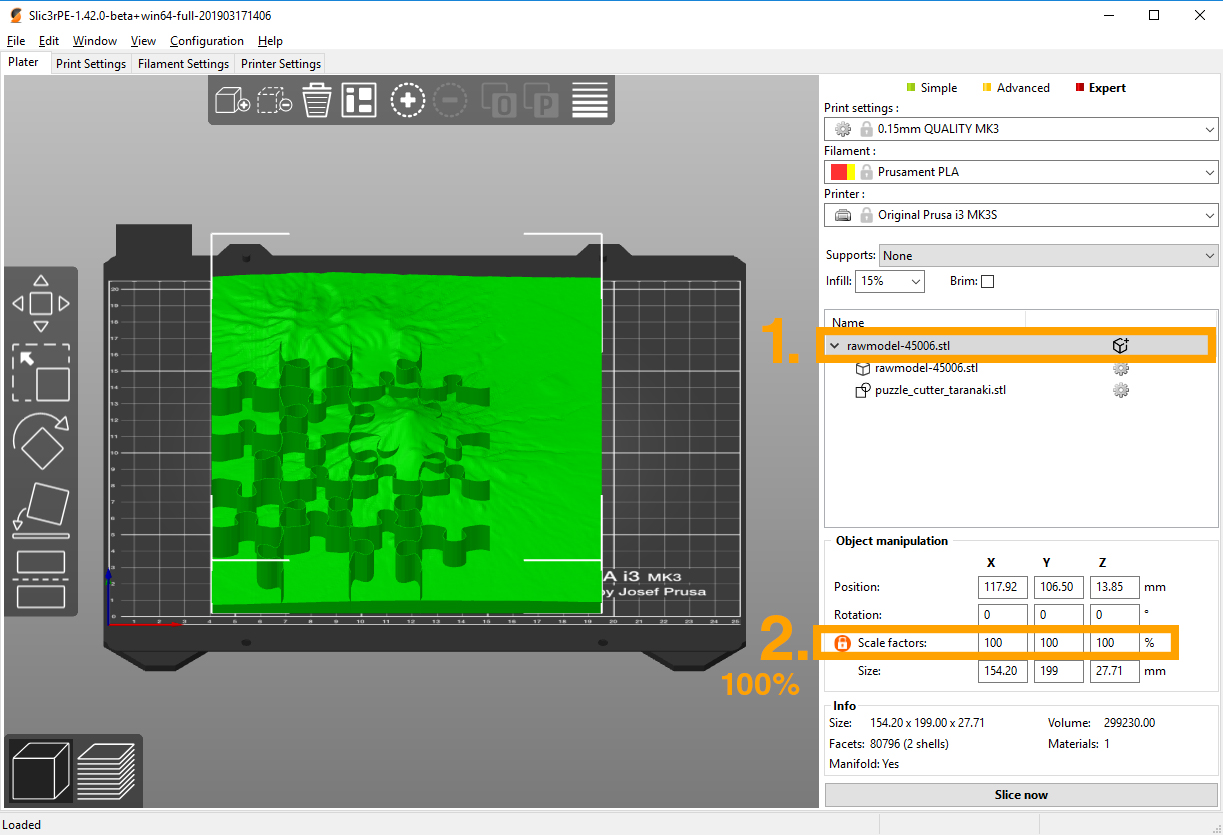
- If you have not changed the size of the source model, proceed to step 5. Otherwise, you may notice that the puzzle-cutter is smaller or larger than the source model.
- In the right column, click the object group (first row). Change the Scale factor to 100% everywhere. Before changing, make sure you have the original values noted.
- Click the line below the first part of the group (the second line in the tree) and enter the dimensions of the model you noted earlier. This unites the dimensions of the puzzle cutter and the source model.
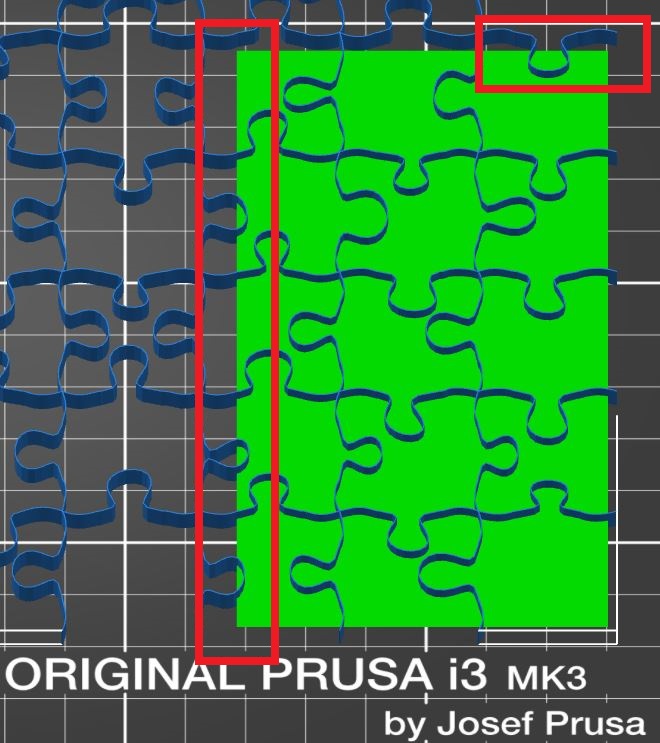
- Position the source model and cutter correctly, so they overlap perfectly. (The puzzle-cutter is 2 mm larger in all axes). The puzzle-cutter should stick out at least a little from the source model on each side. Make sure the puzzle-cutter intersects its entire depth (Z-axis).
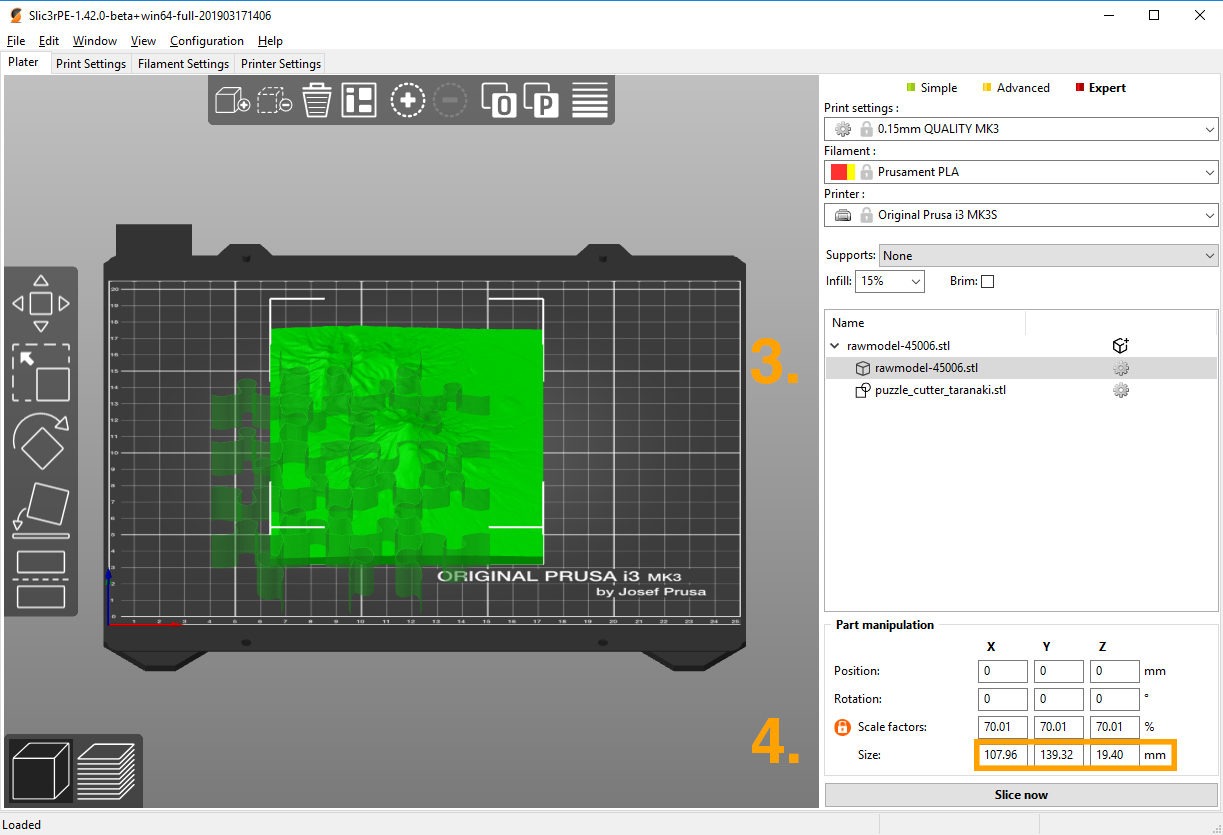
- In the tree structure, right-click the gear icon and add settings for Infill, Layers and Perimeters.
- Set the values as follows: Fill density = 0%, Bottom layers = 0, Top layers = 0, Perimeters = 0.
- Press the Slice now button.
- Optionally, in the Preview, you can add color changes in the vertical scroll bar on the right side of the screen.
- Inspect the model and export the G-code.
Do not change (especially do not reduce) the dimensions of the puzzle-cutter in the X and Y axes. This will reduce the gap between the puzzle pieces and therefore the puzzle could be difficult to disassemble.

5. Printing
Pay attention to the first layer when printing. If the nozzle is very low, the individual puzzle pieces will be joined together. It will be difficult to separate them. Use the Live adjust Z function to prevent the pieces from connecting to each other. This is the key step in printing. If you still cannot prevent them from connecting, you can try to set the Elephant foot compensation to 0.4 mm in the slicer (Print Settings -> Advanced -> Slicing). Another solution is to print the model on a Raft (Print Settings -> Support -> Raft).
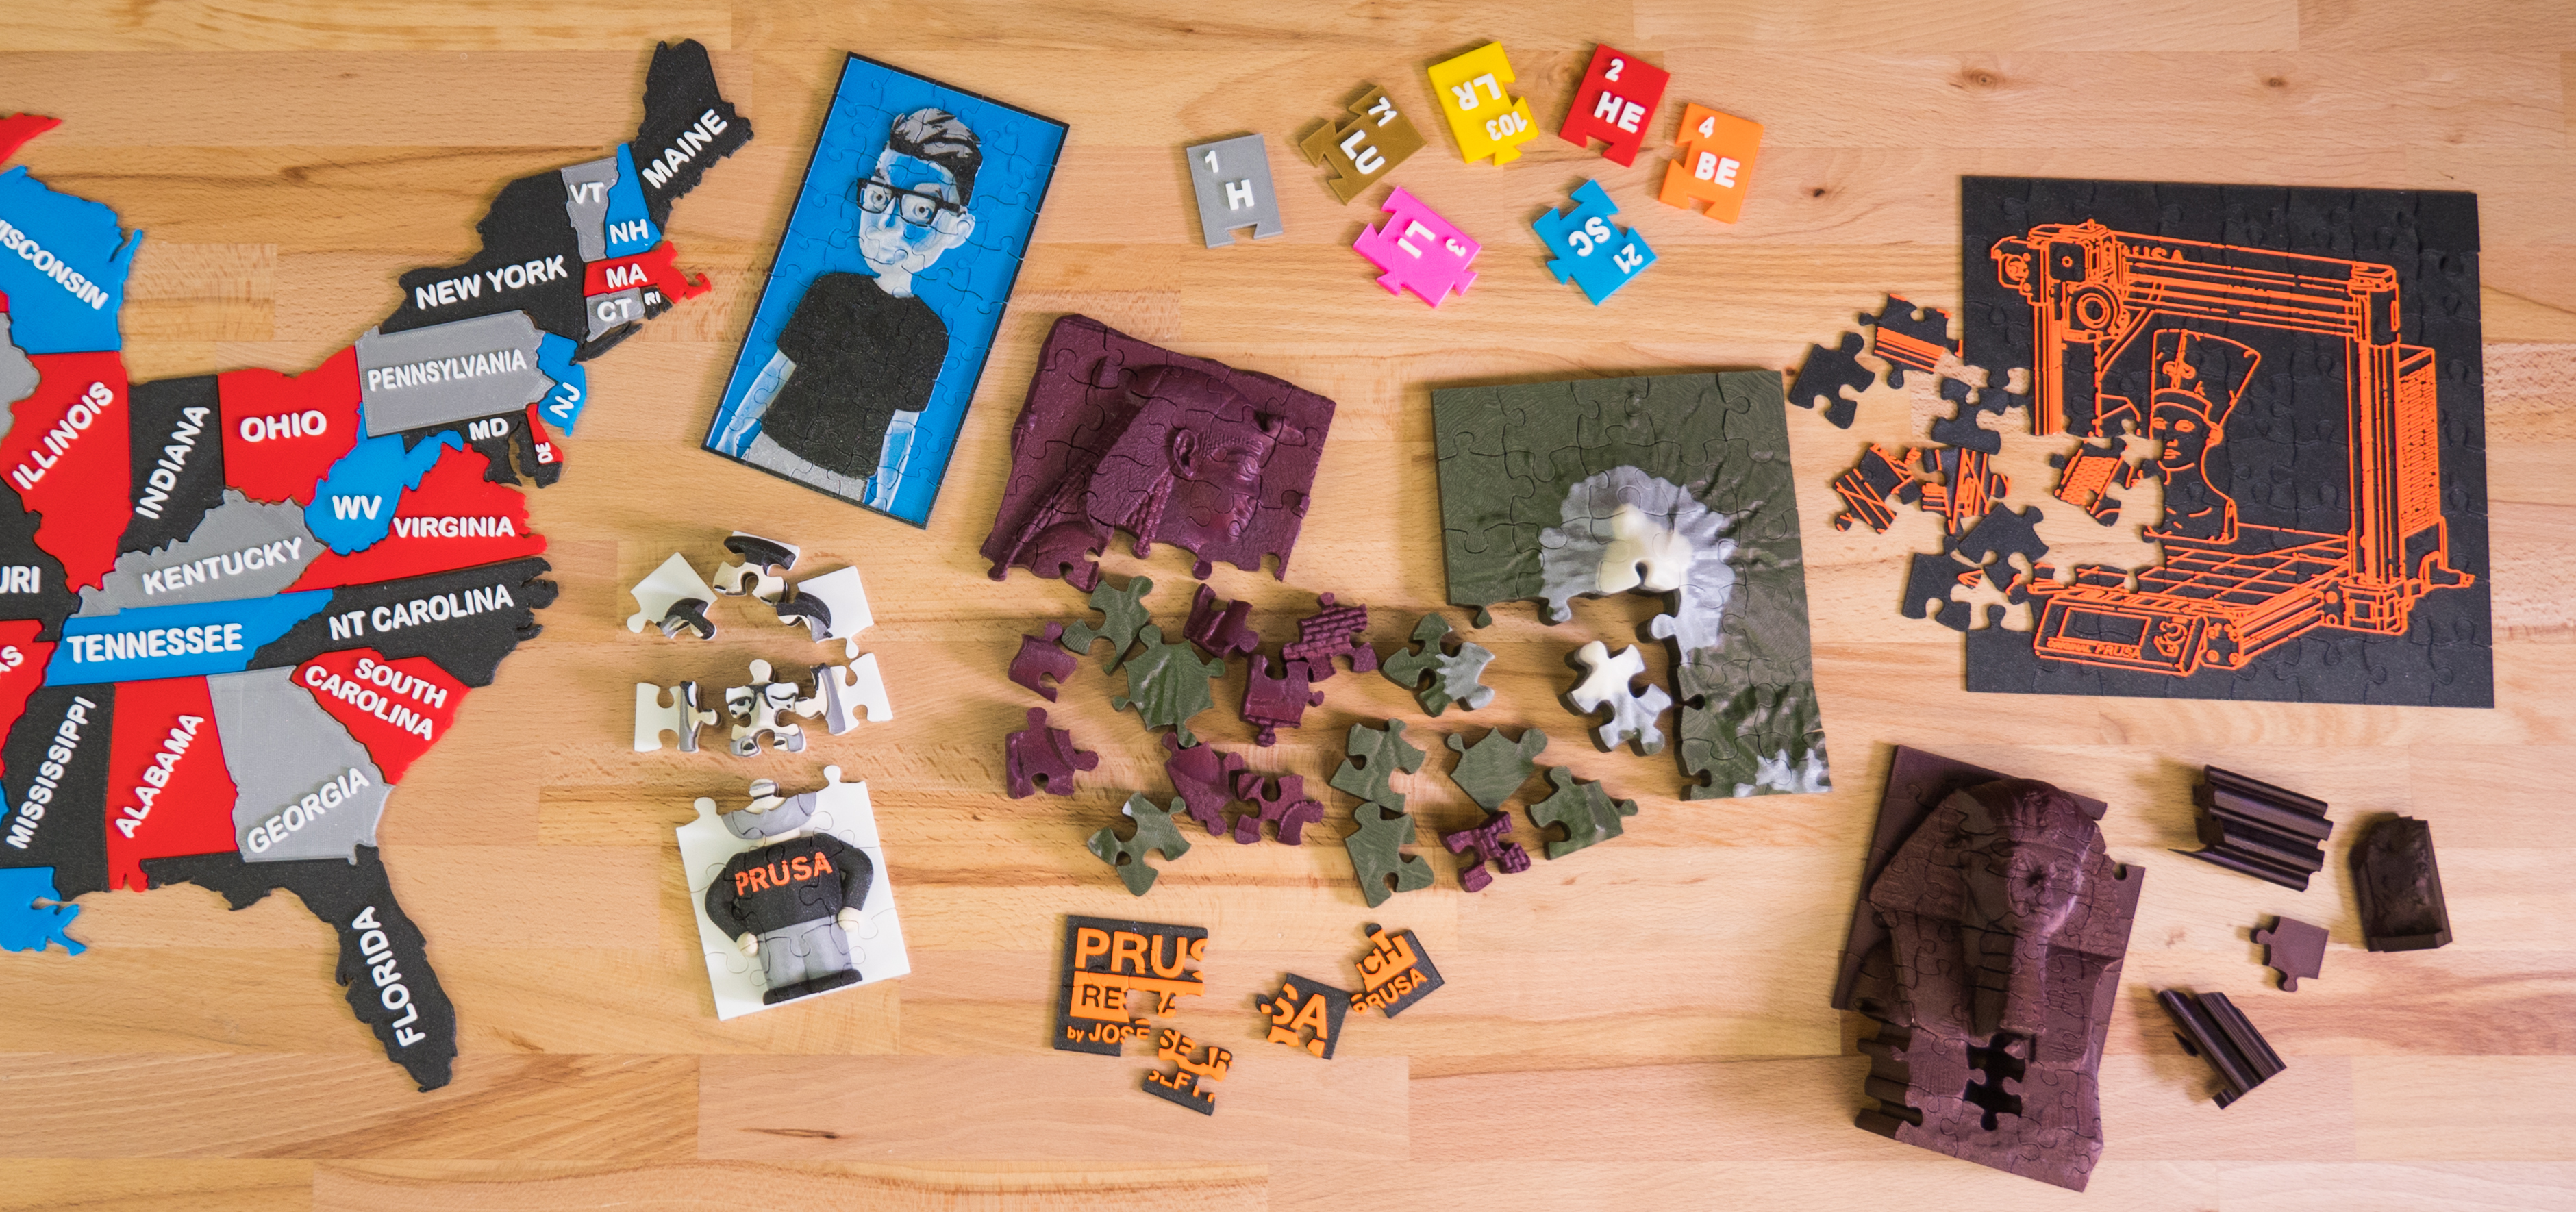
Examples of our 3D puzzles
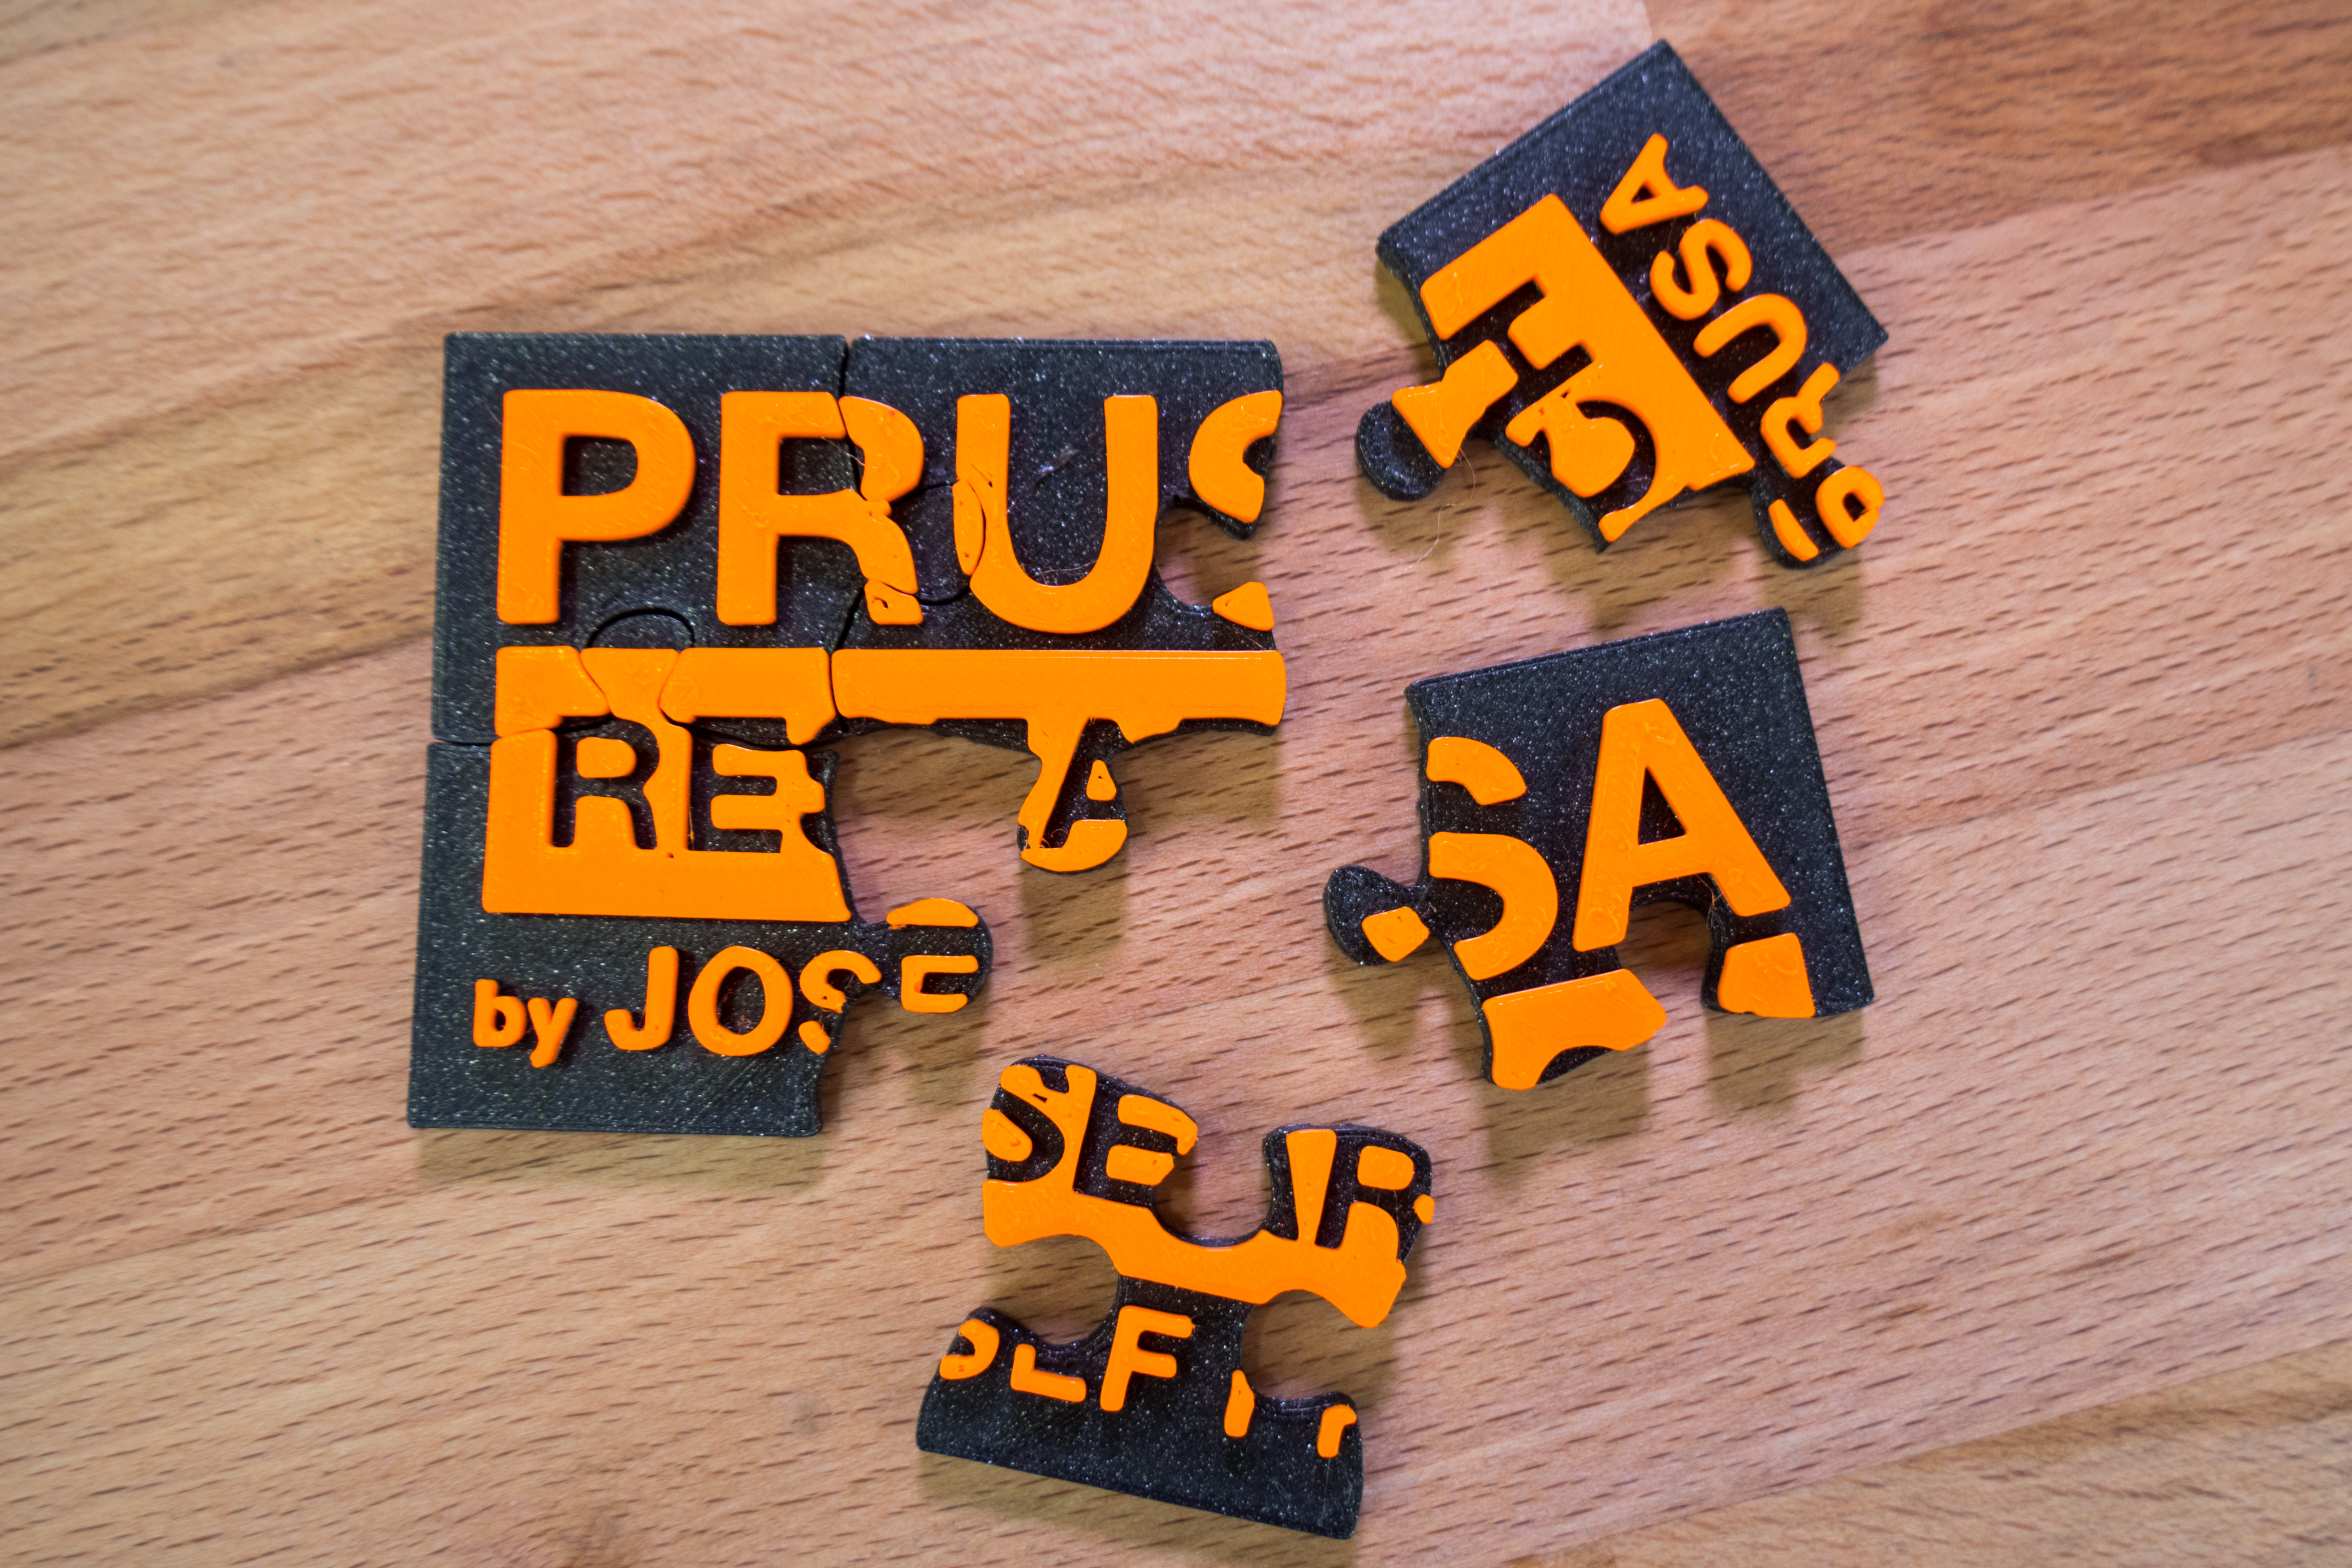
PRUSA RESEARCH logo
The source model was generated from an SVG file using the Tinkercad tool. The color change was added in Slic3r PE. STL, G-code and 3MF files are available at prusaprinters.org
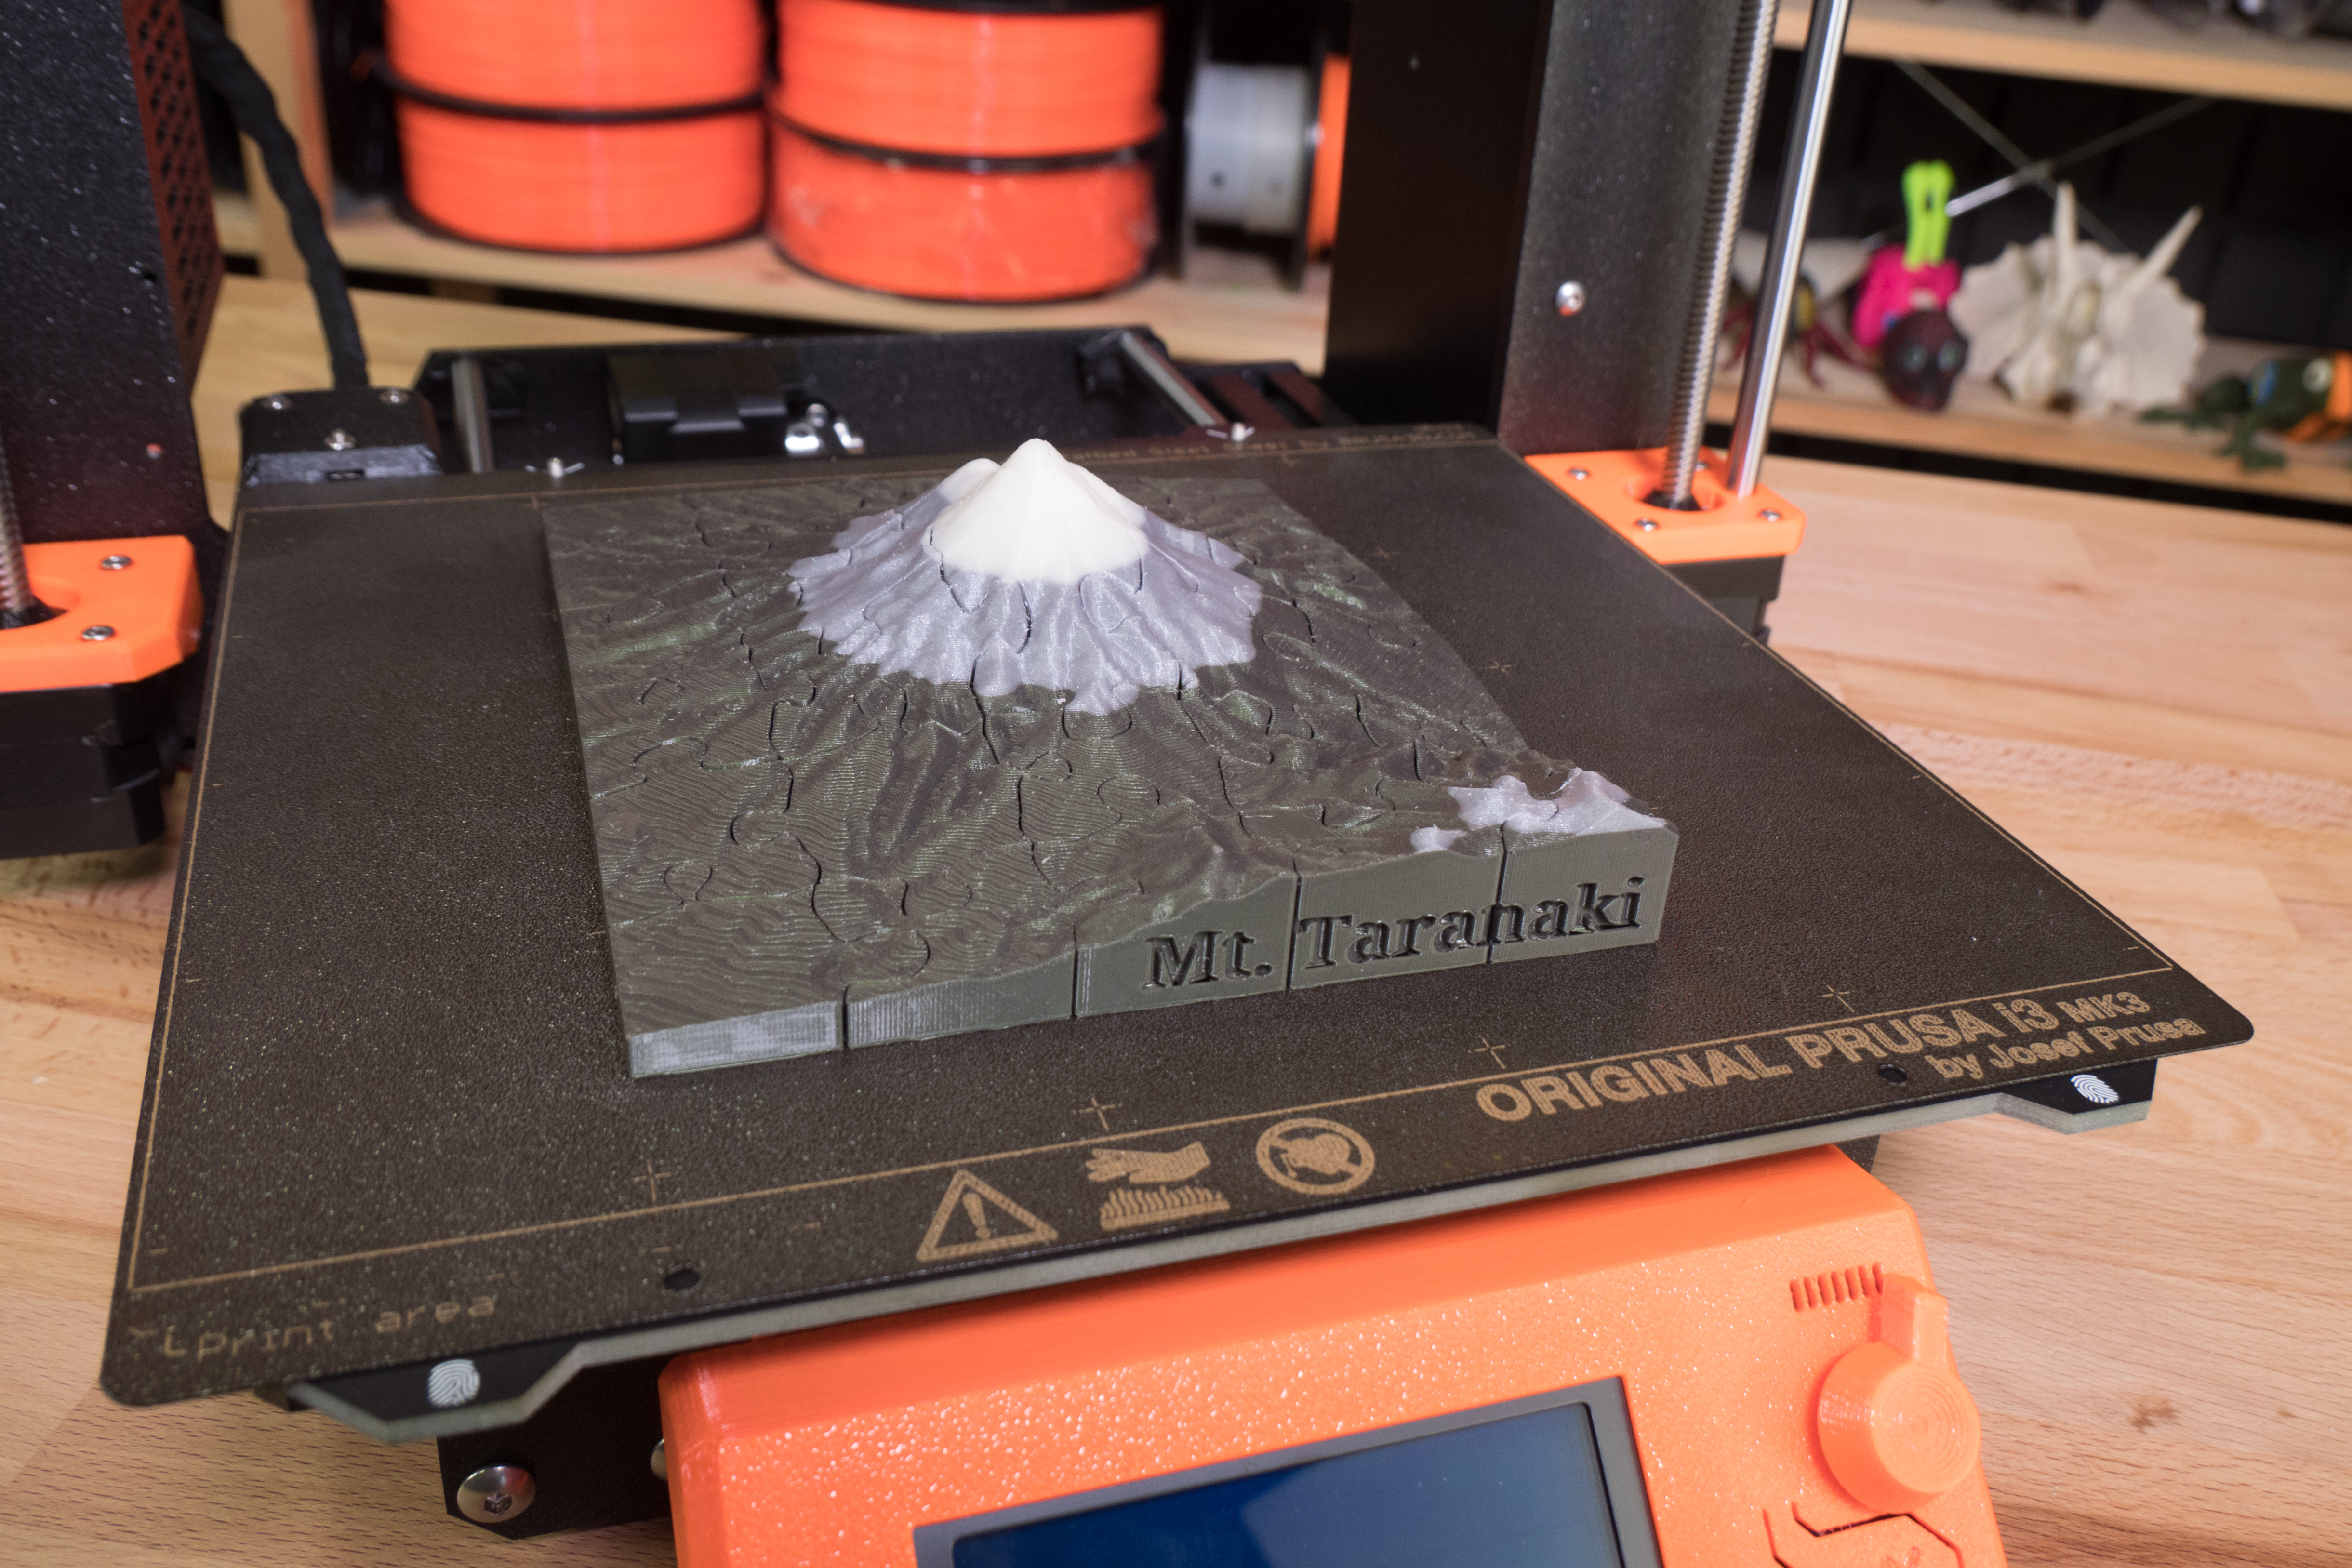
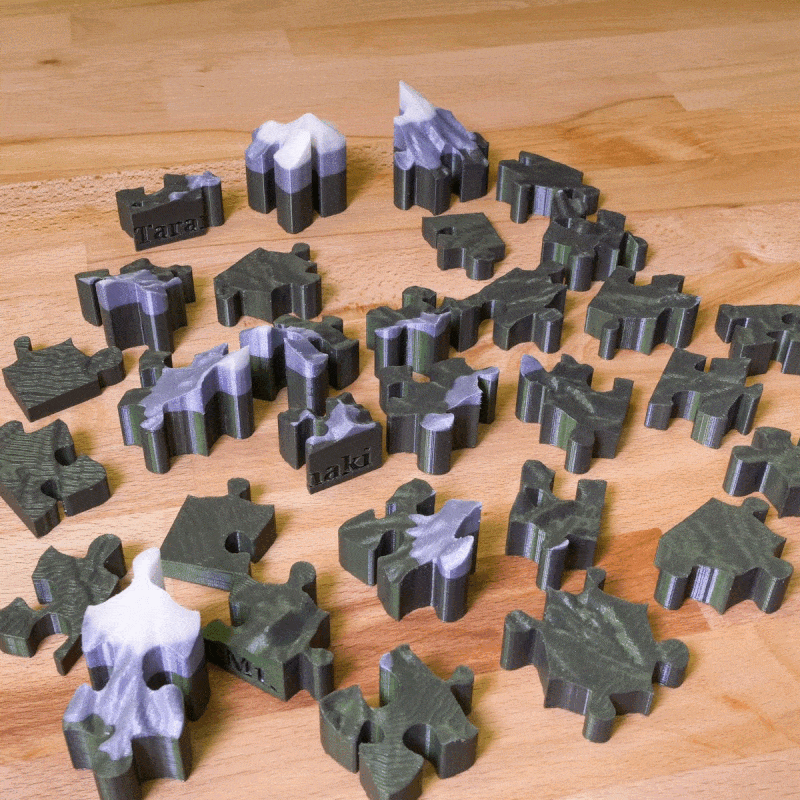
Mount Taranaki (New Zealand)
The terrain map was generated as described in the article How to print maps, terrains and landscapes on a 3D printer. Sign “Mt. Taranaki ” was created in the Tinkercad tool and exported as an STL file. Subsequently, this STL file was used in Slic3r PE as a terrain modifier with settings: 0% fill, 0 perimeter, 0 top and bottom layers. The color change was added in Slic3r PE. Download STL, G-code and 3MF files at prusaprinters.org
Filaments: Prusament Premium PLA Mystic Green, Prusament PLA Galaxy Silver, Prusament PLA Vanilla White.
Josef Prusa Figure
We said that it is possible to use almost any 3D model. We have also attempted to turn our favorite Josef Prusa Figure into a puzzle – and even as a multimaterial print. The figure is placed on its back and the lower half is cut off (use the “Cut” tool in Slic3r PE). Then the elementary slab object is added as the base (right-click on the model -> Add part -> Slab). G-code and 3MF are available at prusaprinters.org


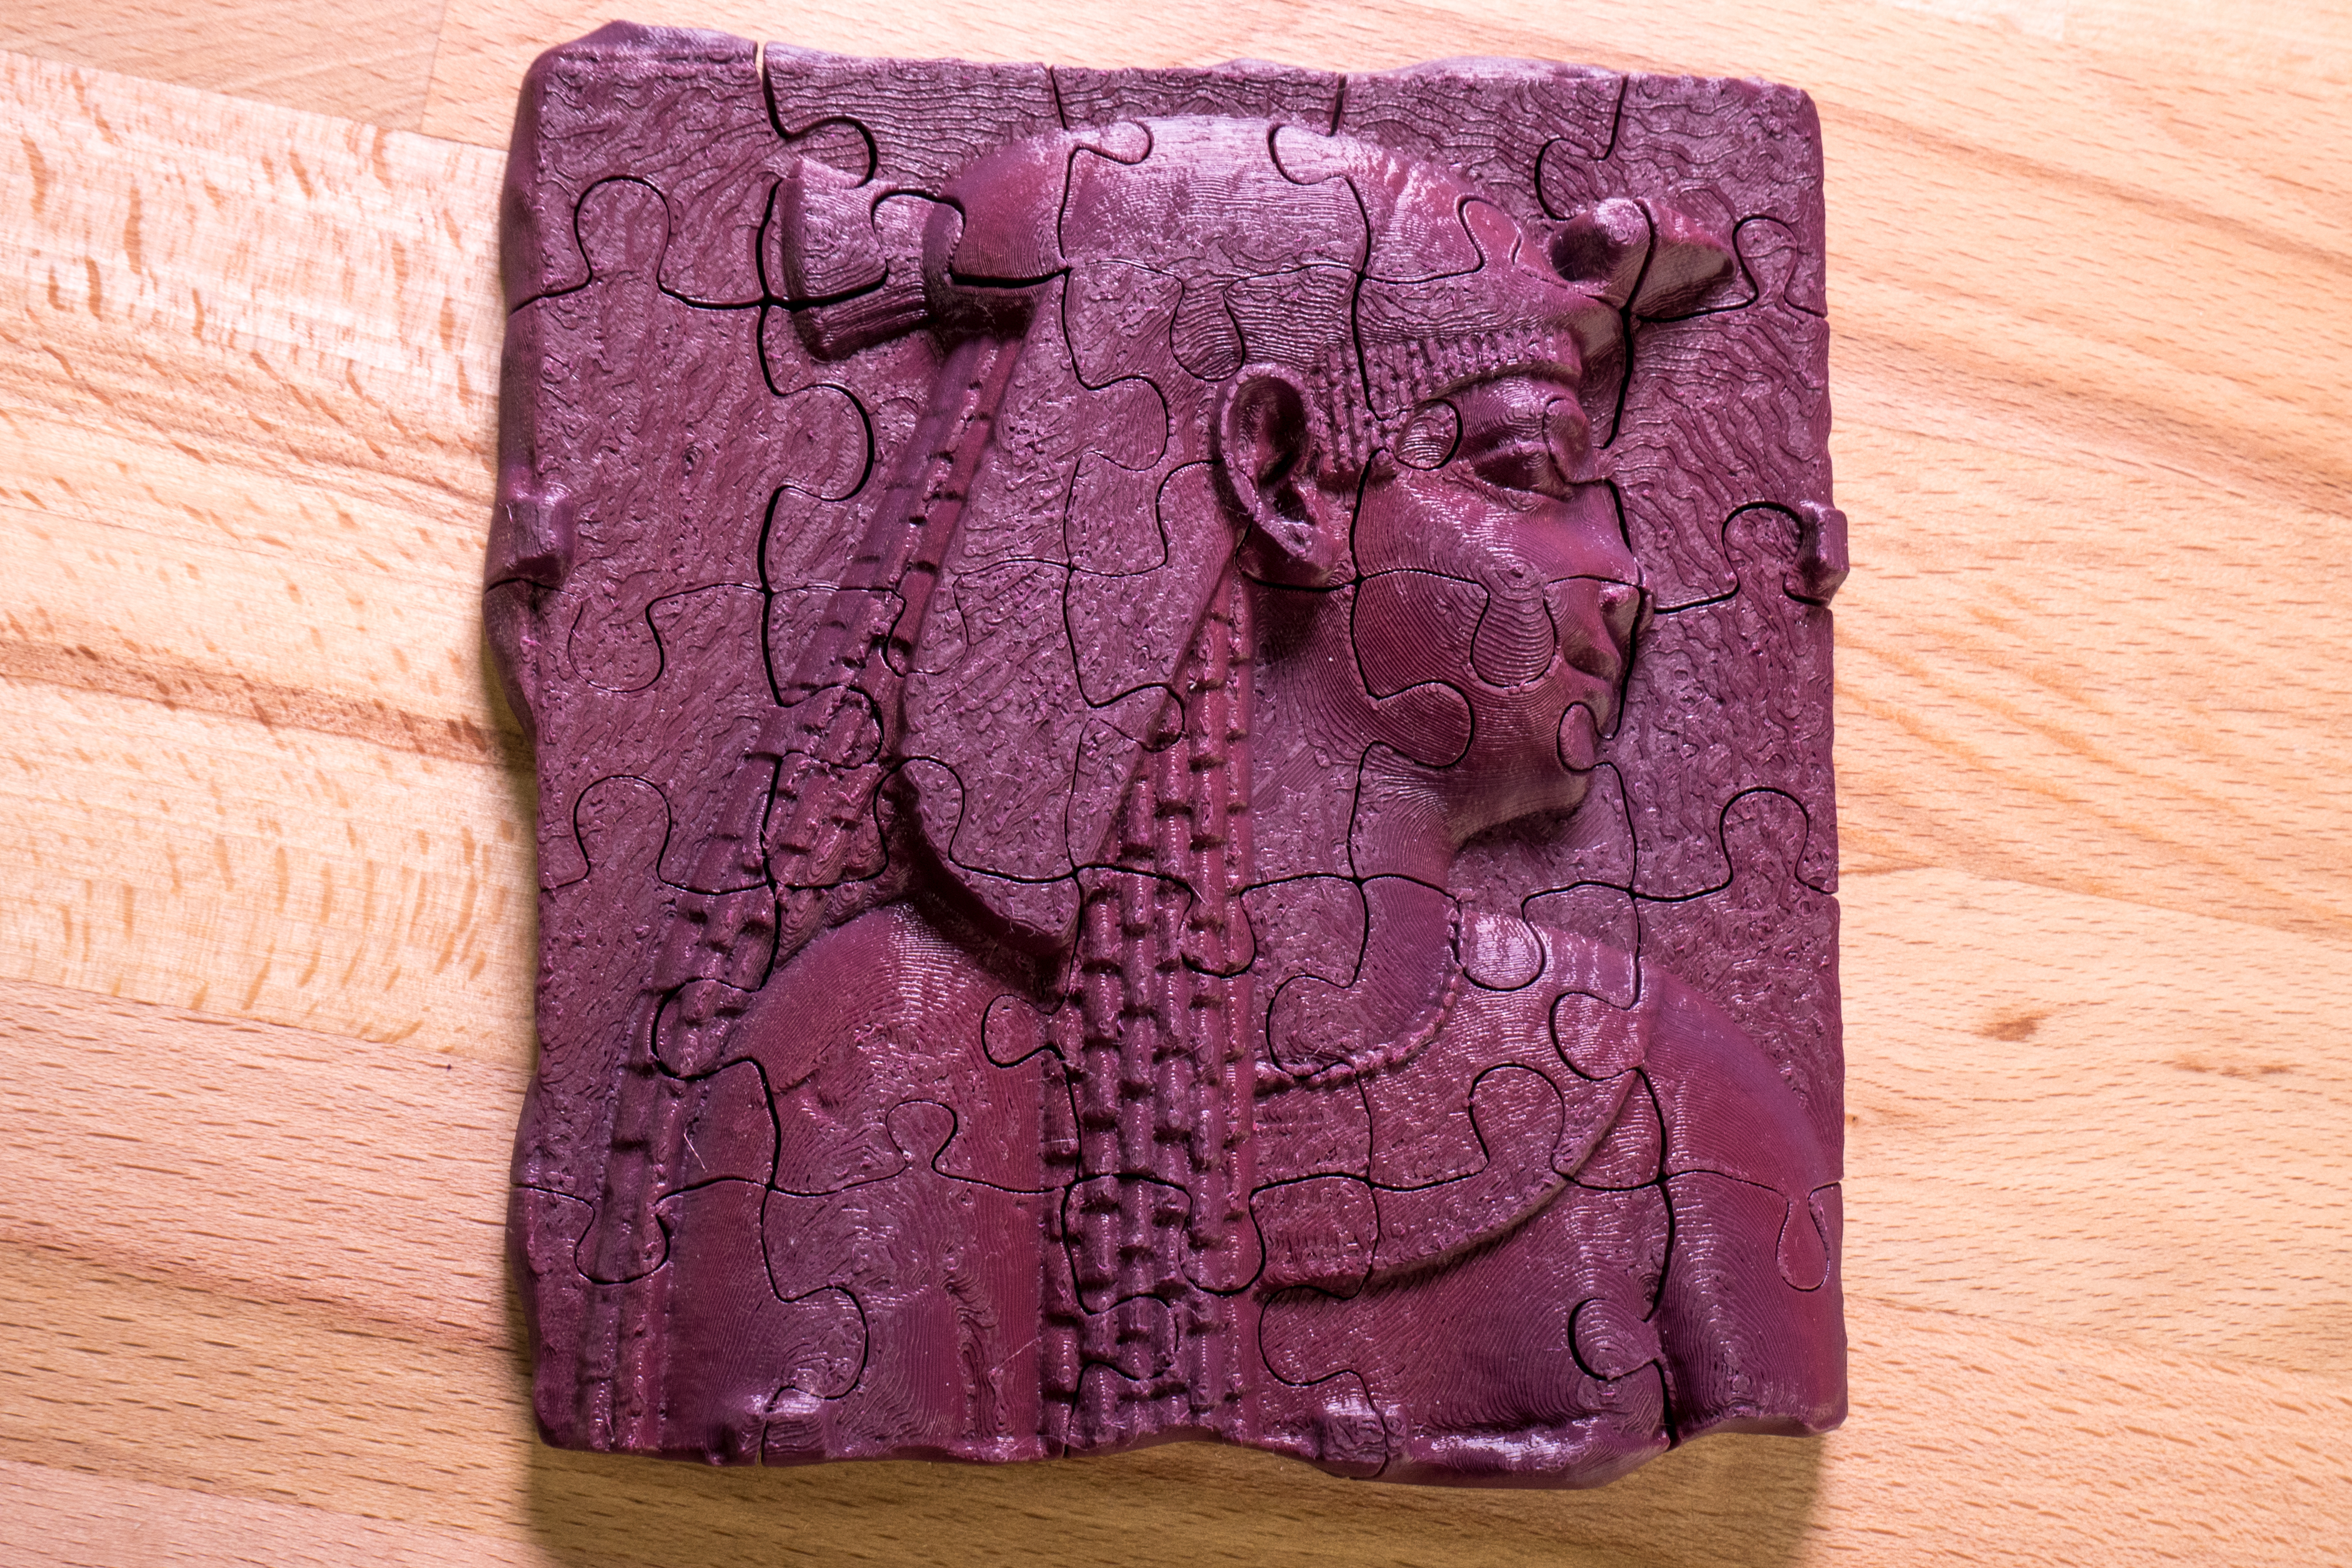
Relief Plaque
The source file is a relief plaque from Thingiverse. To make the model more plastic, it was scaled up in the Z-axis direction. G-code and 3MF are available at prusaprinters.org
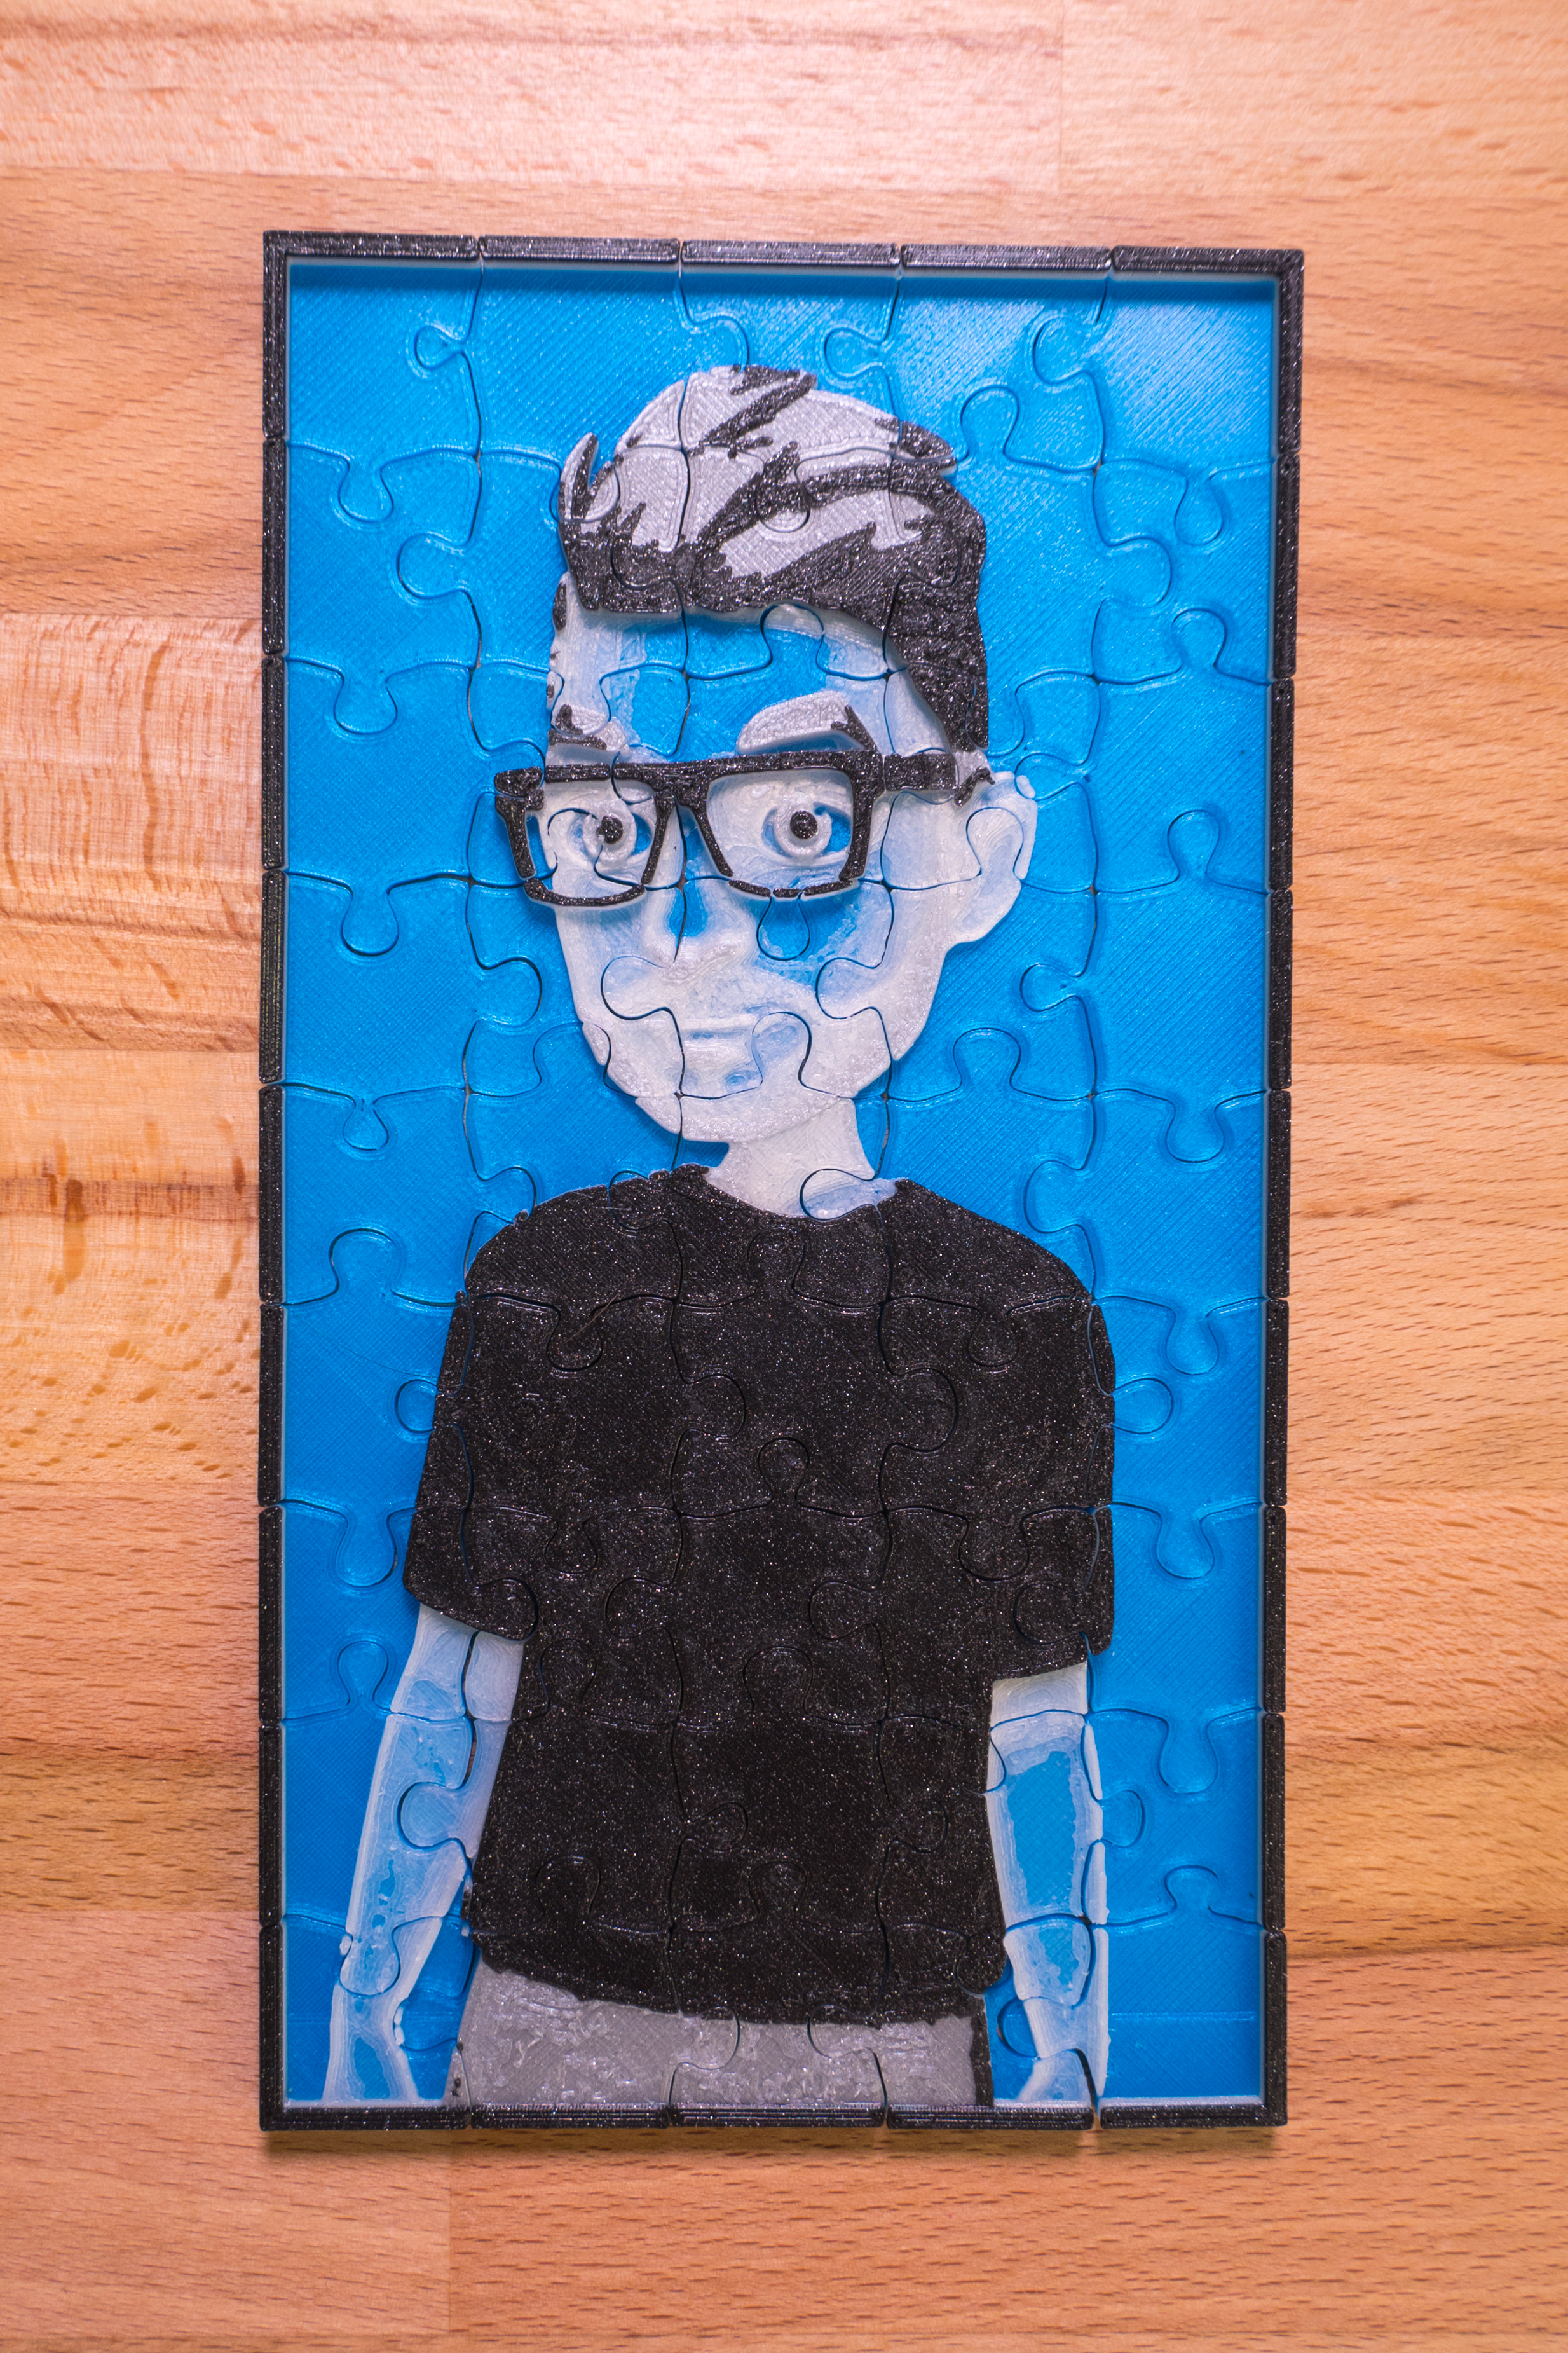
AR emoji puzzle
The only limit is your imagination. As a source file, we tried to use an AR emoji image from a mobile phone. Thanks to the pronounced edges and solid surfaces, the image can be processed as a lithophane with a satisfactory result. In the Slic3r PE, we have set up several color changes to make the character more visible. Download the model at prusaprinters.org
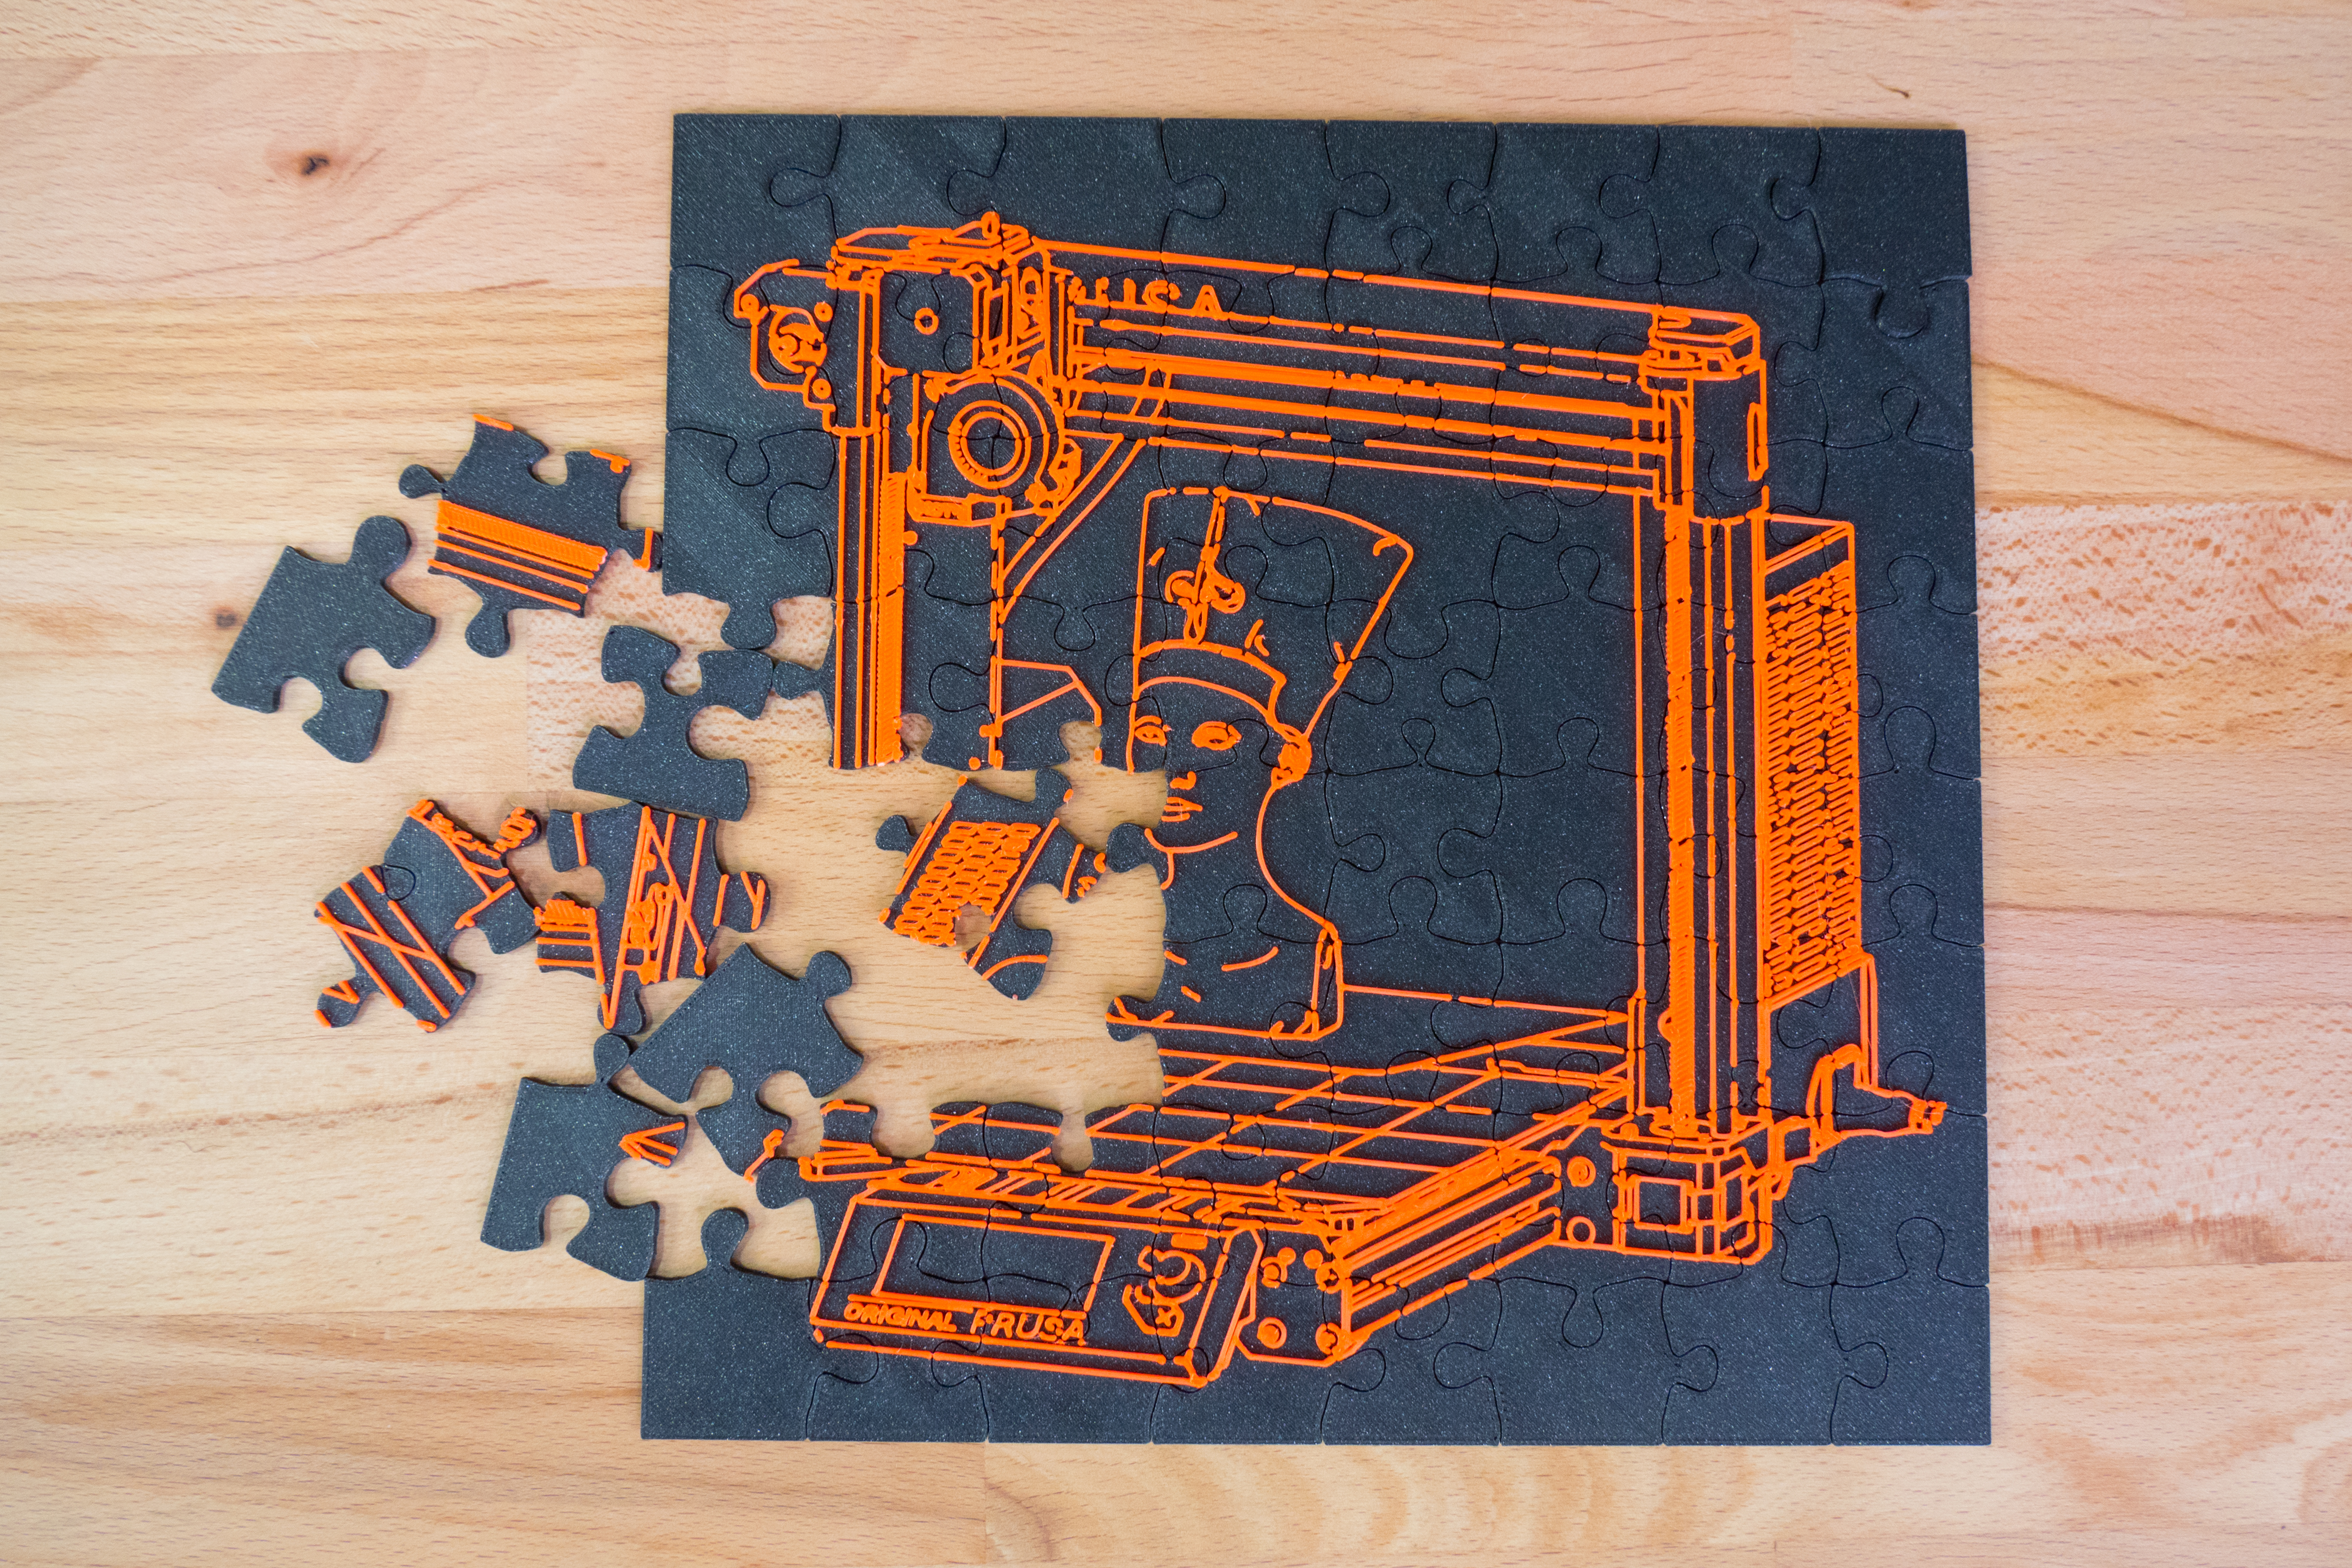
Original PRUSA i3 MK3 puzzle
Do you remember the moment when the printer was delivered to you? So maybe the picture will be familiar. We used the sketch from the Original Prusa i3 MK3 printer box to create these puzzles. Print them and try to assemble your printer in a slightly different way 😉 G-code and 3MF files are available at prusaprinters.org
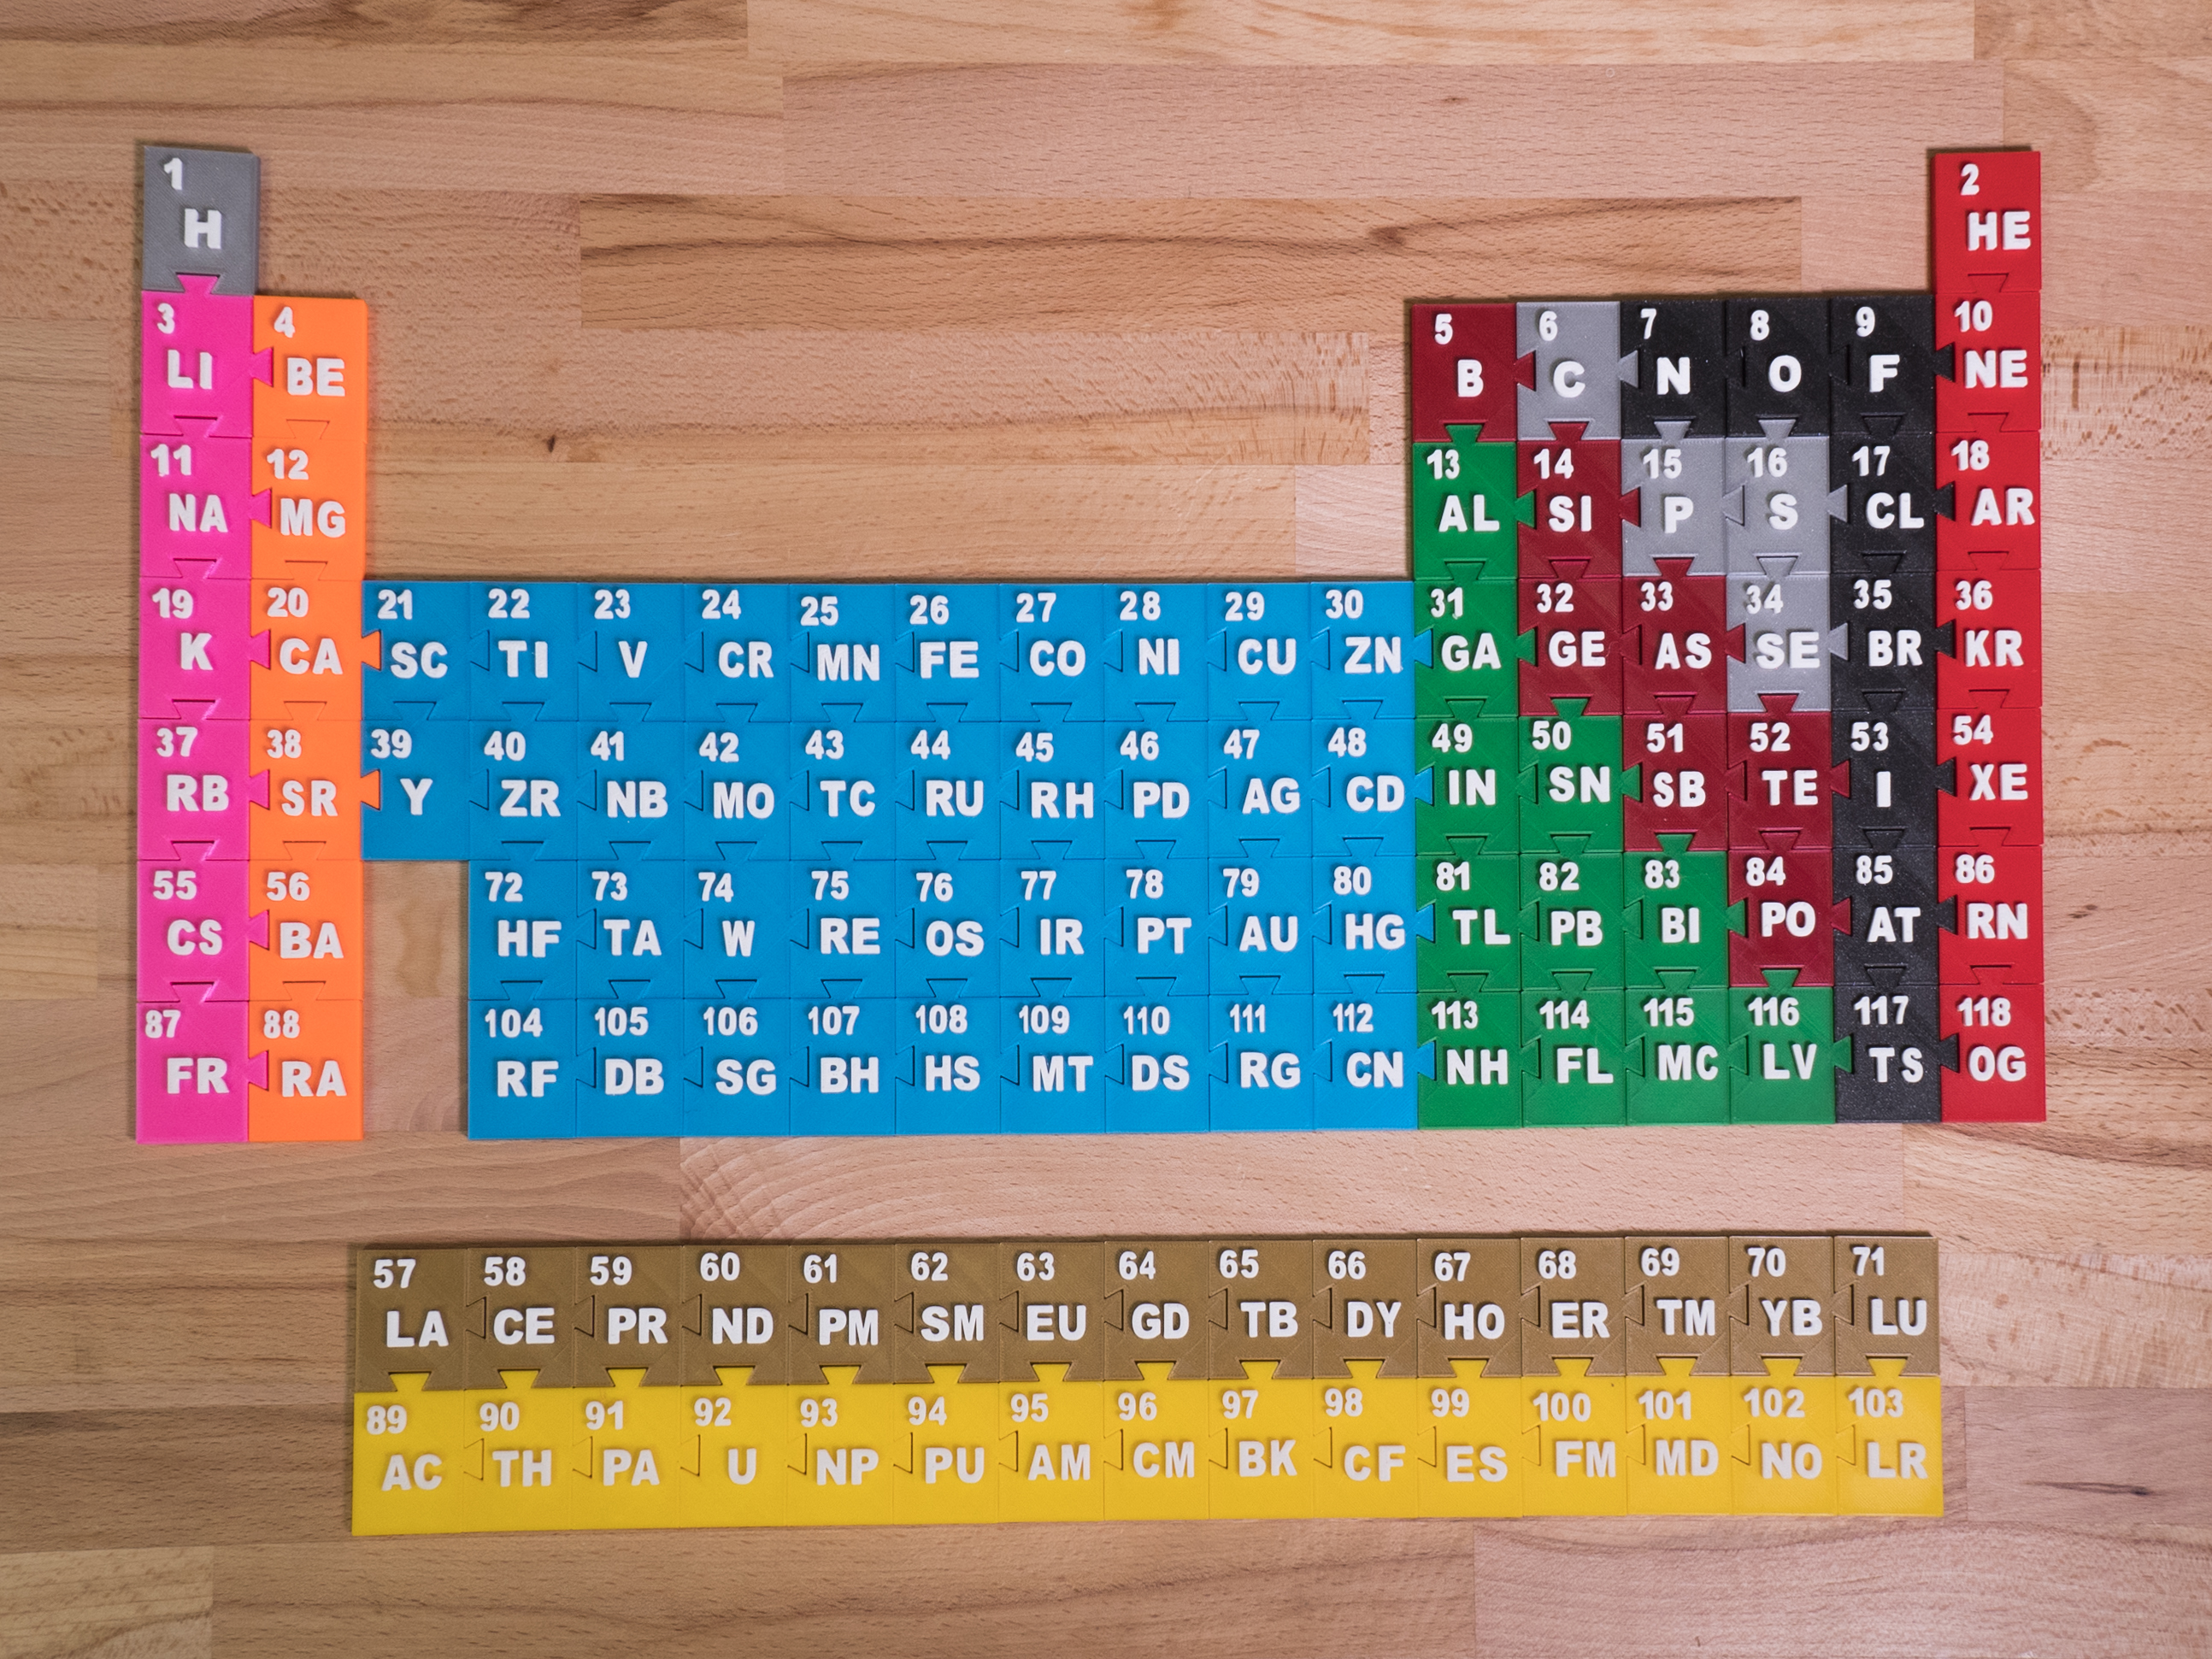
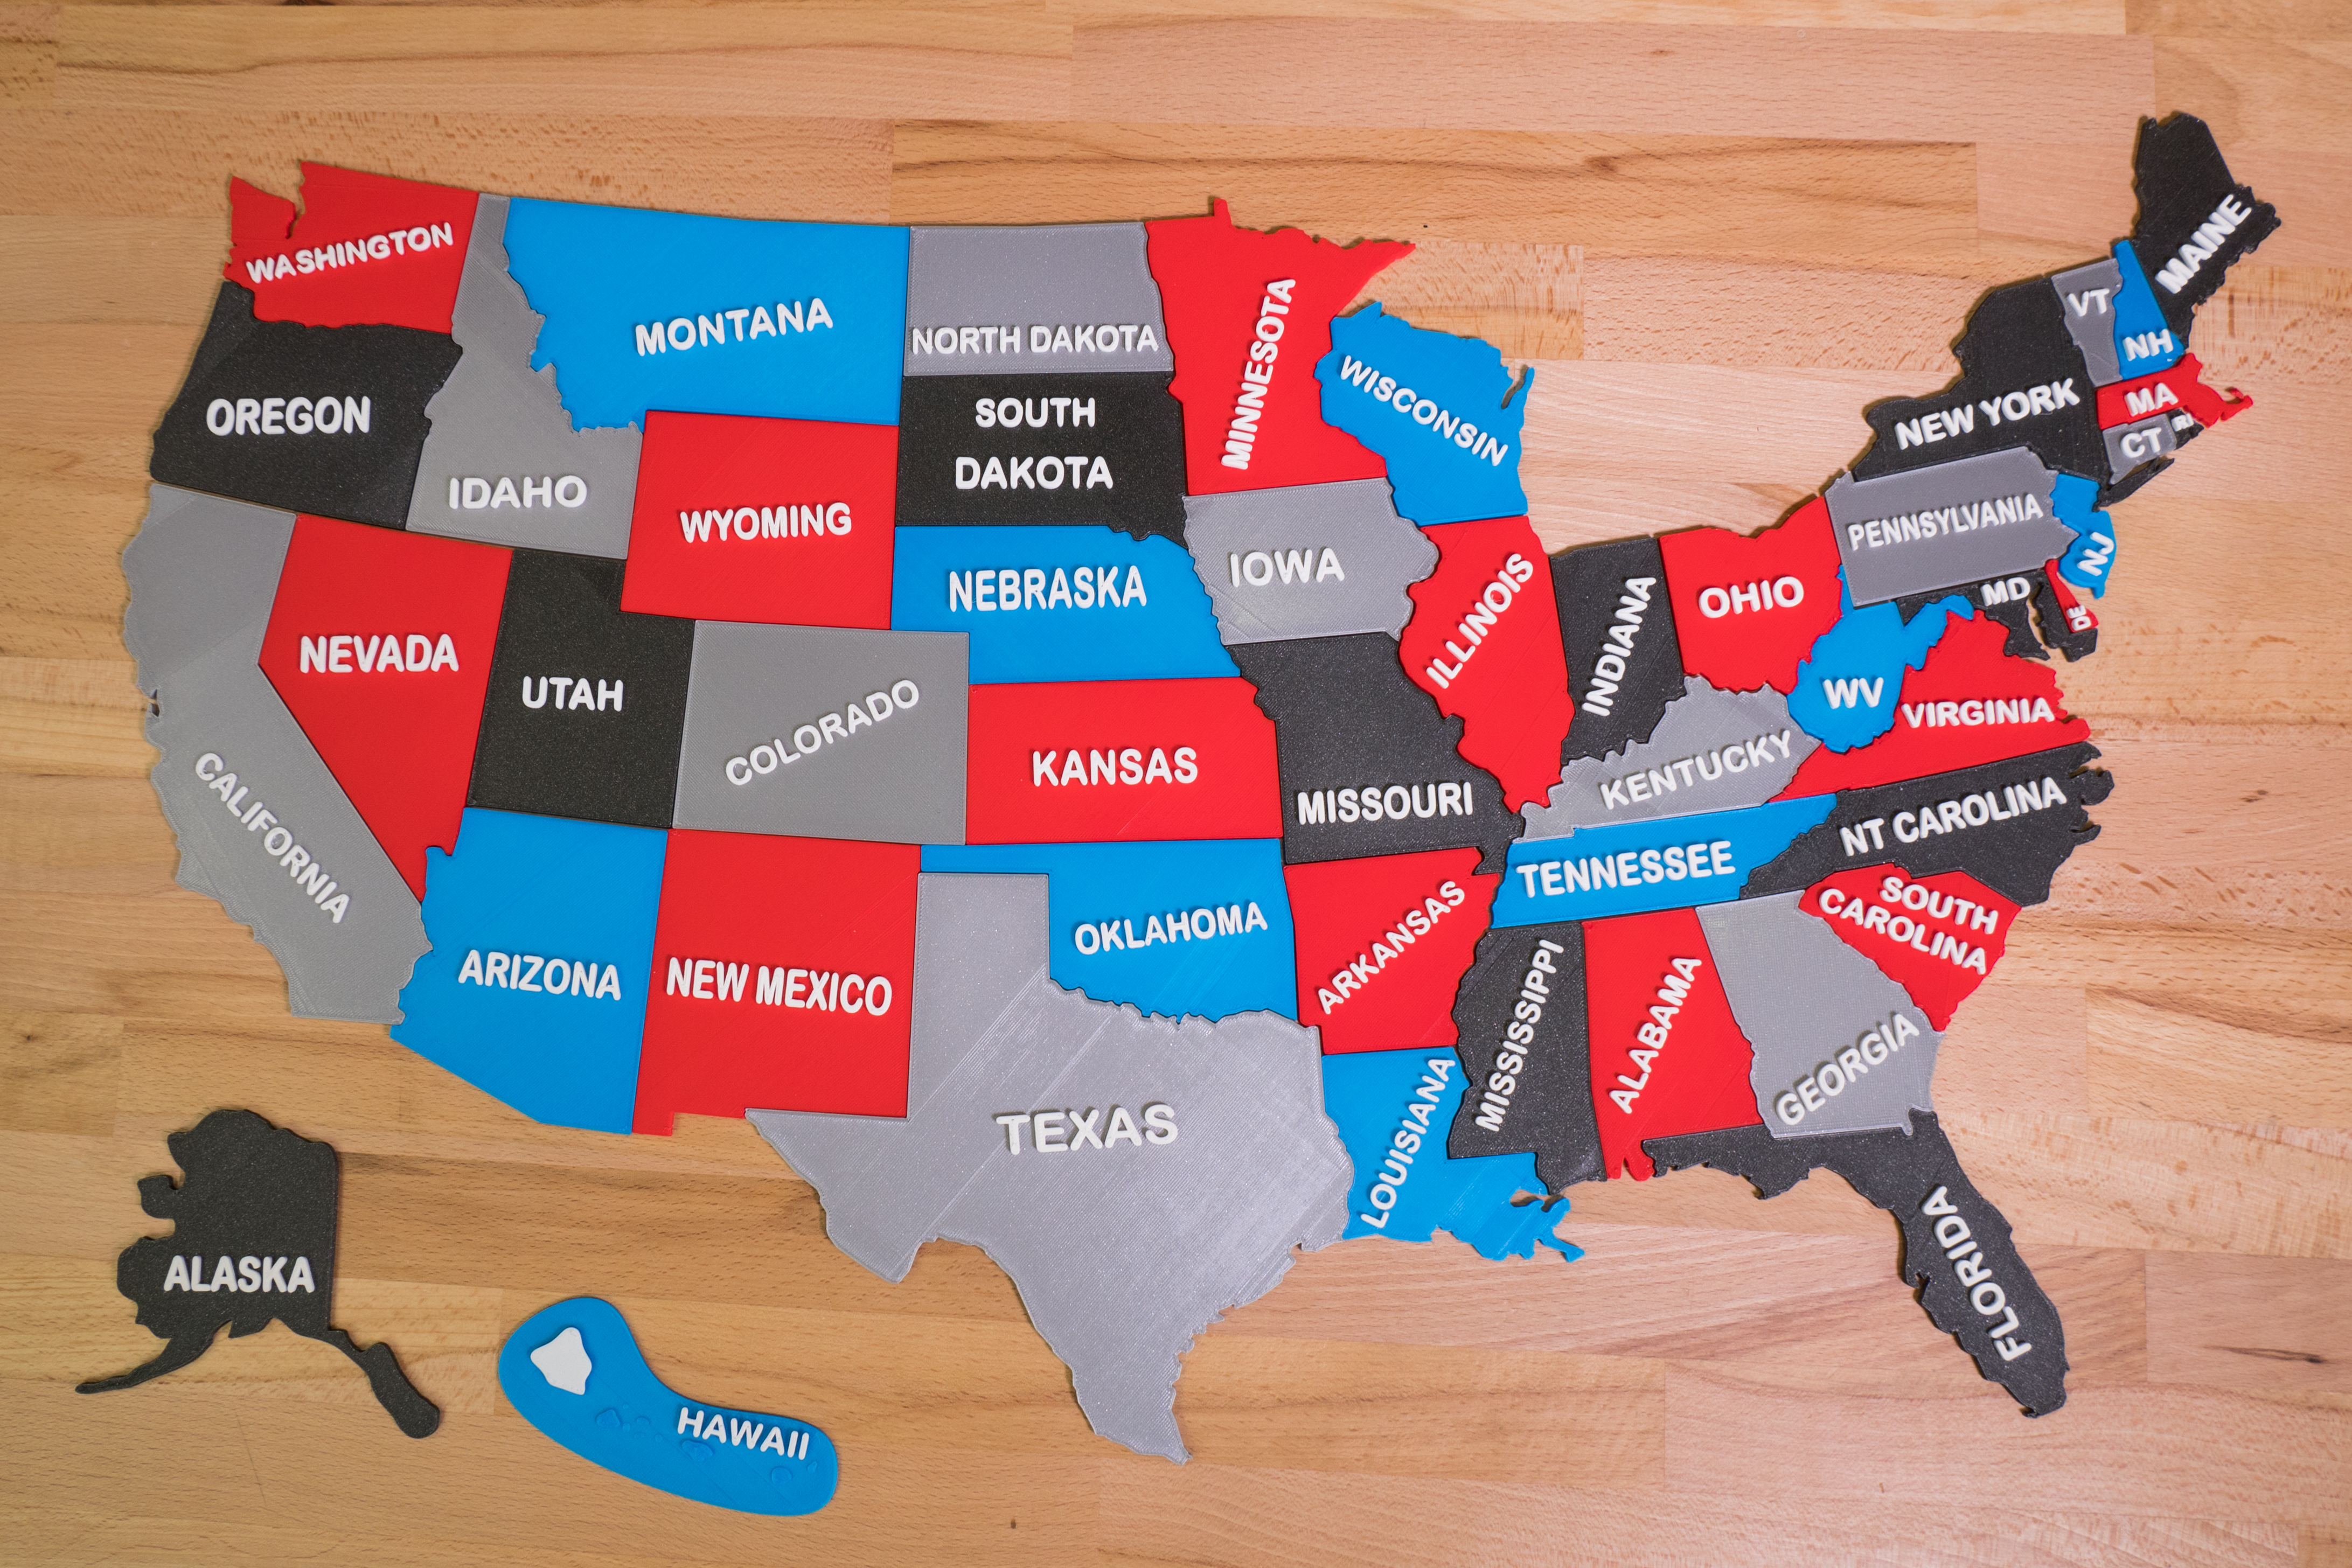
Periodic table of elements and US state map
Puzzles can also have shapes other than typical jigsaw puzzles. The US state map naturally offers to use state borders. In the periodic table of elements, each element is represented by one piece that is connected to the others by locks. For better clarity, we added color changes.
Conclusion
Creating and printing 3D puzzles is easy! It is something new and unusual. Feel free to design and print your original creations. Share the results on Facebook, on Instagram or Pinterest with the hashtag #prusai3 or on our forum. You can print 3D puzzles as a unique gift – they are great gifts suitable for people of all ages. Have fun, be creative and give it a try! 😉
Happy printing!
For everybody who think step 3 is complicated (like my wife), you can do it online now:
https://puzzlecut.cube4fun.net
Generation of the STL file takes couple minutes and it’s limited to 3 slots. So please be patient 🙂
Maybe I’m overlooking something simple, but how can one get some nice border cut pieces for the maps? It’s referred to, then had a link to the USA map, but no reference on how to do a custom map.
Thanks
Instructions on how the US map was created is available from the author of this model. You can find it as a PDF file (USA states, 3d puzzle, study plan.pdf) in ZIP file along with STL files. ZIP file can be downloaded here: https://pinshape.com/items/40388-3d-printed-usa-states-3d-puzzle-study-plan
Anyone who thinks that making the rubik’s cube is difficult can visit that page that explain how to resolve the rubik’s cube puzzle.
Page:https://www.cubosderubik.org/
Has anyone figured out how to avoid extremely narrow or cross-over! thin parts in the puzzle? Specifically it would be nice to specify the minimum distance in X & Y dimensions of any “neck” in the puzzle. I end up with “necks” that are 1~2 mm thick which simply won’t hold up in puzzle usage (certainly won’t hold up with kids).
I’m having to run the generator 4+ time, fiddle with puzzle dimensions, enlarge the STL in the slicer, and other tricks to get acceptable “necks”.
Hoping others can share how they solved this problem.
I’m overlooking something simple haha
<a href="https://basketball-stars.io">basketball stars</a>
Yes yes, if you want to create puzzles with 50 parts this works…. But guess what doesn´t work, an actual puzzle. I mean, what is the point in that scad file if it can´t even handle 150 pieces!? and a dimension bigger than 30cm!?
For real, don´t trick ppl into thinking that this is working as an actual jigsaw puzzle maker, its not, and the algo you created can´t handle any real puzzle idea.
So maybe call it child jigsaw puzzle creator witt not more than 50 pieces.