


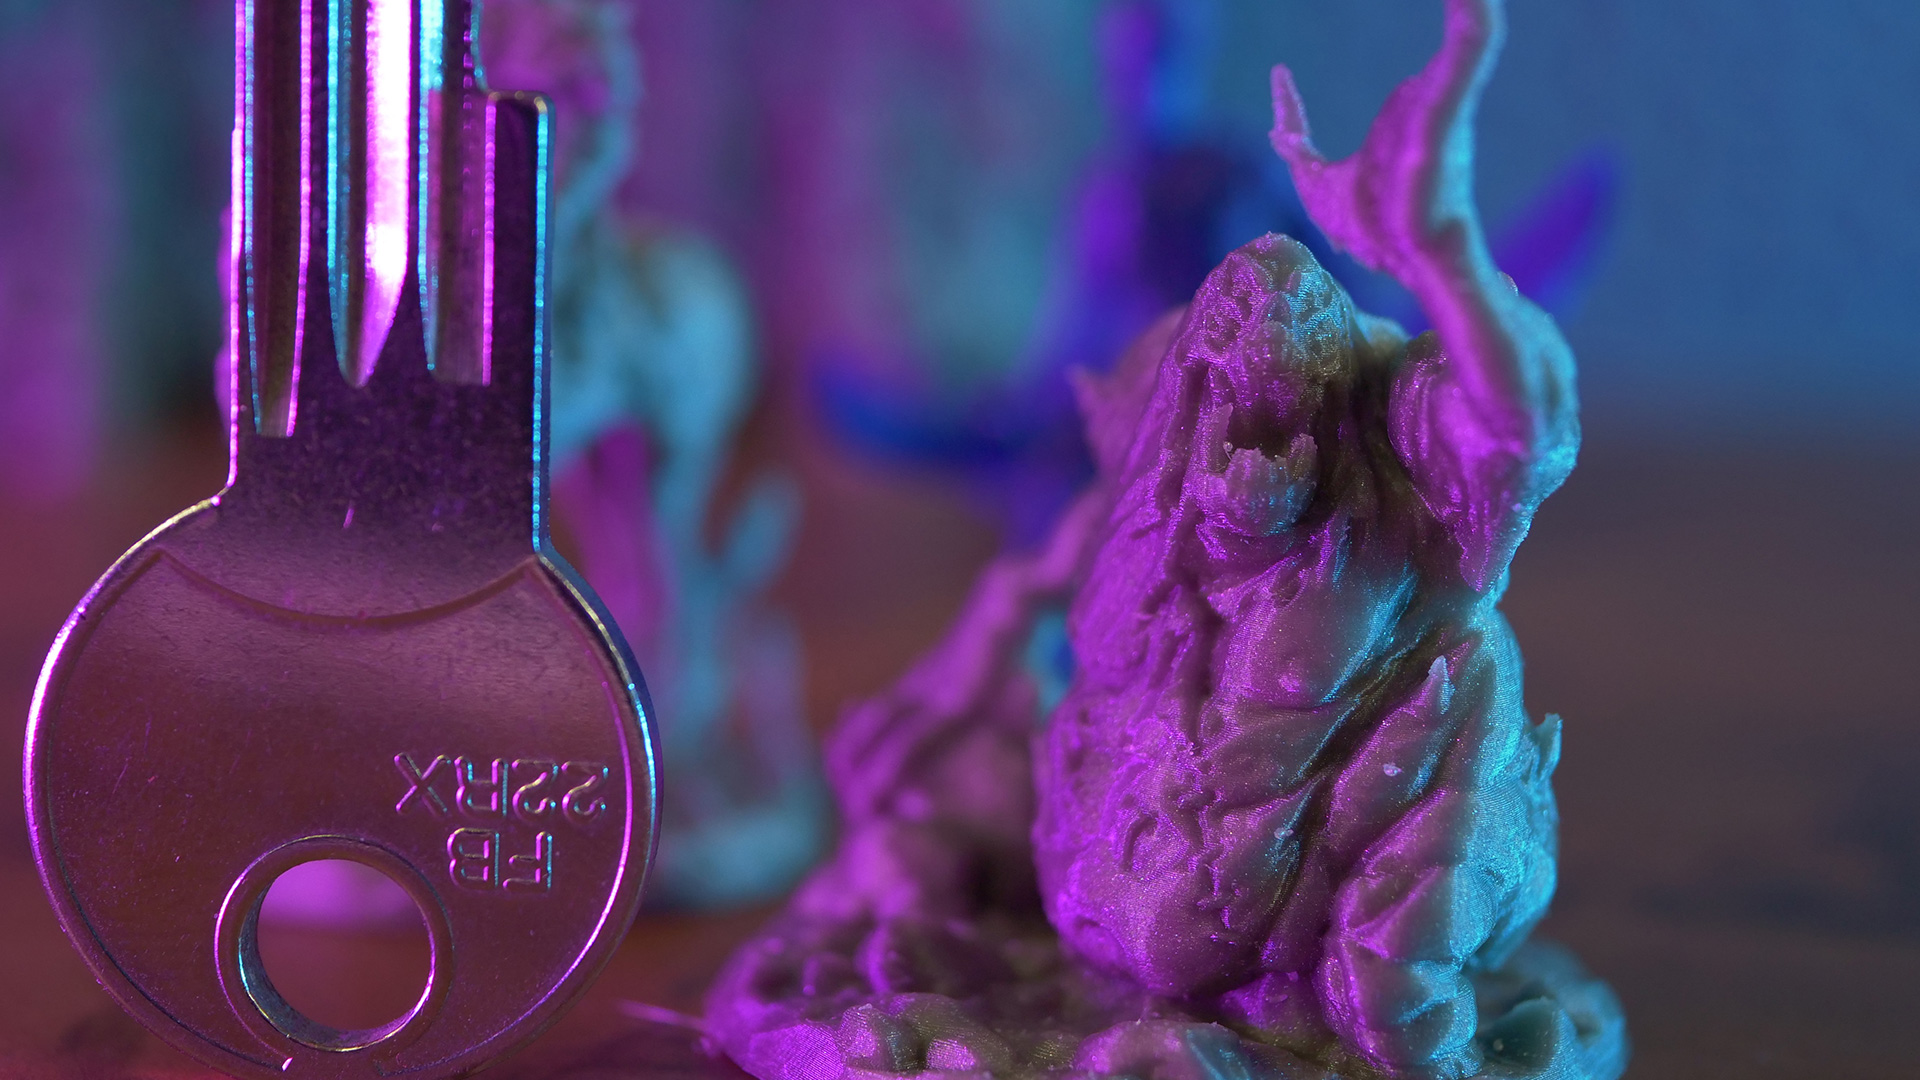
Our new Original Prusa MINI 3D printer may be small, but it’s capable of doing some great things. And tiny things, too! Miniatures for tabletop games present a good challenge. These figures are small and richly detailed, so many users prefer to get an SLA 3D printer. However, it’s possible to produce incredibly convincing results even with the stock MINI – with one tiny addition: a 0.25mm nozzle. So let’s take a look at how you can spice up your next Dungeons and Dragons session!
In other words: what we’re looking at here is the general idea of producing tiny figures or tabletop game accessories on hobby-grade 3D printers. Characters usually come in two sizes – 28 and 32 mm (more about this later), which is just a hair over one inch – pretty small then. Luckily, there are some tricks which will help you to produce great-looking results. Needless to say, this process will also work with the MK3S/MK2.5S 3D printers. There are downsides, though. Be prepared for long prints – one figure can take up to 2-3 hours depending on the size and volume of supports.
Swap the nozzle!
Swapping the nozzle is the first key task on the list. The nozzle on the MINI is easily accessible and replacing the default 0.4mm one with a 0.25mm model takes roughly two minutes and will set you back about 12 USD. The process is described in detail in the handbook, so here’s just a quick recap.
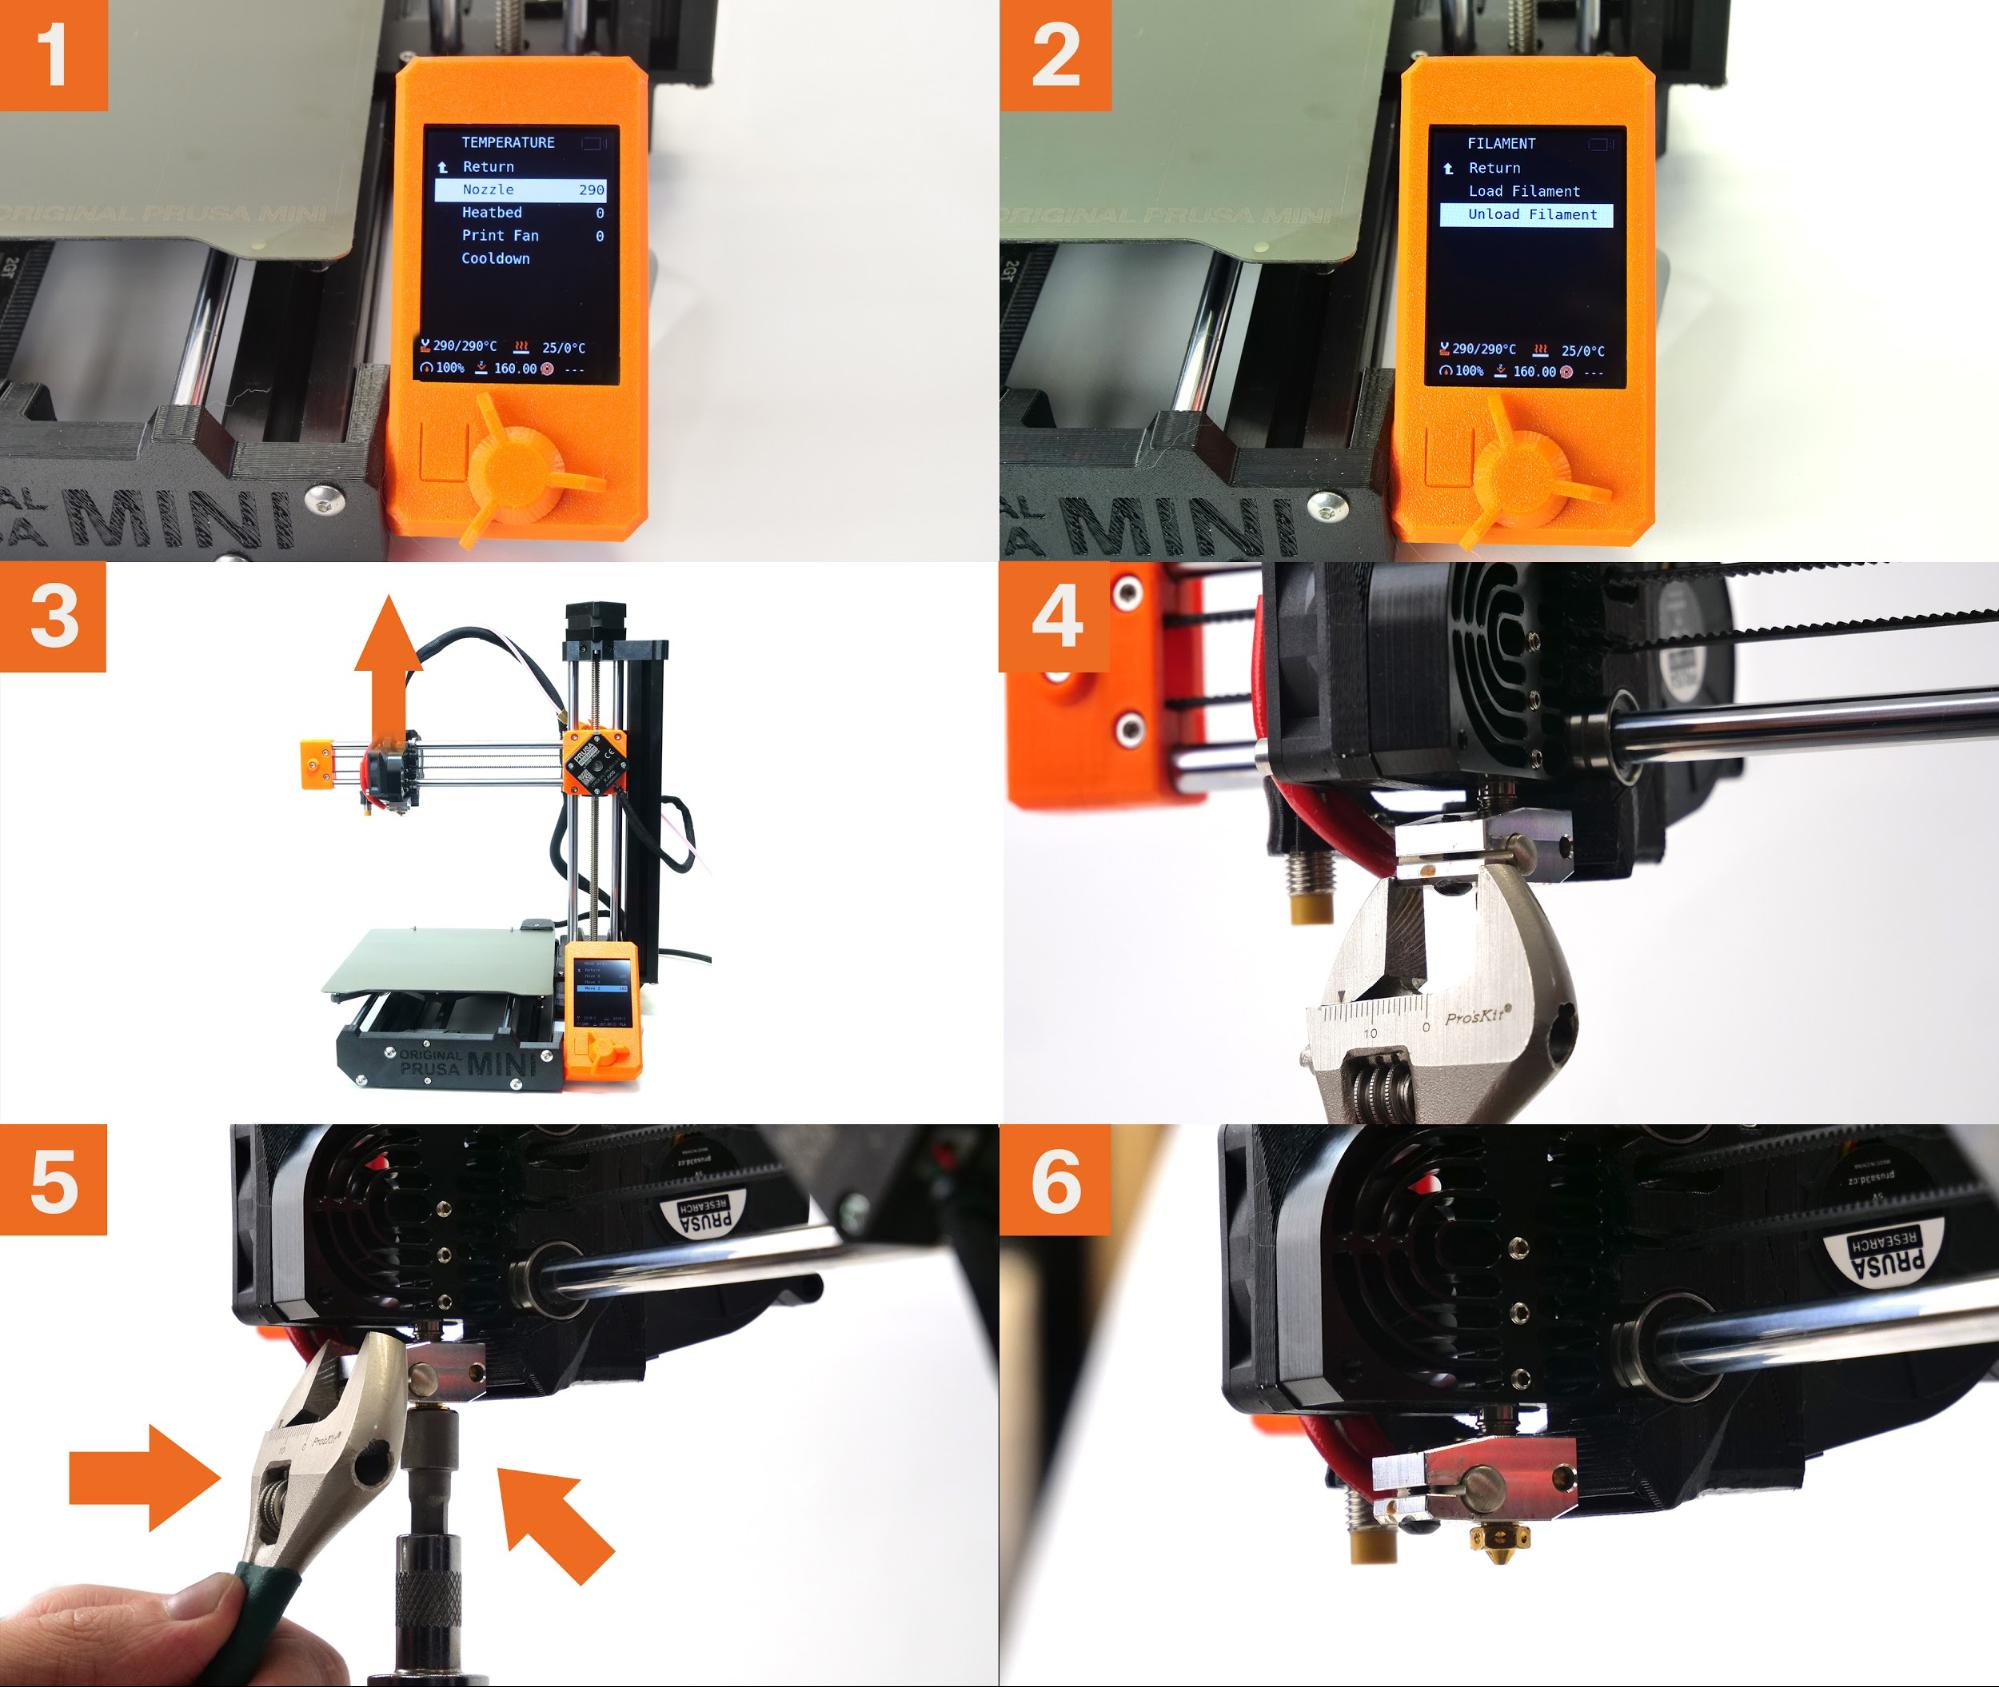
You will need:
- 16mm spanner or adjustable wrench (a good set of pliers is an option, too)
- 7mm socket wrench (or a second set of pliers)
- E3D-compatible 0.25mm nozzle
The process is simple and doesn’t take long:
- Preheat the nozzle to 280 °C (Settings – Temperature – Nozzle)
- Unload filament (if present)
- Move the Z-axis to the top
- Hold the heater block with the spanner/wrench
- Use the 7mm socket wrench to unscrew the nozzle – WARNING: BOTH THE SOCKET WRENCH AND THE NOZZLE ARE EXTREMELY HOT!! Put the nozzle in a safe location. Do not touch the socket wrench!
- Carefully insert the 0.25mm nozzle and tighten it gently but firmly. Don’t use excessive force!
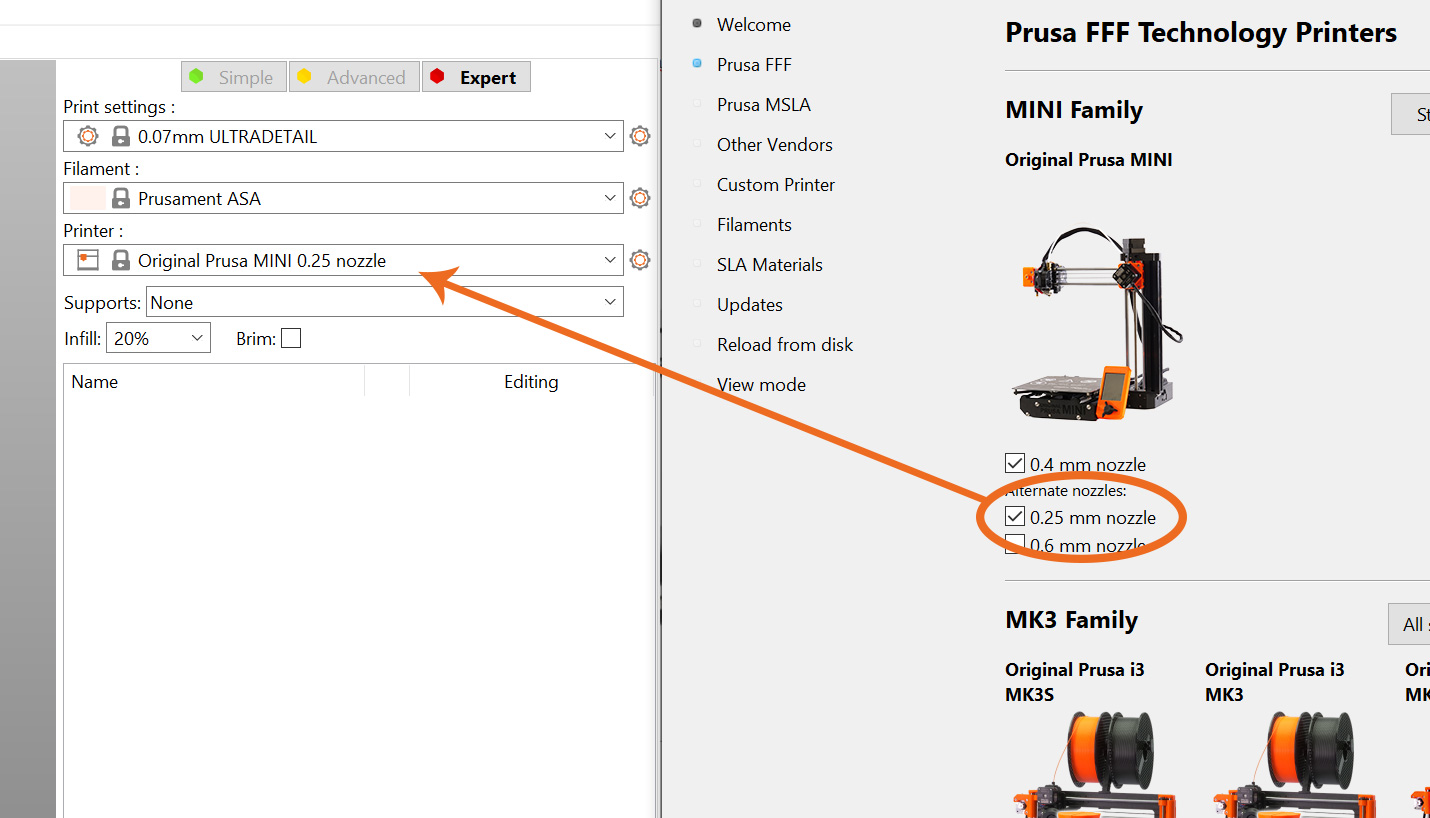
The final step is adding the corresponding profile in PrusaSlicer. Go to Configuration – Configuration Wizard – Prusa FFF and tick 0.25 mm nozzle. Don’t forget to switch to the correct printer model in the menu on the right – it should say Original Prusa MINI 0.25 nozzle.
We have covered various nozzle diameters in great detail in an older article
Before we get to slicing, it’s important to select the right material first. It might come as a surprise to you, but we achieved really good results with ASA. Let’s take a closer look!
Choosing the right materials
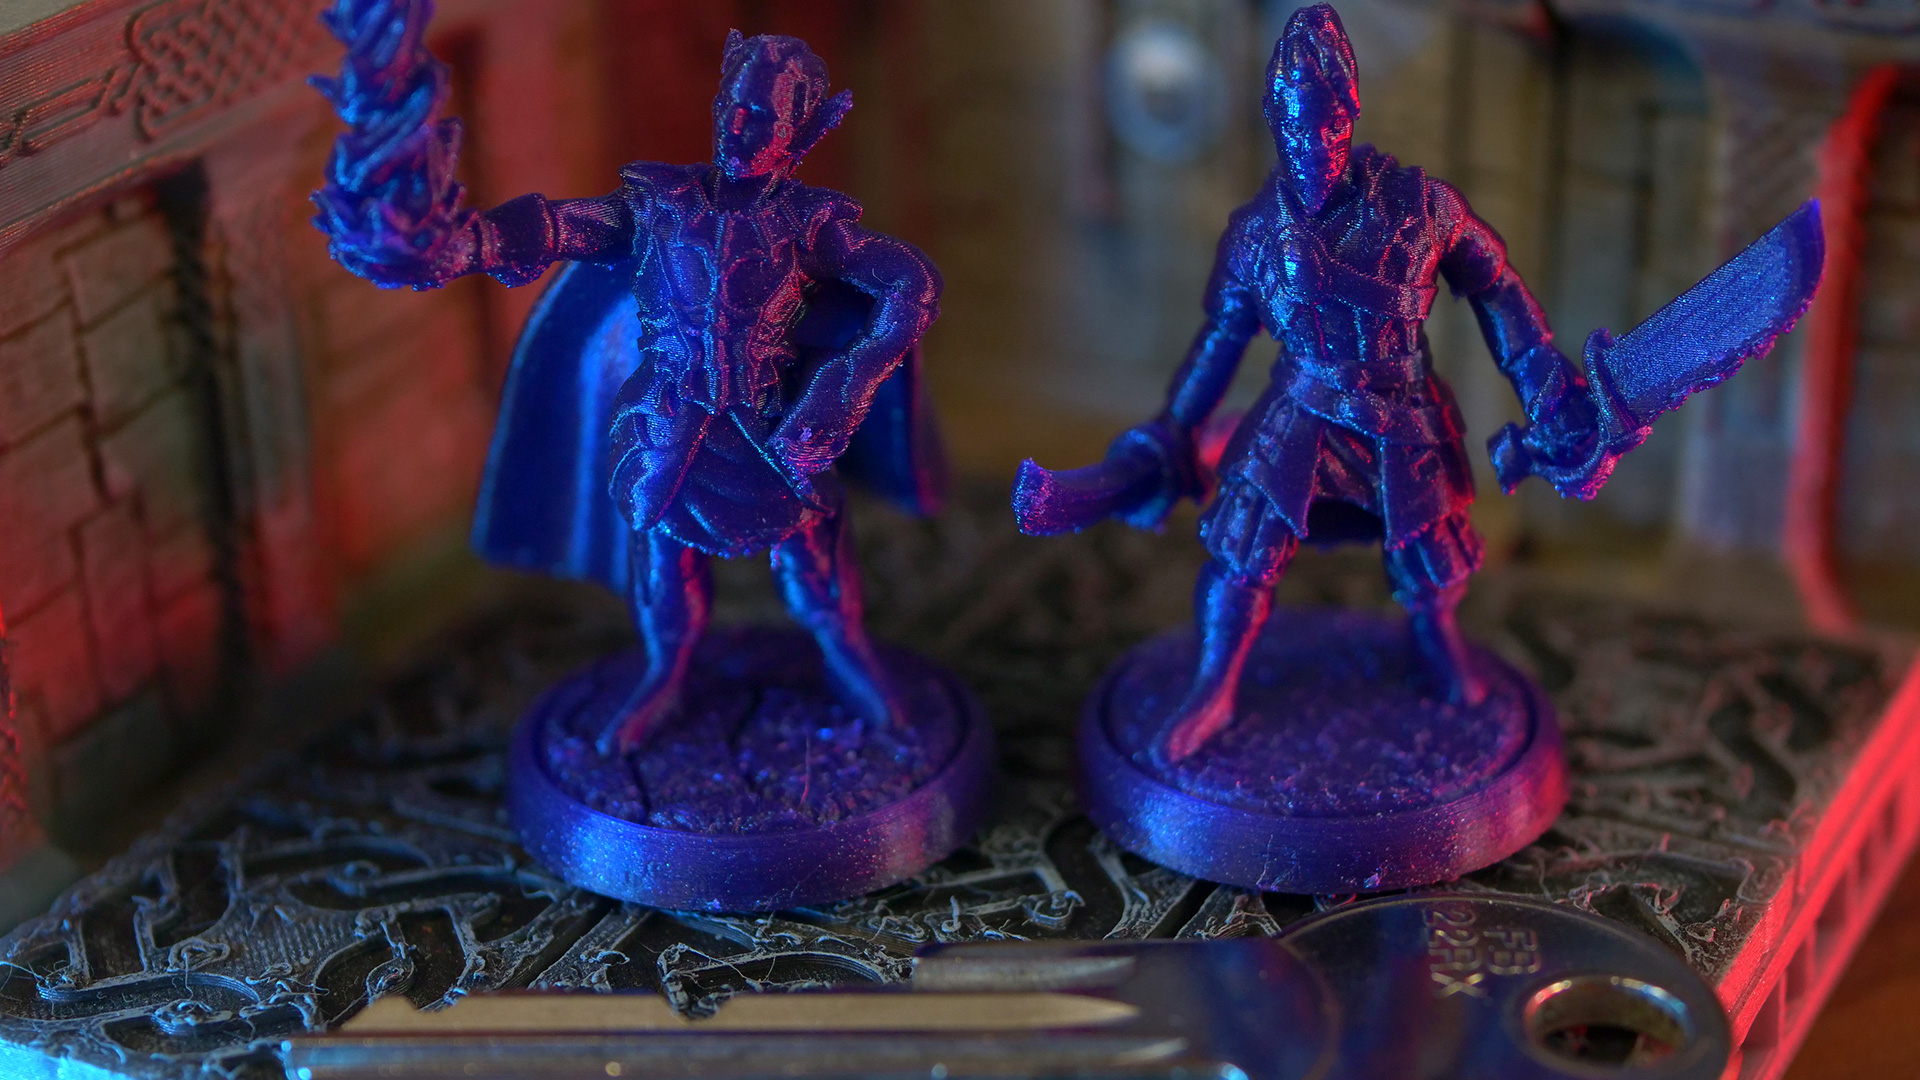
The most common go-to material when it comes to 3D printing is PLA. It’s widely available in many colors, doesn’t require any special approach, and is generally easy to work with. The amount of details on the models is very good, but there’s a catch: depending on the selected color/brand of filament, the number of details you perceive may vary. This is due to the fact that various materials have different properties – e.g. transparency, translucency, glossiness, some materials have additives (such as glitter in PLA Prusa Galaxy Black). This all affects how visible the details, including the layers, will be. Of course, if you’re planning to paint the models, this doesn’t concern you. In case you’re planning to use unpainted figures, here’s a couple of things to consider:
Filaments with glitter are good at hiding layer gaps – but details, too!
- White filaments work in a similar fashion – due to a semi-translucent surface, they can help hide layers better, while the model still maintains a good level of detail
- Black filaments (without glitter) can achieve a high amount of detail, but the layer lines may be more pronounced
- Grey filaments (like Prusament Pearl Mouse) are a good compromise between white and black colors

However, as stated previously, really good results can be produced with ASA. We announced our own in-house produced line of ASA materials last year and while this material is usually recommended for durable objects and outside use due to it’s great mechanical and UV-resistant properties, it works amazingly well for miniatures. No stringing, a good amount of detail, no warping (only in this case – due to small contact areas), doesn’t require an enclosure.
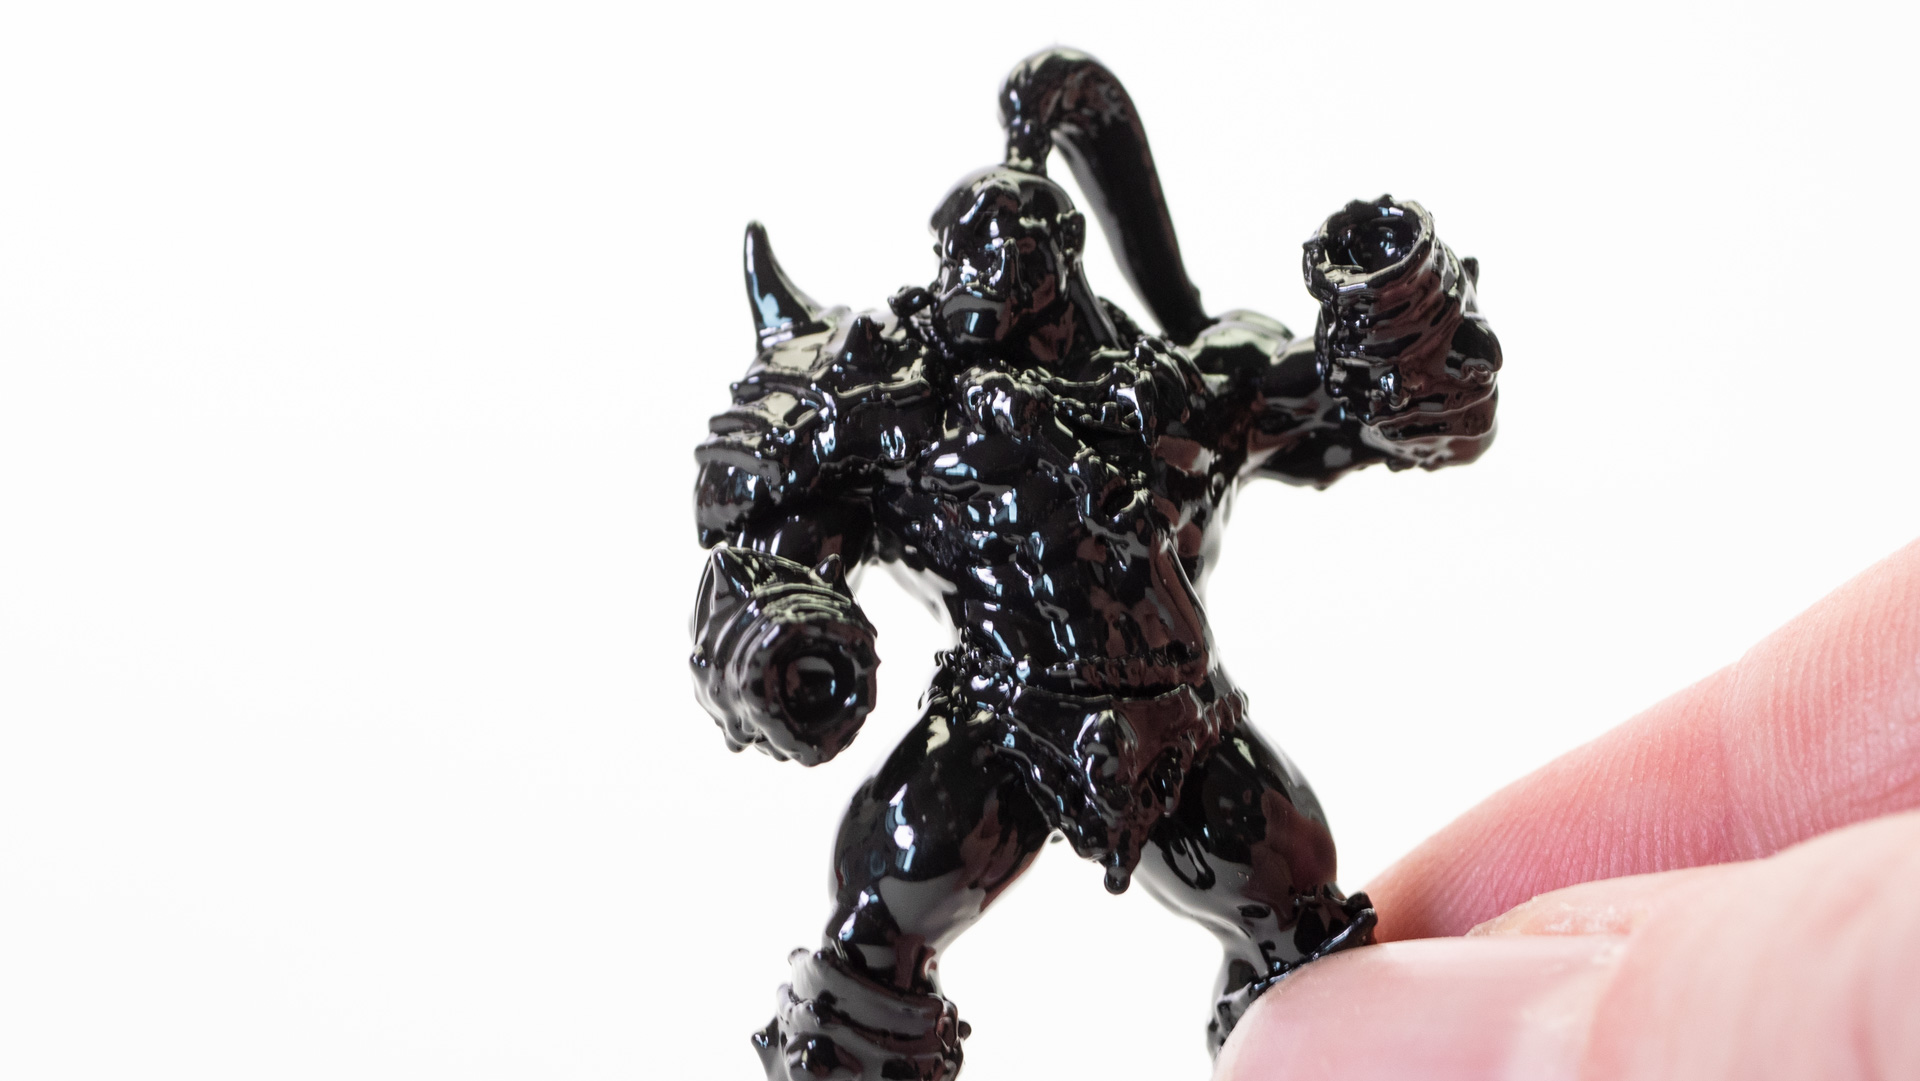
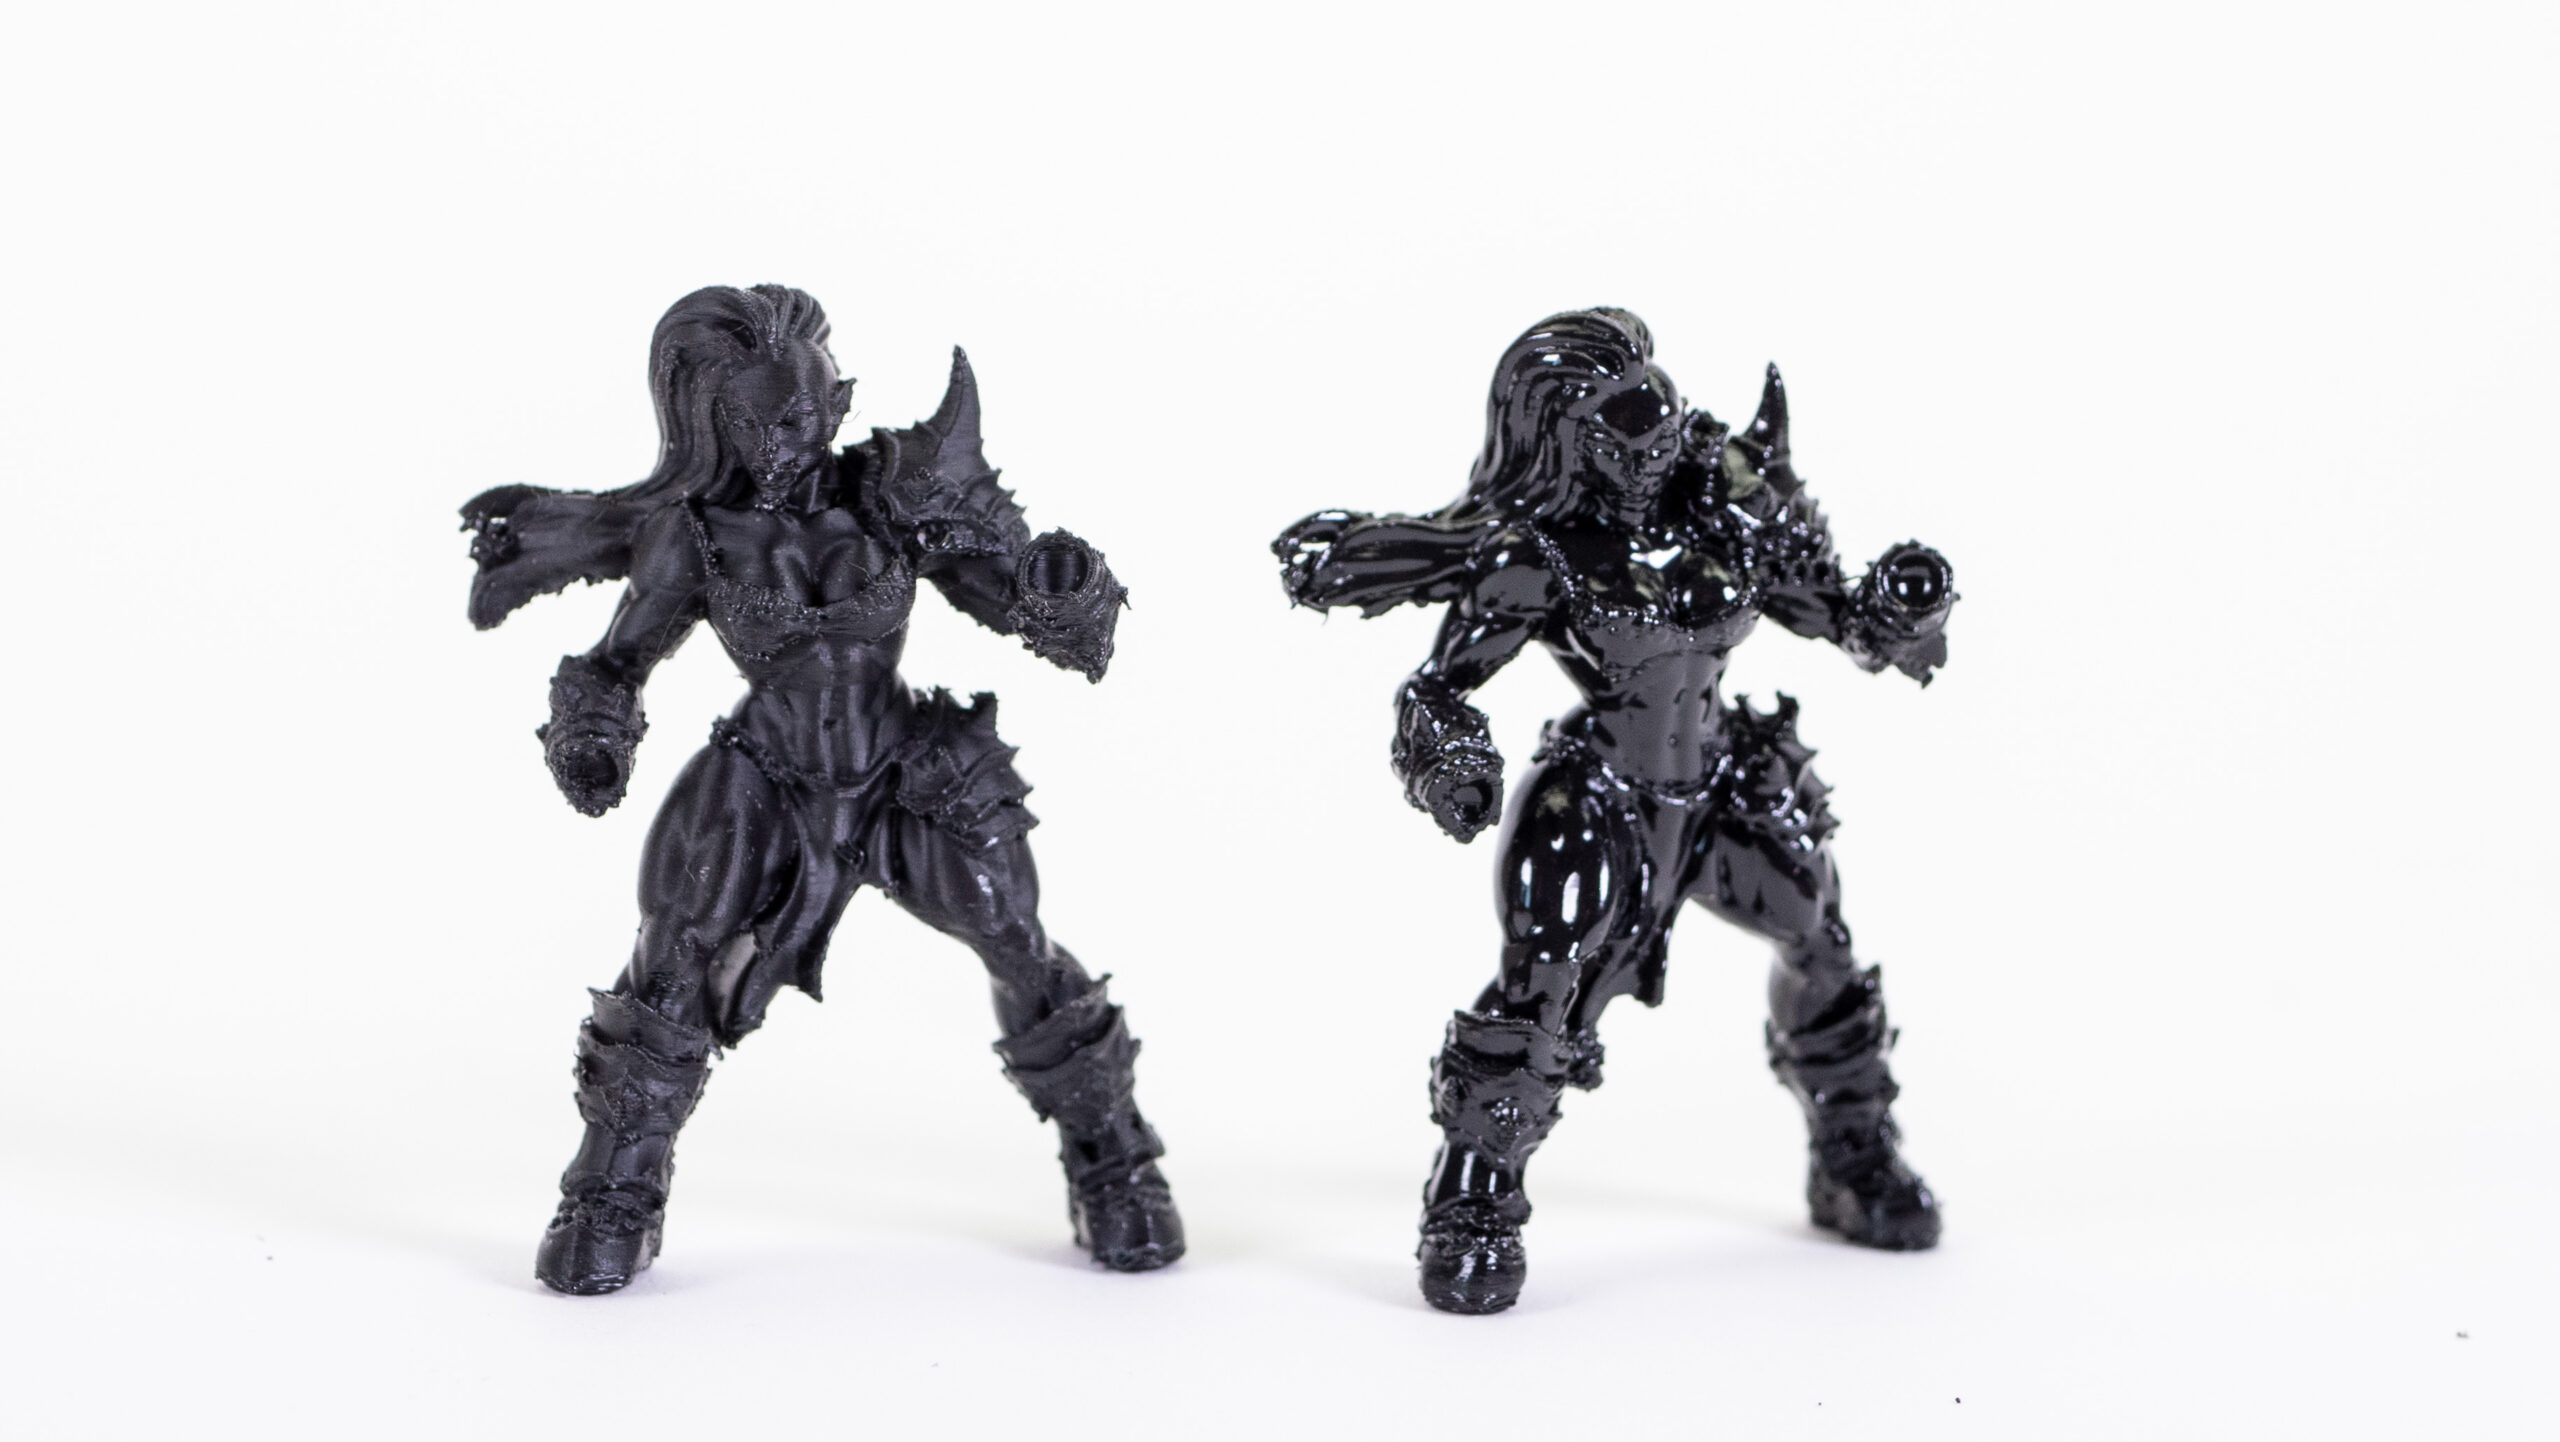
Plus, ASA has one major advantage: you can smooth out the surface of your prints to get at least a little bit closer to the quality you expect from SLA printers. The results are by no means directly comparable, but still – considering the size of the figures, it’s pretty good.
Smoothing of ASA 3D prints
A dedicated guide on how to smooth out your 3D prints has been already published on our blog, so consider this just a quick overview.
DISCLAIMER: Acetone is a flammable liquid! If you decide to assemble a smoothing chamber and heat the acetone inside, you’re doing it on your risk. Please read the full guide (linked above) first to learn more about potential risks and dangers. Keep a close eye on the setup during the entire process, do not leave the container unattended. Acetone produces prominent odors – keep the room ventilated!
ASA is a material that can be smoothed with acetone vapors. What happens during this process? Essentially, acetone vapors have the ability to dissolve ASA-based objects. If the timing is right, the surface will become soft enough so the layers start to melt together. If you overdo it, your print will turn into jelly. While smoothing is more recommended to be used with larger objects, it can also be used to post-process miniatures.
Please note that this is an advanced process. It requires manipulation with chemicals and some skills with basic electronics.
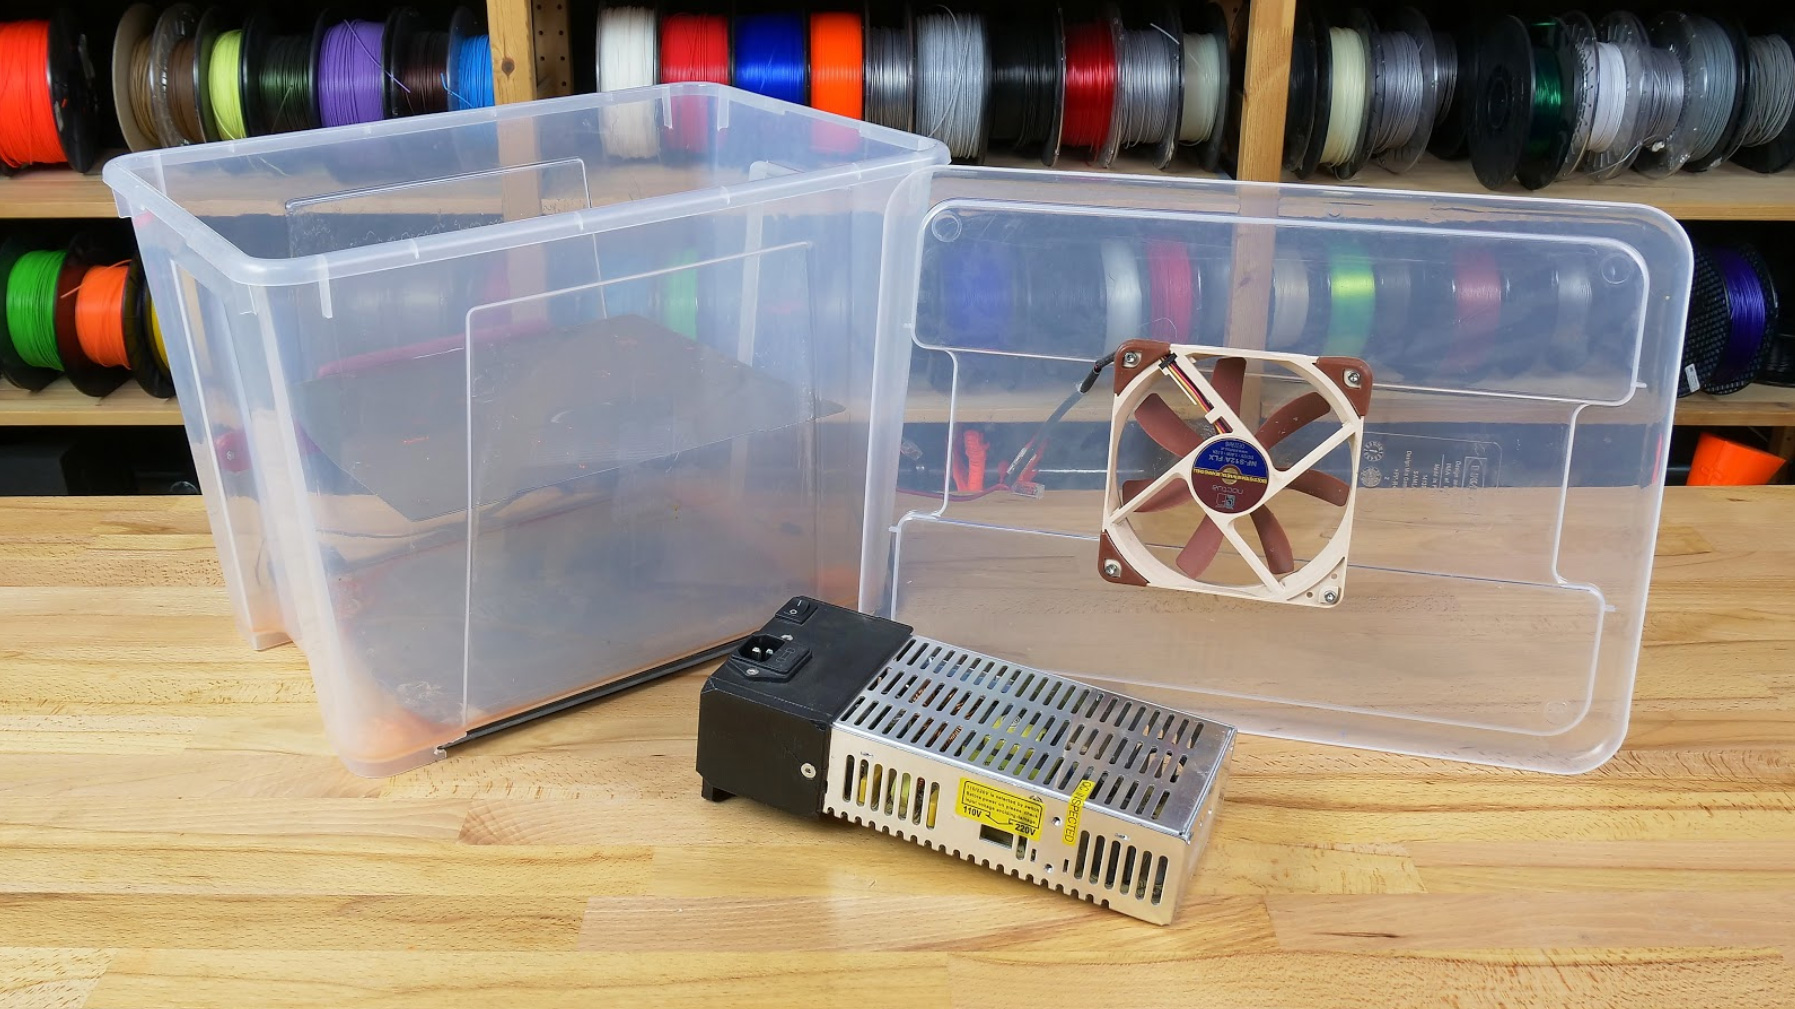
We have used a PETG-based plastic container with polypropylene being also an option. However, DO NOT use ABS containers, acetone will melt them! We placed the container onto the heatbed of the Original Prusa MINI. Then, we added a metal platform on the tank bottom, because the object you want to post-process cannot be submerged in acetone. Finally, we mounted a PC-case fan on the lid to improve the vapor circulation within the chamber and poured a bit of acetone into the container. Then, we increased the heatbed temperature to 80°C to speed up the process. Again: please refer to the full guide published here before you start!
After roughly 20-25 minutes, we took the figure out of the chamber – you can see the results below. A word of caution: prints exposed to acetone vapors remain very soft for about 30-60 minutes, so handle them with care (do not touch them directly). Complete hardening is sometimes achieved only even after 24 hours. There’s a downside to this process: it’s difficult to give you exact numbers for exposure, the volume of acetone, etc. – all will heavily depend on the size of the container, size of the object, amount of details, fan specifications. The good old trial and error approach will be required here, e.g. print 5 copies of the same model and leave them in the chamber for 15-20-25-30-35 minutes and observe which result is the best.
Getting the best models and understanding the scale
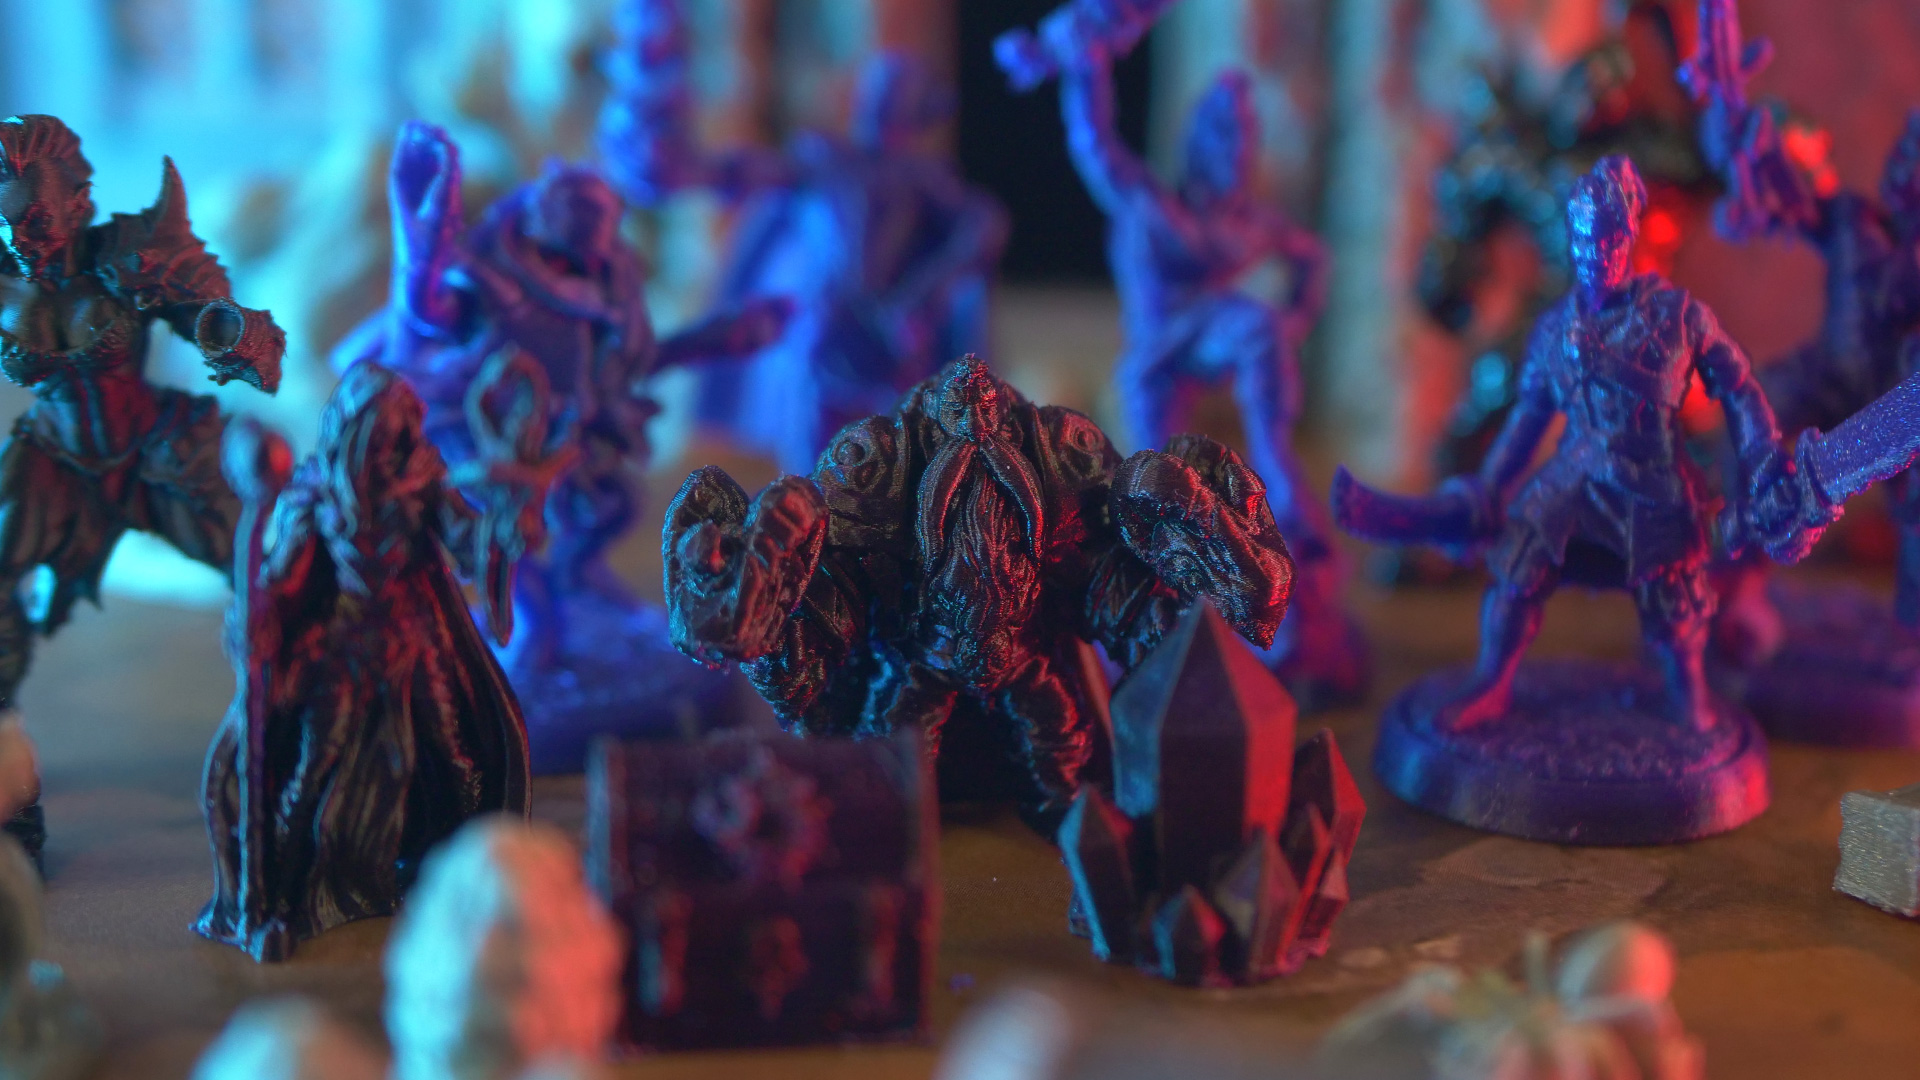
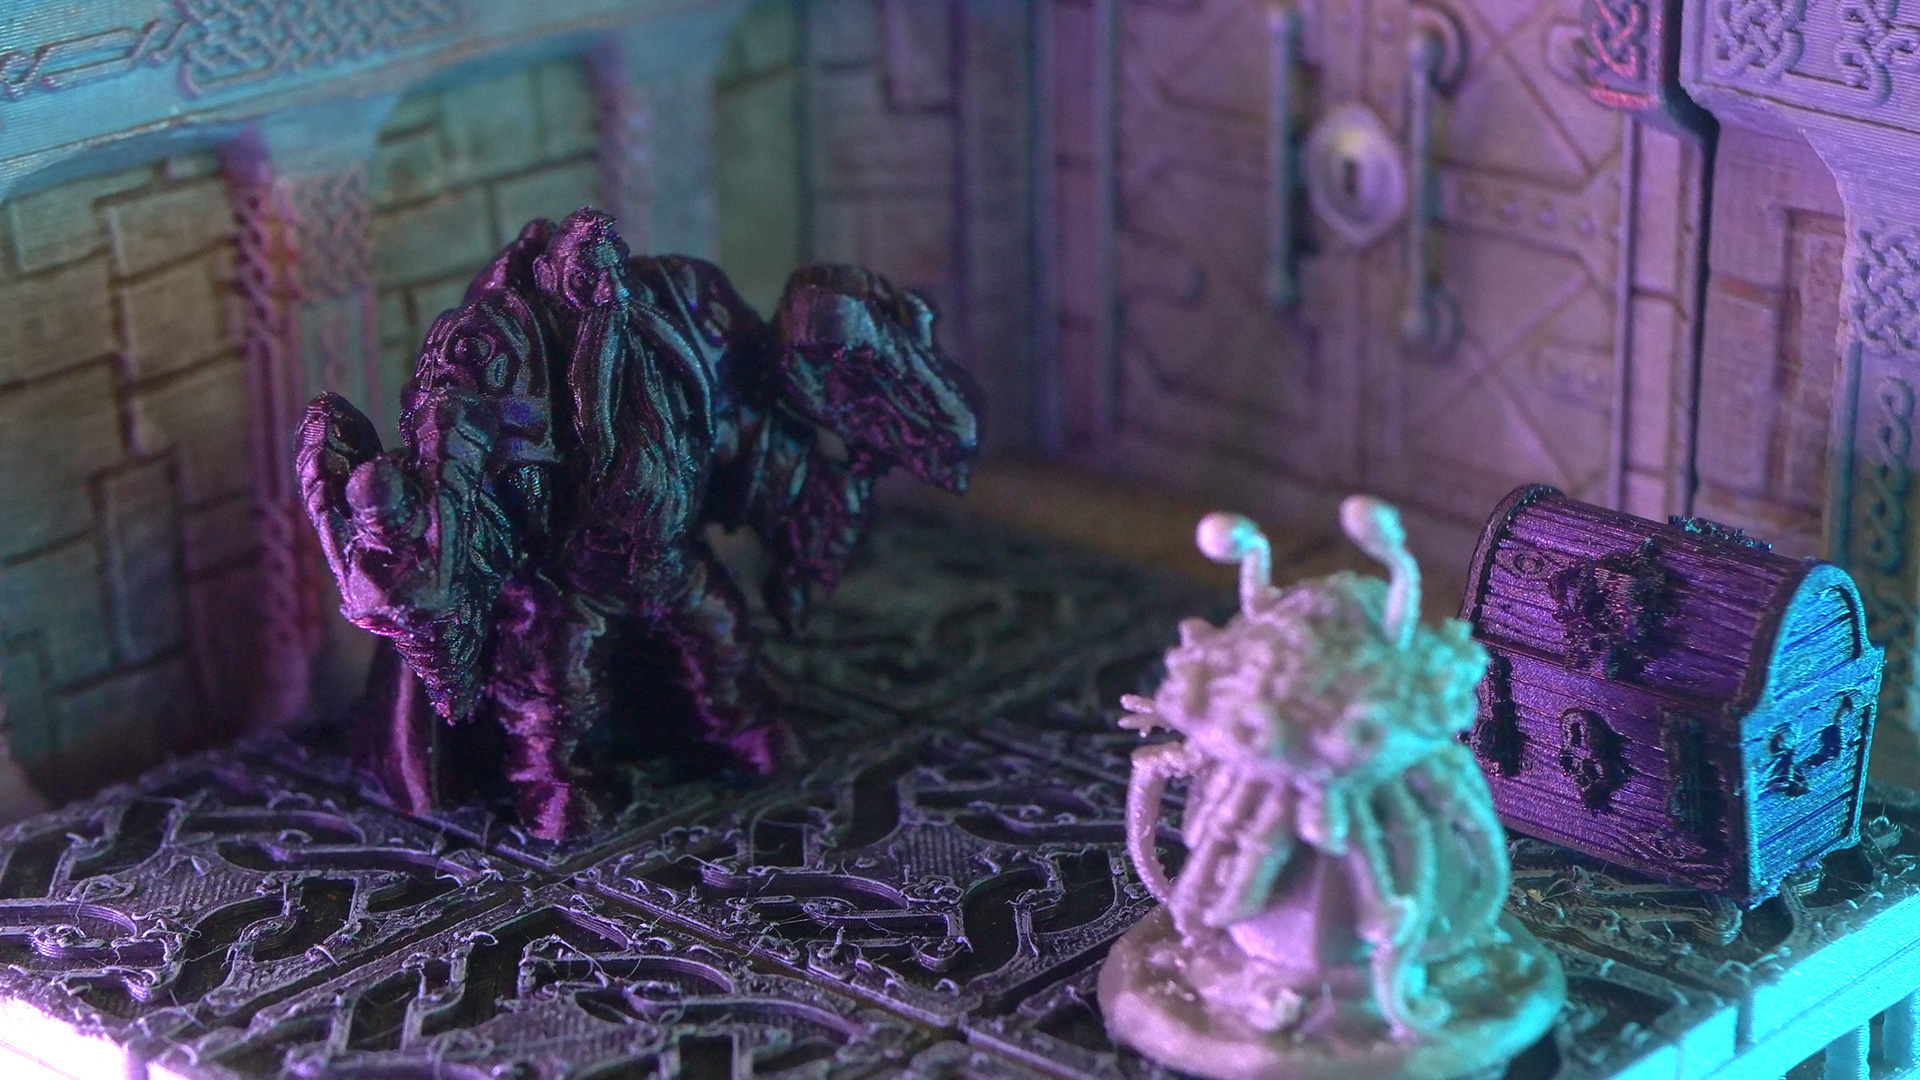
Now that you have picked the best filament for the job, it’s time to look for the right models. Does the story call for the action of a group of wizards? Or dastardly deeds of a dreadful necromancer? How about printing a chest full of precious loot – or maybe a mimic? There are dozens of places where you can look for suitable models.
Before we start, we should clear up one thing. Many characters are labeled as “28mm scale” or “32mm scale”. These are both, in fact, 1:56 scale, the only difference is that 28mm scale refers to the eye-line of the model, while 32mm refers to the top of their heads. Not everyone sticks to these numbers, though, and you can find slight variations on the market. Also, there are options such as “heroic” when the character is larger than an average human and so on.
While the best figures usually need to be purchased, you can still find a ton of free models of various themes and genres at PrusaPrinters.org. There’s a whole dedicated section for tabletop gaming, so be sure to check it out. Downloading free models and testing your setup on them is a great way to learn all the tricks before you pull out your credit card and start purchasing more stuff.
Visit MyMiniFactory, Zealot Shop, Duncan Shadow, Hero Forge, or you can try the ultimate list called The Mini Index which lists an incredible number of artists and links to their websites.
However, before you decide to purchase a paid model, here’s a couple of things to keep in mind:
- FDM/FFF 3D printers won’t retain every single amazing detail you see on high-resolution renderings
- Think about the placement of supports – is the character very complex with thin geometry running in all directions and with parts starting in mid-air? You will need more supports, which can cause trouble once you try to remove them from thin parts
- What size is the contact area? Tiny feet or paws? Or is the character placed on a pedestal? Tiny contact area might be a problem and you will need to use functions such as Brim to increase the adhesion.
- Try to select characters which are designed for FFF/FDM 3D printers – they are usually a bit bulkier, feature a pedestal/platform, and hands and weapons are placed in angles that are more 3D-printer-friendly
Slicing and 3D printer preparation
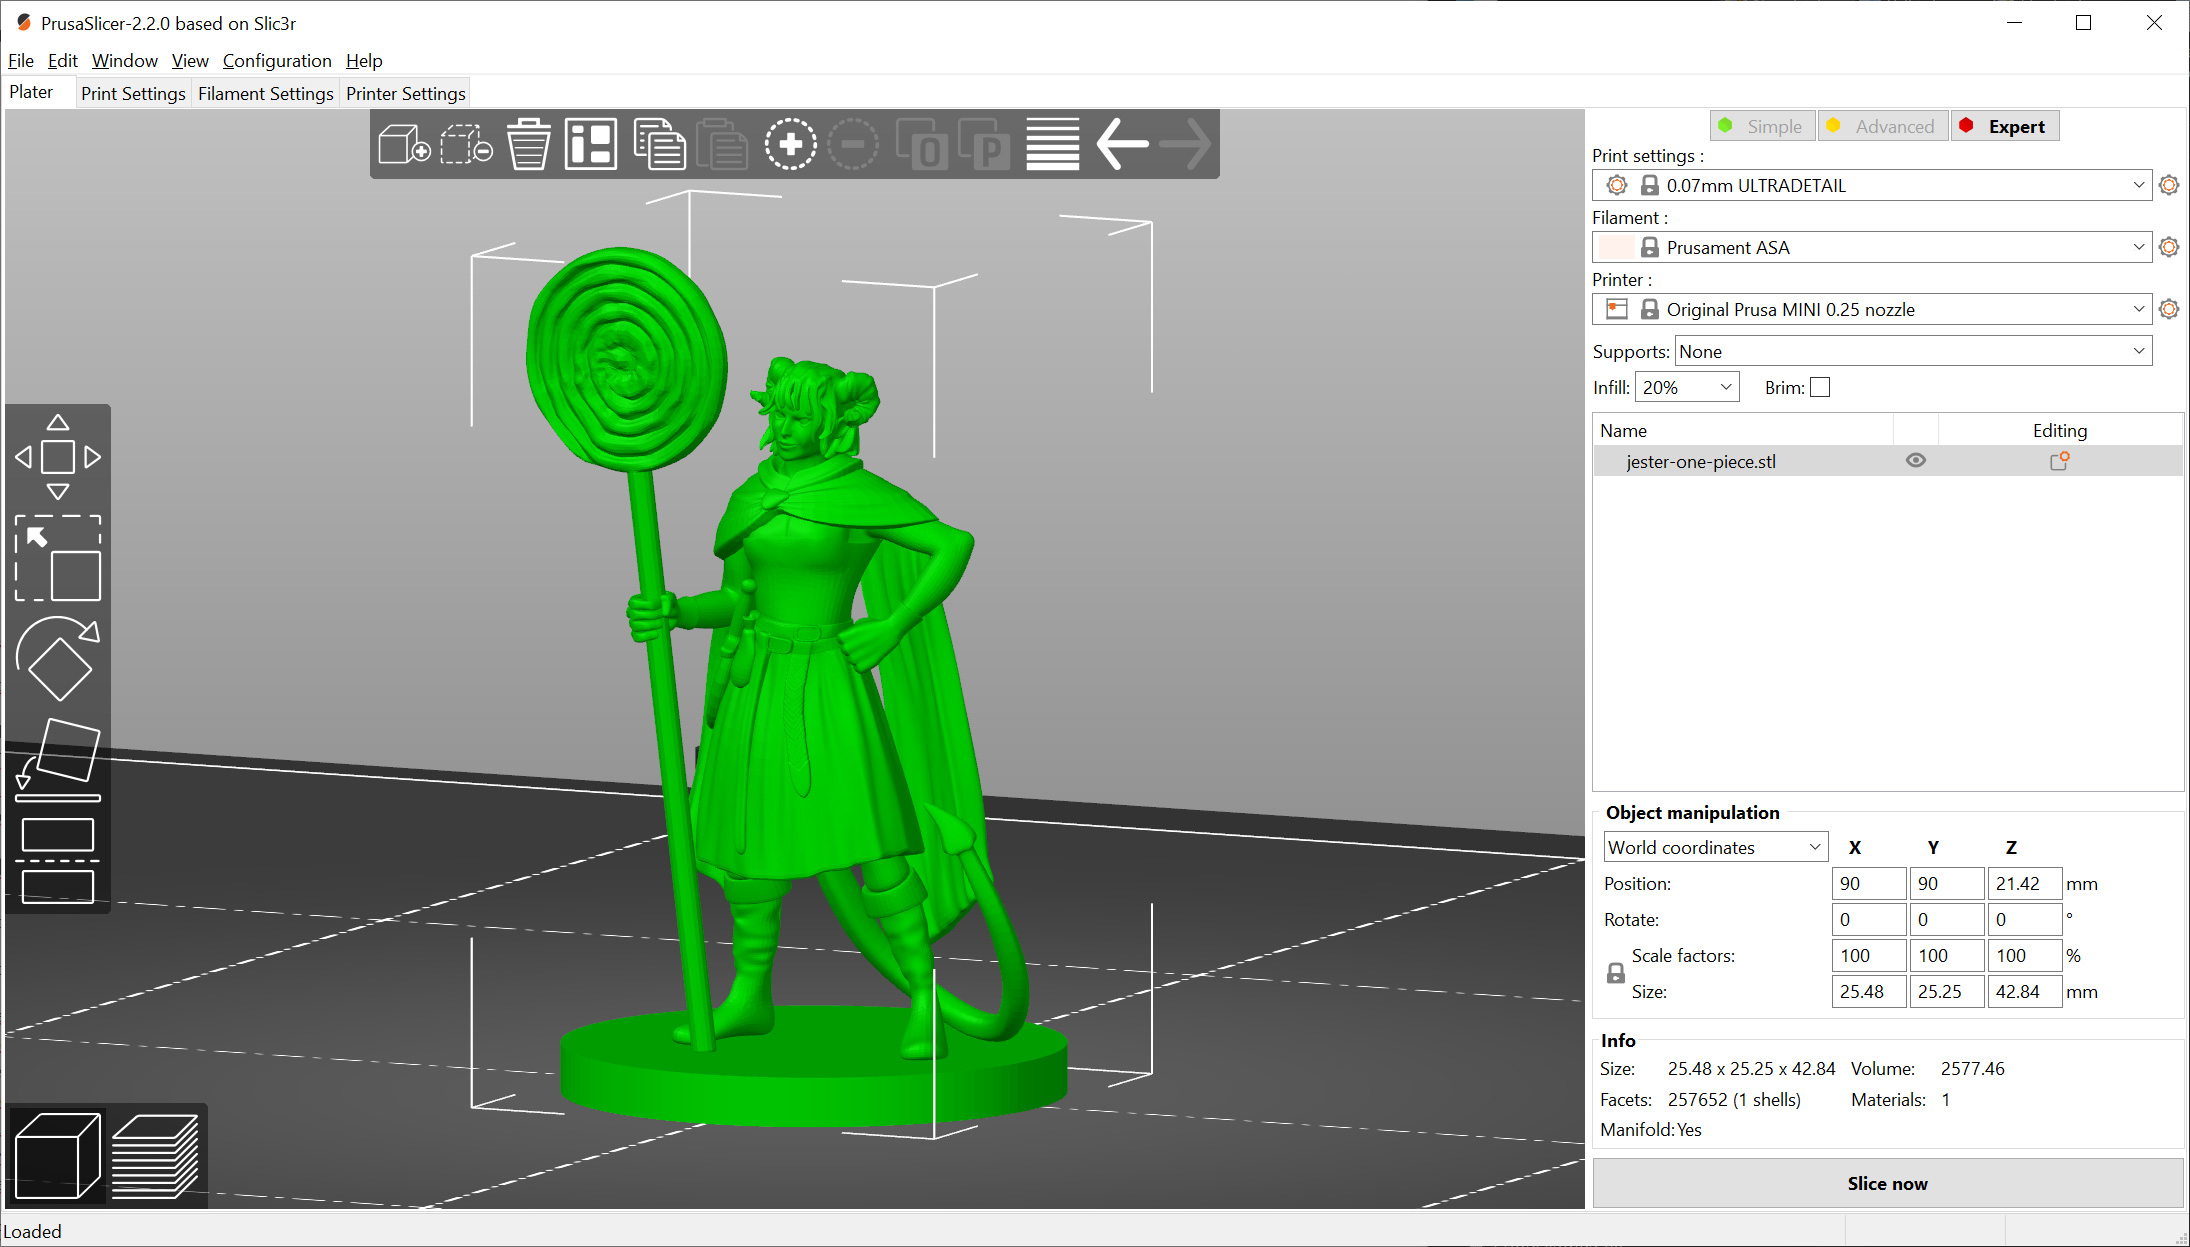
Once you import a model into PrusaSlicer, use the built-in tools to scale it to the correct dimensions (as explained in the previous chapter). Make sure there are no errors shown in the menu on the right, and if there are, fix the model by right-clicking it in the list first.
Since every model is different, it’s difficult to give you exact values and numbers. Instead, here’s a list of our recommendations:
- Use either 0.07 or 0.1mm layer height
- Try to keep the supports to a minimum – you can adjust the overhang threshold in Print Settings – Support Material (available in Advanced Mode). We went as low as 15° with some prints.
- If your test prints show signs of over-extrusion (excessive material on the surface), you can tweak the Extrusion multiplier value. You can find it under Filament Settings – Filament – Extrusion Multiplier (Advanced mode). The default value is 1.0, so try using 0.9 instead and see if the result is better.
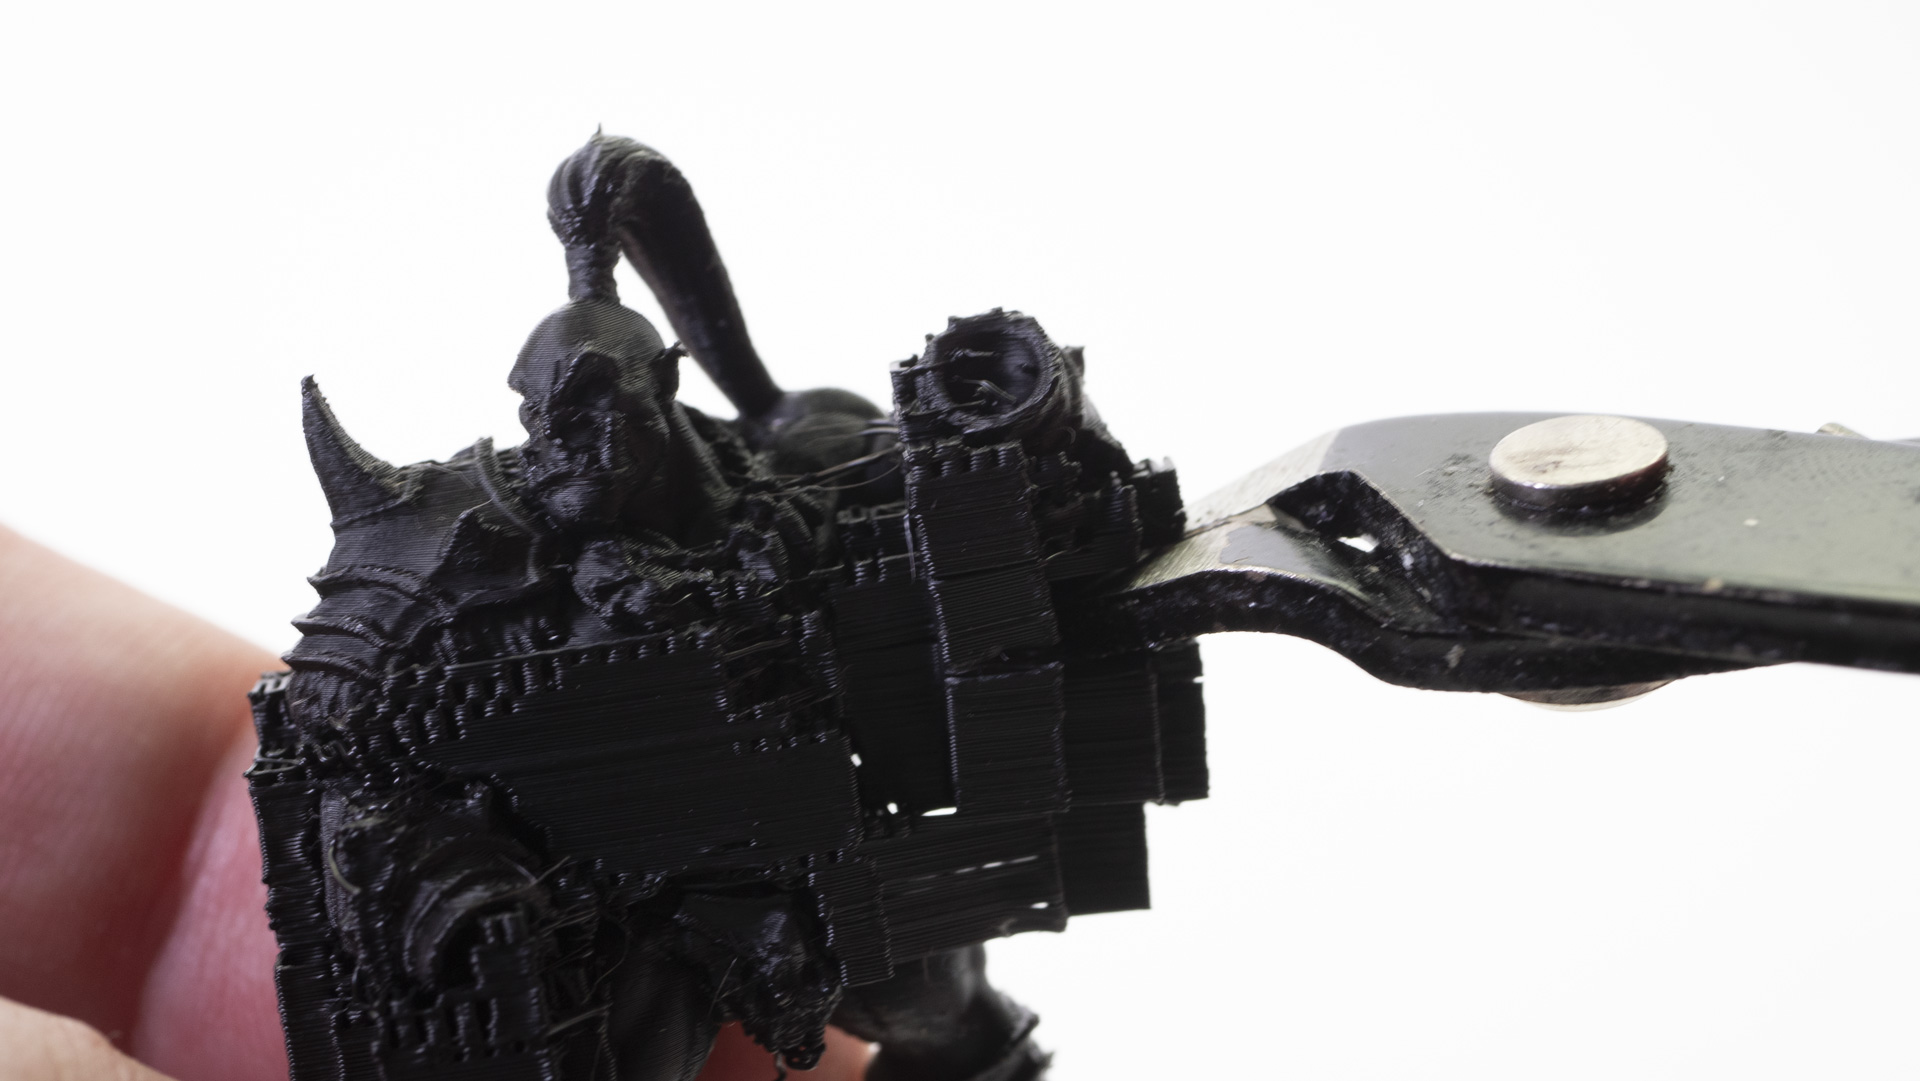
- Try to avoid placing a single character with thin hands/accessories/weapons raised up – e.g. a knight holding a raised sword above his head. The issue is that once the printers gets to print just the thin sword and nothing else, the nozzle will remain in one place for a long time – this can melt already solidified material. The solution? Place two figures next to each other, so the nozzle has to move away from one model, allowing it to cool and solidify.
- Consider using a slower printing speed to improve the precision and minimize the chance of “overshooting” the path.
- Try decreasing the print temperature by 5°C – the MINI can handle it without the risk of clogging the nozzle.
Once you slice the model, check the preview carefully – especially the first few layers. These are always crucial and this applies to tiny models even more. The contact area (e.g. feet) will be probably much smaller, so you need to make sure the base will hold on the print sheet nicely. This brings us to the next part: to print great-looking miniatures make sure your 3D printer is in a good condition.
Specifically:
- Inspect the nozzle and ensure it’s not worn out
- Clean the print sheet according to the instructions in the handbook
- Make sure your Live Adjust Z value / first layer calibration is correct
This might look like a lot of trouble, but the exact opposite is true. Once you get the gist of it and learn to recognize potentially problematic parts of 3D models in PrusaSlicer, you’ll be able to print pretty much everything with ease. And keeping the printer well-maintained, of course, goes without question 🙂
Expanding your options
We have already explained why it’s handy to learn how to swap nozzles on your 3D printer in our older article. The MINI is compatible with 0.25, 0.4, and even 0.6mm nozzles, which brings you a ton of new options. While the 0.4mm is a good compromise between quality and speed, the 0.25mm will give you greater precision in the X and Y axes, while the 0.6mm increases the printing speed dramatically – and surprisingly without sacrificing too much quality.
The 0.25mm nozzle can be used not only to print miniatures but also to produce cool business cards and other objects where precision is extremely important. There’s a downside, though: the print time increases by no small margin. Printing a single 28/32mm character takes roughly 2-3 hours depending on the number of supports under the model. However, you can still print 3-4 figures overnight easily. And while the quality is not on a par with SLA machines, with some of the tricks we described here, you can achieve pretty convincing results.
If you are worried about your academic assignments. we are here to help you. We provide the best online assignment help at a very moderate cost.
For more information message us on Whatsapp – +16692714848
website – http://fullassignment.com/
The customer service is HORRIBLE. My MK3 was working fine and has now been useless for over 2 months while going back and forth with support. Oh, they did send me a thermister. WOW, that didn’t work.
Not everyone sticks to these numbers, though, and you can find slight variations on the market. Also, there are options such as “heroic” when the character is larger than an average human and so on.
Click here: https://ondersteuningtelefoonnummer.weebly.com/blog2/inktsysteemstoring-op-hp-printer-verhelpen
doesn’t require an enclosure ?
Are you sure?
Asa is toxic as i know
o2tvseries is a website to download the latest TV Series movie A-Z. O2tvseries.com, download full season film in different formats like HD, 3GP
very beautiful. I appreciated
Nice work! Thanks for the post. Will help me alot.