
We’ve promised that we would start publishing dev diaries to give you a unique opportunity to see what’s happening “behind the curtain” – and here’s the first one! Today, we’ll take a look at the Mesh Bed Leveling routine and the changes we made in recent firmware releases. This includes the new community-requested 7×7 Mesh Bed Leveling.
7×7 Mesh Bed Leveling and how we tackled it
We’ve been using a 3×3 Mesh Bed Leveling (MBL) on our printers for a long time. What does it do? The P.I.N.D.A. probe measures the distance from the steel sheet in nine locations across the print area (a grid of 3×3 points). It creates a virtual 3D map of the sheet and allows the printer to compensate for an uneven surface. However, around six months ago, our community started to point out that apparently, 7×7 calibration gave improved results. Also, 7×7 pull requests appeared on our Github. We started to investigate the situation because the procedure is more complex than a simple increasing the number of measurement points.
What we needed was hard data – real measurements and performance tests. Therefore, we first decided to accurately measure the quality of MBL algorithms using a dial gauge – and not just visually on a test model.
So we assembled a set of special firmware versions, each containing one implementation of MBL (external pull requests from external contributors and our own implementation).
All testing firmware samples had the automatic distance measurement validated using a digital dial indicator. Specifically:
- Original Prusa FW with MBL 3×3
- FW by stahlfabrik with MBL 7×7 support
- FW by mionut with MBL 7×7 support
We used a special G-Code to activate the dial indicator measurement. The G-Code template is G78 Aaaa Bbbb Cccc Dddd Eeee Ffff, where:
- aaa is the x-axis width of the measured area
- bbb is the y-axis width of the measured area
- ccc is the number of points in the x-axis
- ddd is the number of points in the y-axis
- eee is the offset in the x-axis
- fff is the offset in the y-axis
Example: G78 A205 B200 C3 D3 E0 F0
Measured deviations were automatically recorded onto an SD card for further processing.
Our testers performed a set of measurements on the selected set of printers/firmware and the results of the first weren’t overwhelmingly conclusive. The accuracy was about 20-30 % better compared to 3×3 MBL. We did not feel that 7×7 is a major improvement, considering all the factors.
Firmware results Comparison
The biggest difference in actual deviation in millimeters (smaller numbers mean a better accuracy):
| Firmware name | Without MBL | With MBL (3×3) | With MBL (7×7) |
|---|---|---|---|
| Prusa | 0,704 – 0,711 | 0,254 – 0,262 | N/A |
| stahlfabric | 0,690 – 0,701 | 0,247 – 0,265 | 0,189 – 0,197 |
| mionut | 0,694 – 0,703 | 0,232 – 0,263 | 0,180 – 0,194 |
Through another analysis, we found out that it’s necessary to minimize the measurement error with repeated measurements using the P.I.N.D.A. sensor. Therefore, there are repeated distance measurements during MBL process – typically 3 to 5 in one location. The higher number of measurements increased the accuracy by a small margin, but the expected error rate below 0.05 mm still seemed unreachable.
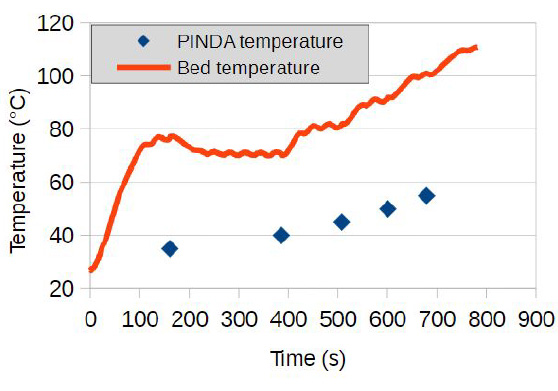
Another thing is, the P.I.N.D.A. sensor sensitivity is highly temperature-dependent. In the current version, it’s supplemented with a thermistor that allows the detected magnetic field level to be compensated.
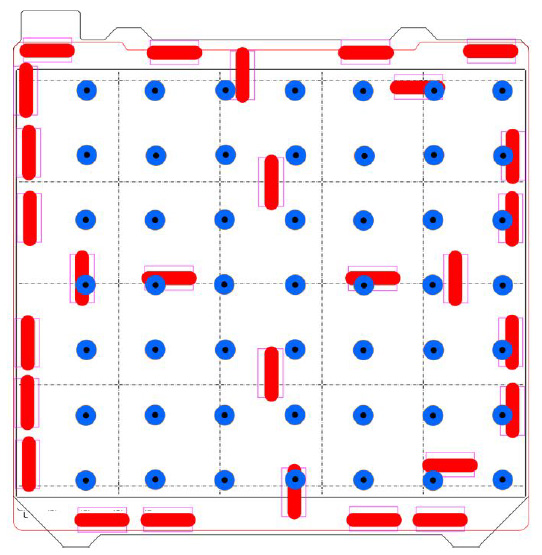
And then there was another issue – the magnets in the heatbed. These can throw off the readings, so we had to find a way around it. Our MBL avoids the magnets because the firmware contains information about exact locations of all the measurement points – in other words, we’re not using a regular 7×7 grid.
The need for speed
We’re pretty sure you’ve figured one rather annoying thing about 7×7 measurements already. The original 3×3 measurement took 17 seconds to perform. Now there were five times more points to measure – quite inconvenient. This is why the printer with 7×7 MBL is performing a “tapping” routine instead of the old measuring movements. The extruder won’t rise higher when the measured values are within internally set limits. It’s up to you how many measurements you want to perform in a single location (we recommend a minimum of 3 and up to 5 for maximum accuracy).
So what happens if the measured value is out of bounds? The printer will try to correct the situation automatically – it will move the extruder up and slowly down again, which is the original measuring procedure. Only if this doesn’t help, it’s necessary to perform Z-leveling. By the way, there was at least one surprising observation during testing: if there are two printers placed next to each other on a shelf, the vibration of the first one could throw off the MLB on the other one. However, this situation can be also solved by running the slower measurement routine.
Here’s the comparison of MBL times for the various number of points:
- 7×7 points, 5 measurements – 56 seconds
- 7×7 points, 3 measurements – 46 seconds
- 3×3 points, 3 measurements – 17 seconds
56 seconds may seem like a rather long time, when you’re standing next to the printer, waiting for it to start printing the first layer. However, when you are starting a several-hours-long print job, this number becomes almost insignificant. In return, you will get better printing performance, especially if your steel sheet is not 100% perfect.
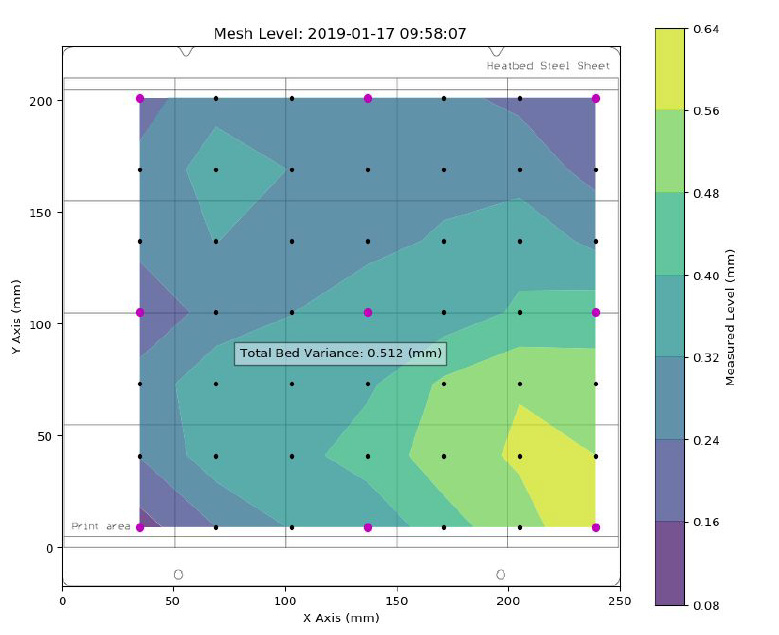
We have also confirmed, that the results are not dependent on the target surface temperature. Our community developed a visualization plugin for OctoPrint called PrusaMeshMap. You can see an illustration of measurements on a pre-heated bed below.
Conclusion
7×7 MBL brings improvements that we could measure and verify, however, they are not really game-changing ones. We assume that when it comes to printers with a different print bed design (where greater local deformation may occur), the improvement would be more noticeable. Even so, considering the fact that printing times are usually hours, not minutes, the one-minute delay at the start (when using the maximum number of measurements) doesn’t matter that much.
You can select between 3×3 and 7×7 MBL in Settings/Mesh Bed Leveling menu.
Firmware news
The improved Mesh Bed Leveling is just one of many changes we have implemented since the launch of the MK3/S – and we’re still planning new additions, tweaks, and updates. Do you want to know what we are cooking?
Firmware 3.8.1
- First Layer Calibration with materials other than PLA
- bugfixes
- localization fixes
Firmware 3.9 (November 2019)
- Linear Advance 1.5 with backwards compatibility with older G-Codes – developed in cooperation with our community
- Plenty of UI tweaks, overall improvements
- Improvements to the filament sensor – a higher level of control
We’re also focusing on many other areas, e.g. crash detection in Y-axis when printing with ASA, decreasing the temperature of the extruder motor when printing with PLA, and more. Stay tuned and don’t forget to update your printer’s firmware regularly!
Also, let us know if you like our dev diaries and what would you like to read about!
So excited to see the “Firmware 3.8.1 First Layer Calibration with materials other than PLA” feature coming soon in the next firmware update. I have a MMU2 setup with all 5 filaments loaded with PETG. It was always an inconvenience to have to unload one of those filaments and replace with PLA, run the calibration, then load back the PETG.
Yes please! “First Layer Calibration with materials other than PLA” feature coming soon in the next firmware update”
Good grief I don’t want to ever print in PLA, and I don’t want to remove and replace filament just to calibrate. How is this acceptable?
I agree I have no PLA anywhere so if I run the set up wizard eg after some printer maintenance – I have to cancel it turn the machine on and off when it gets to the first layer calibration – then go in and manually set the z height … it feels a total cludge at the moment. (Indeed the z calibration trail it forces one to print is pretty useless as a pattern anyway) . This is a small gripe however as overall I think the printer is amazing and the attention to so many areas in the firmware and ongoing commitment to continual refinement is nothing short of remarkable. Well done Prusa.
I really hope I am not forced to use 7×7 in the future. 3×3 did very well. If the answer goes like “we do not provide 3×3 anymore” I guess I would stop any updates.
7×7 certainly seemed to make a difference to the reliably of the first layer on mine, and the extra speed tapping method is appreciated. But it could be a lot faster…
The only part of the bed that really needs to be measured is the part being used. Any points outside that area could be skipped and replaced with an average point for that perimeter. For small parts it would make a huge perceived difference. Psychologically the level sensing and first layer are the bits where people have to be waiting for the printer, once it’s going they can do something else. So ‘saving only 30 seconds’ has a disproportionate effect on how fast it ‘feels’
I definitely appreciate the article and hope to see more.
I’m an embedded software developer and I watch the GitHub repositories with interest as both a professional and a user. This was an interesting look at the internal processes behind accepting feature requests submitted code.
Very nice. Every time I see an update I know I make the right choice. I originally was looking at an Ender 3 vs Prusa and went for the Prusa. Keep up the good work.
So Prusa firmware with MBL(3×3) has a measured deviation of 0.254-0.262 mm. Given the first layer height is 0.200 mm, how can that large deviation even work? The print head would crash into the print surface every time.
Could you explain your measurements further. Seems the deviation would need to be < 0.200 mm to print a 0.200 mm first layer.
Looking forward to see LA 1.5 implemented 🙂
Is there an article that explains how values from meshbed levelling are used for correction during print? That would be a good read!
Thank you for sharing the inside knowledge on the improvements in firmware and slicer. Exciting to know what ideas and thoughts had led to the current design.
Keep them coming 😉
Looking forward to LA 1.5 and hollowing out models for SL1.
Looking forward to seeing more dev articles.
Are they likely to cover firmware code?
Love the 7×7 mesh bed with 5 porbes… Never seen so consistent 1st leyer on MK3. It is worth avry extra second…
7×7 mesh bed leveling has been the saving grace for that perfect first layer contact.
Without it, I was getting warping all over the place.
Awesome update!
Should the mesh leveling compensate for high spots on the print bed?
I am fighting a first layer problem where in 3 or 4 distinct spots the first layer gets very thin.
these 3 or 4 points appear to coincide with the spaces between the 9 mounting screws. it looks like 4 humps visualized. so for example, one hump exists between the left bottom, center bottom, right center and center screws.
running a 7×7 mesh level, and looking at bed visualizer the humps show up, yet the printer does not appear to compensate (running the latest mk3s firmware as of 12/1/2019).
a square printed on the center of the bed will have a thickness of say 0.245 when set for .2 in the slicer software. but printed on the humps, the nozzle might be about to scrape the bed, very thin layer, every where else, it appears acceptable. it does this on multiple sheets, PEI, steel and TheKing, turned multiple ways, so it looks like it is coming from the print bed, not the sheet I use. There are no magnets in these locations according to the diagram.
now, If I turn manually say the right Z rod, in bed visualizer, it shows the bed tilted, but the print itself seems no different, showing the mesh leveling is correcting for the bed, but not for high spots on the build plate.
I have done the nylock nut mod and have gotten the screw locations to within 0.04 overall at a bed temp of 100C. I don’t know how to deal with the high spots, almost like the heatbed is constrained at the screws and bowing up between the screws in this locations.
i am about to splurge on a diff heat bed, just to eliminate more possibilities