


After several alpha versions, beta versions and release candidates, the final version of our latest PrusaSlicer 2.2.0 with SLA hollowing and support for 3rd party printers is out! Thank you, everyone, who shared feedback with us! PrusaSlicer releases are usually accompanied by major changes and the newest 2.2.0 is no exception. Let’s take a look!
What’s new in PrusaSlicer 2.2.0
Before we jump into a detailed analysis of new functions, here’s a quick overview:
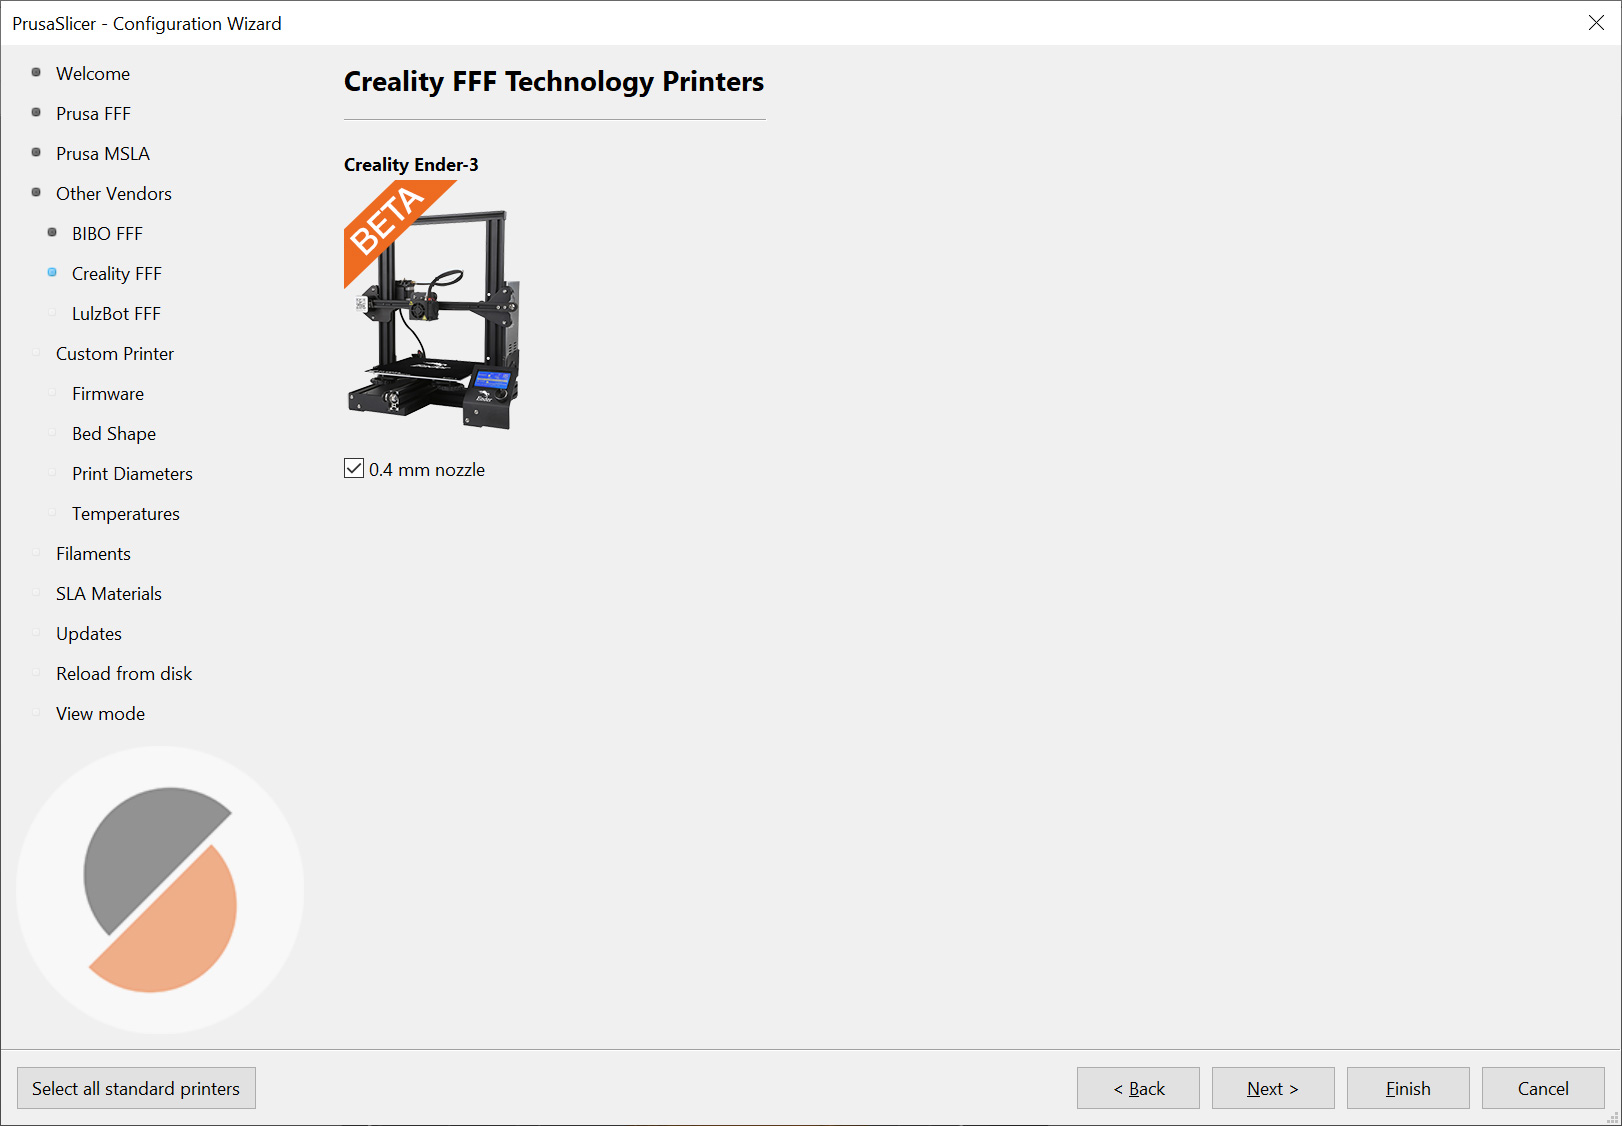
- Bundled profiles for 3rd party printers (Creality Ender 3, BIBO2 Touch, Lulzbot Mini Aero, and Taz6 Aero beta profiles are included)
- Hollowing for SLA models
- Automatic variable layer height
- Adaptive elephant foot compensation
- Safe ejecting of SD cards / USB drives
- Insert pause/ custom G-code at a certain height
- Reload from disk on 3MF files
- Smaller wipe tower without sparse layers
- Sequential printing
- 3Dconnexion SpaceMouse Support
- OS X Dark Mode support
- Improved path planning, thumbnails in 3MF files, improved ColorPrint…
- …and more!
Download Drivers & Apps Installer (with PrusaSlicer 2.2.0, drivers and sample objects)
All of the major things are perfectly summarized in this video:
And since the number of features and tools in PrusaSlicer keeps growing steadily, we also keep continuously expanding the PrusaSlicer documentation.
Bundled profiles
Our goal is to turn our PrusaSlicer into a truly universal slicing software for all sorts of third-party printers. Pretty much everything is already in place, so we’re working with the community to implement profiles for the most popular third-party 3D printer brands. It means adding profiles not only for the machines but also for specific materials (filament settings may vary depending on printer model – e.g. different extruder temperatures). We’ll post a separate article about how to contribute, but if you want to start working on the profiles right away, check the PrusaSlicer wiki page.
This also means we had to change the logic in how material profiles work. PrusaSlicer stores Print, Printer, SLA Printer, and SLA Materials in separate lists – the names of the profiles are required to be unique inside their respective groups. For instance, Prusament PLA profile works with the MK3S 3D printer profile, but not with the MK3S MMU2S profile, because the ramming parameters are different. To keep things simple, PrusaSlicer shows only the shorter “logical name” aka “alias” in the list of materials, while the full profile name is shown on the respective parameter page. Head over to GitHub to learn more about how this system works.
SLA Hollowing
This is a very important addition and it took us a while to implement because we wanted to do it right. As you probably know, SLA prints are completely solid, there’s no infill pattern. While this makes the objects quite durable and heavy, it also means increased resin consumption. And since resins are usually pretty expensive, the costs for printing a solid object can be rather high, especially when printing large models. By hollowing an object, you can reduce the costs of printing massively. And there are more benefits – lighter models require fewer support pillars, while still retaining a good weight distribution. And a smaller surface area of each layer decreases the force needed to detach the print from the display. Up until now, we recommended using Meshmixer to make objects hollow. However, starting with PrusaSlicer 2.2.0, everything’s under one roof.
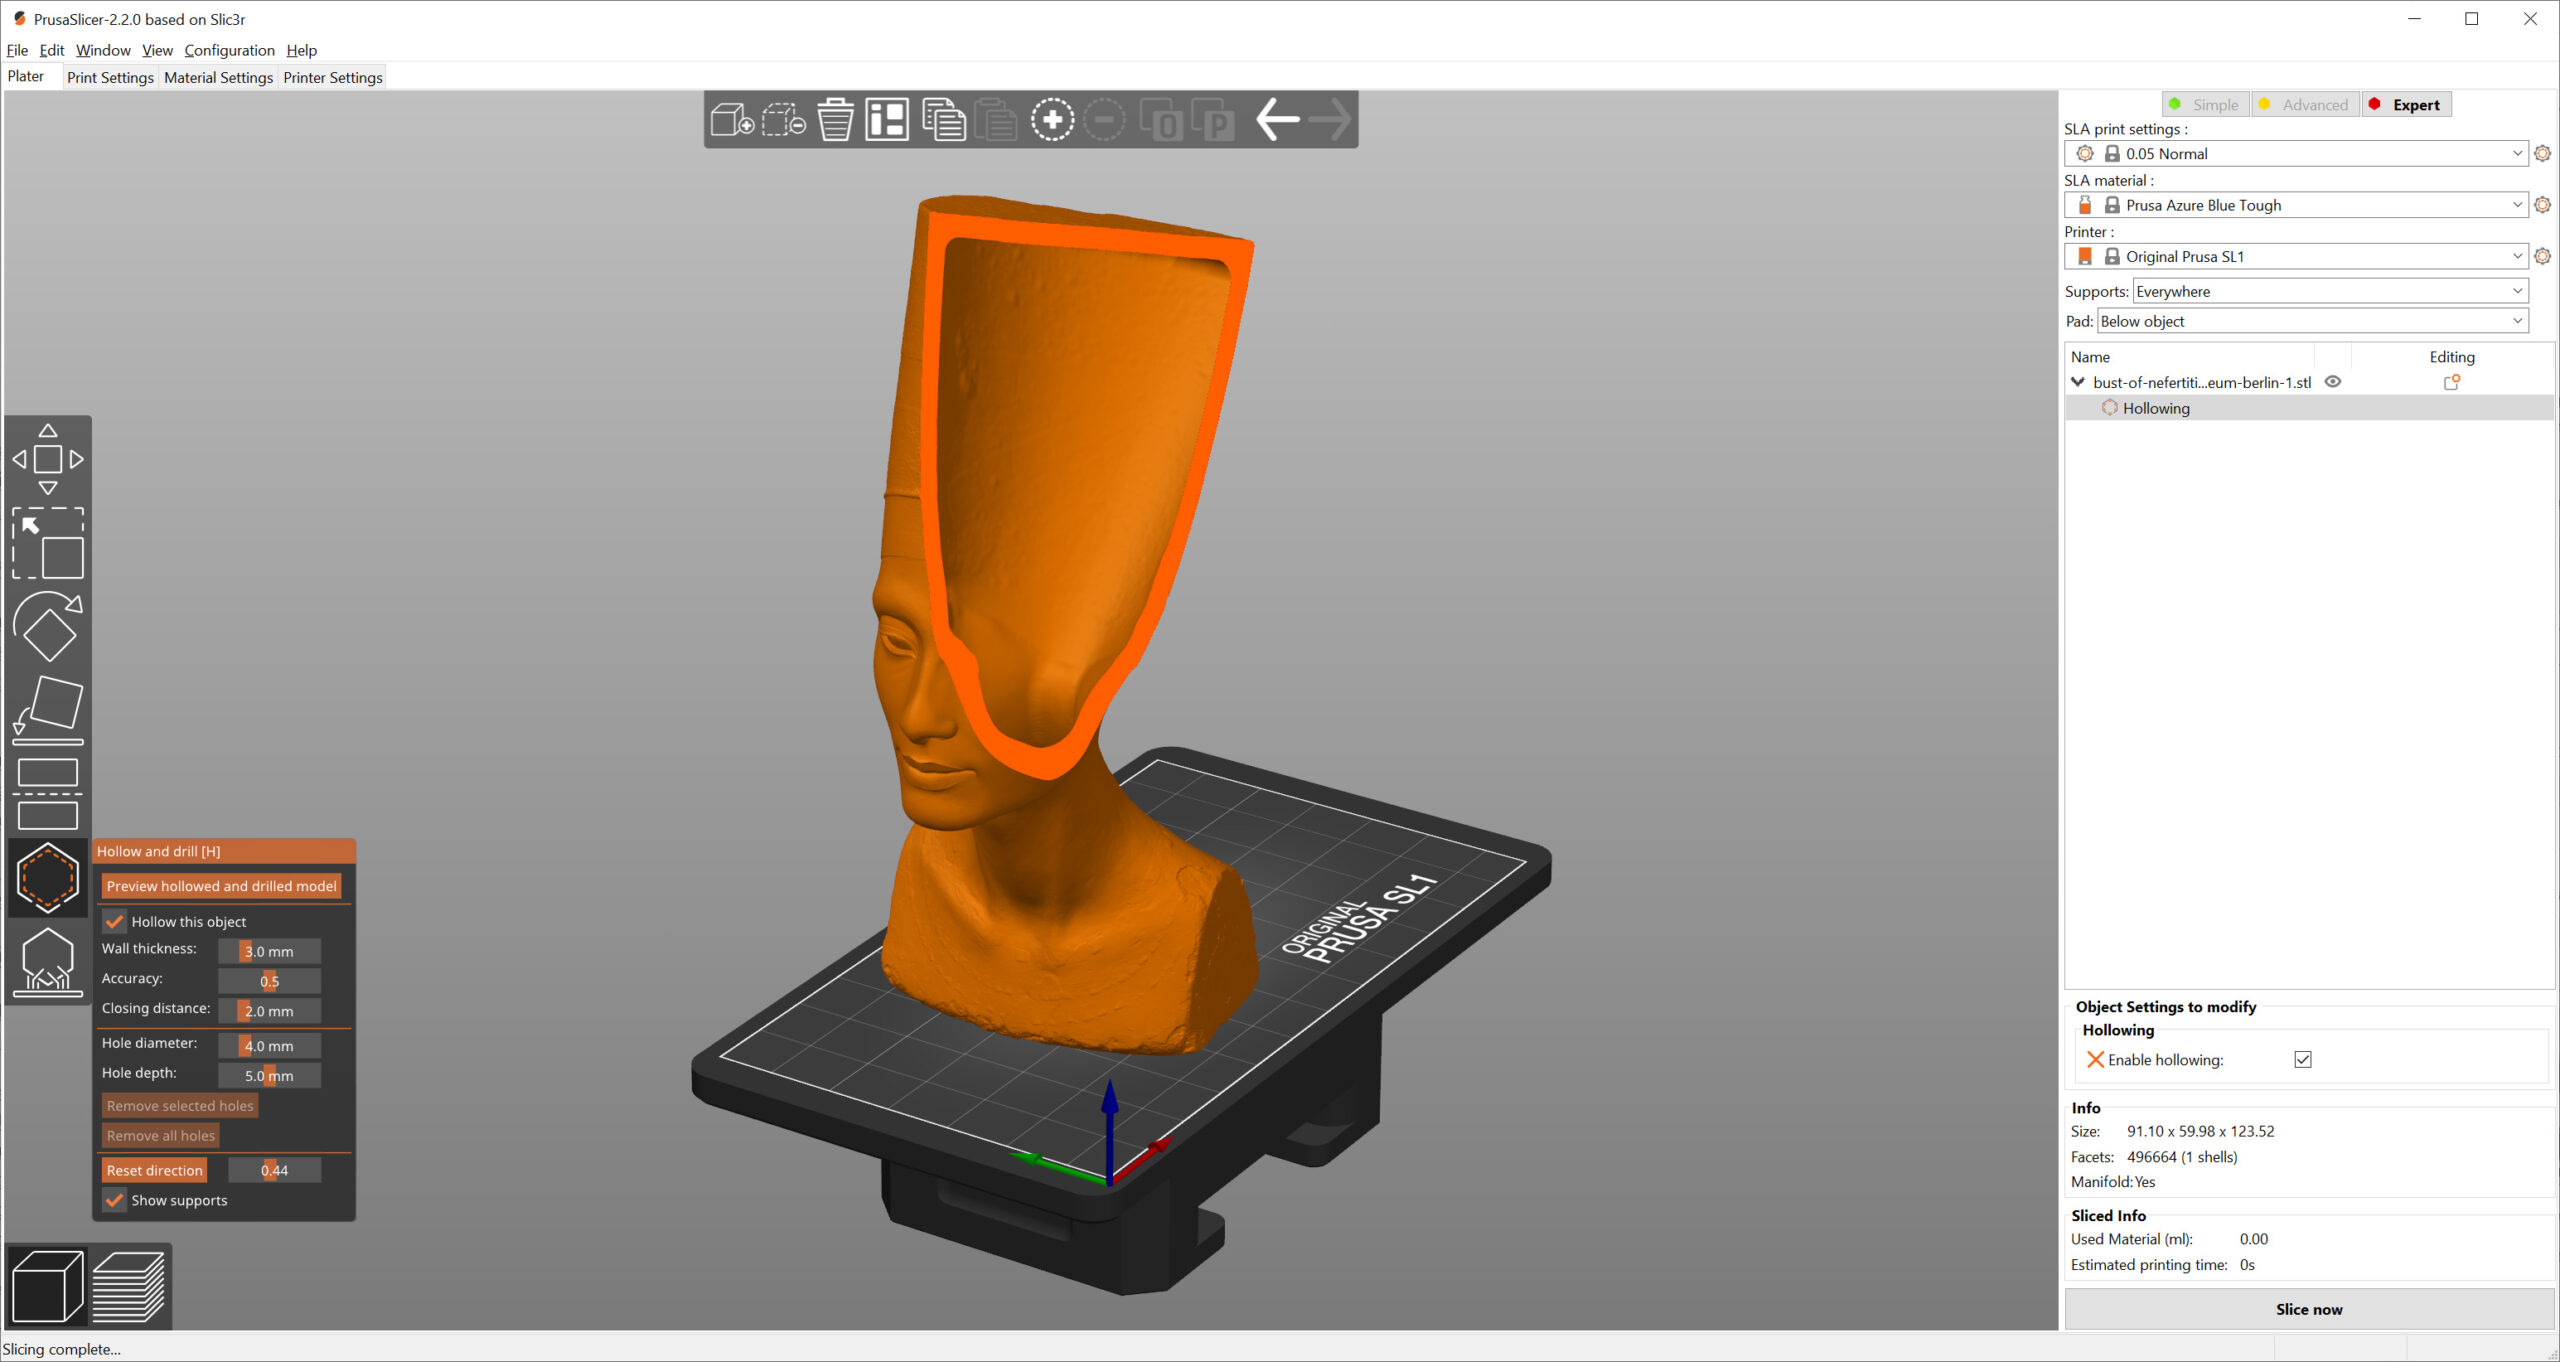
We’re giving you a pretty powerful tool that will save you a lot of precious resin. Let’s take a look at how it works: once you import a model and click the Hollowing and drilling menu, you will be presented with a couple of options. Hollowing thickness is the general thickness of the shelf (we recommend not going lower than 2 mm). Hollowing accuracy defines how precise/quick the calculation will be. Low hollowing accuracy may result in issues with thin walls, so in case you want to print something small with a thin shell, increase the accuracy. Hollowing closing distance is a bit more complex, but here’s the gist of it: the closing distance sets a threshold, which affects how many (and how complex) cavities will remain inside the hollowed objects. It also fills in sharp concave corners of inner walls, from which it would be difficult to remove the uncured, highly viscous resin.

Of course, hollowing would be complete without drainage holes – there should be at least two of them, ideally on opposite sides of the objects (adding more than two holes is better, though). However, sometimes you don’t want to compromise the quality of the surface, so you can position these holes so they don’t interfere with the look of the object. This is extremely important: with no holes on the object, the liquid resin will remain uncured inside the object – in case the object breaks, the resin will most likely leak out. So we definitely recommend adding a couple of holes to make cleaning the inside of the object easier. Click the surface to add a hole, then click and drag to move it. Finally, click the Preview hollowed and drilled model to inspect the preview. You can also work with the hollowed model in the Supports menu, so you can place supports inside it.

Automatic Variable Layer Height
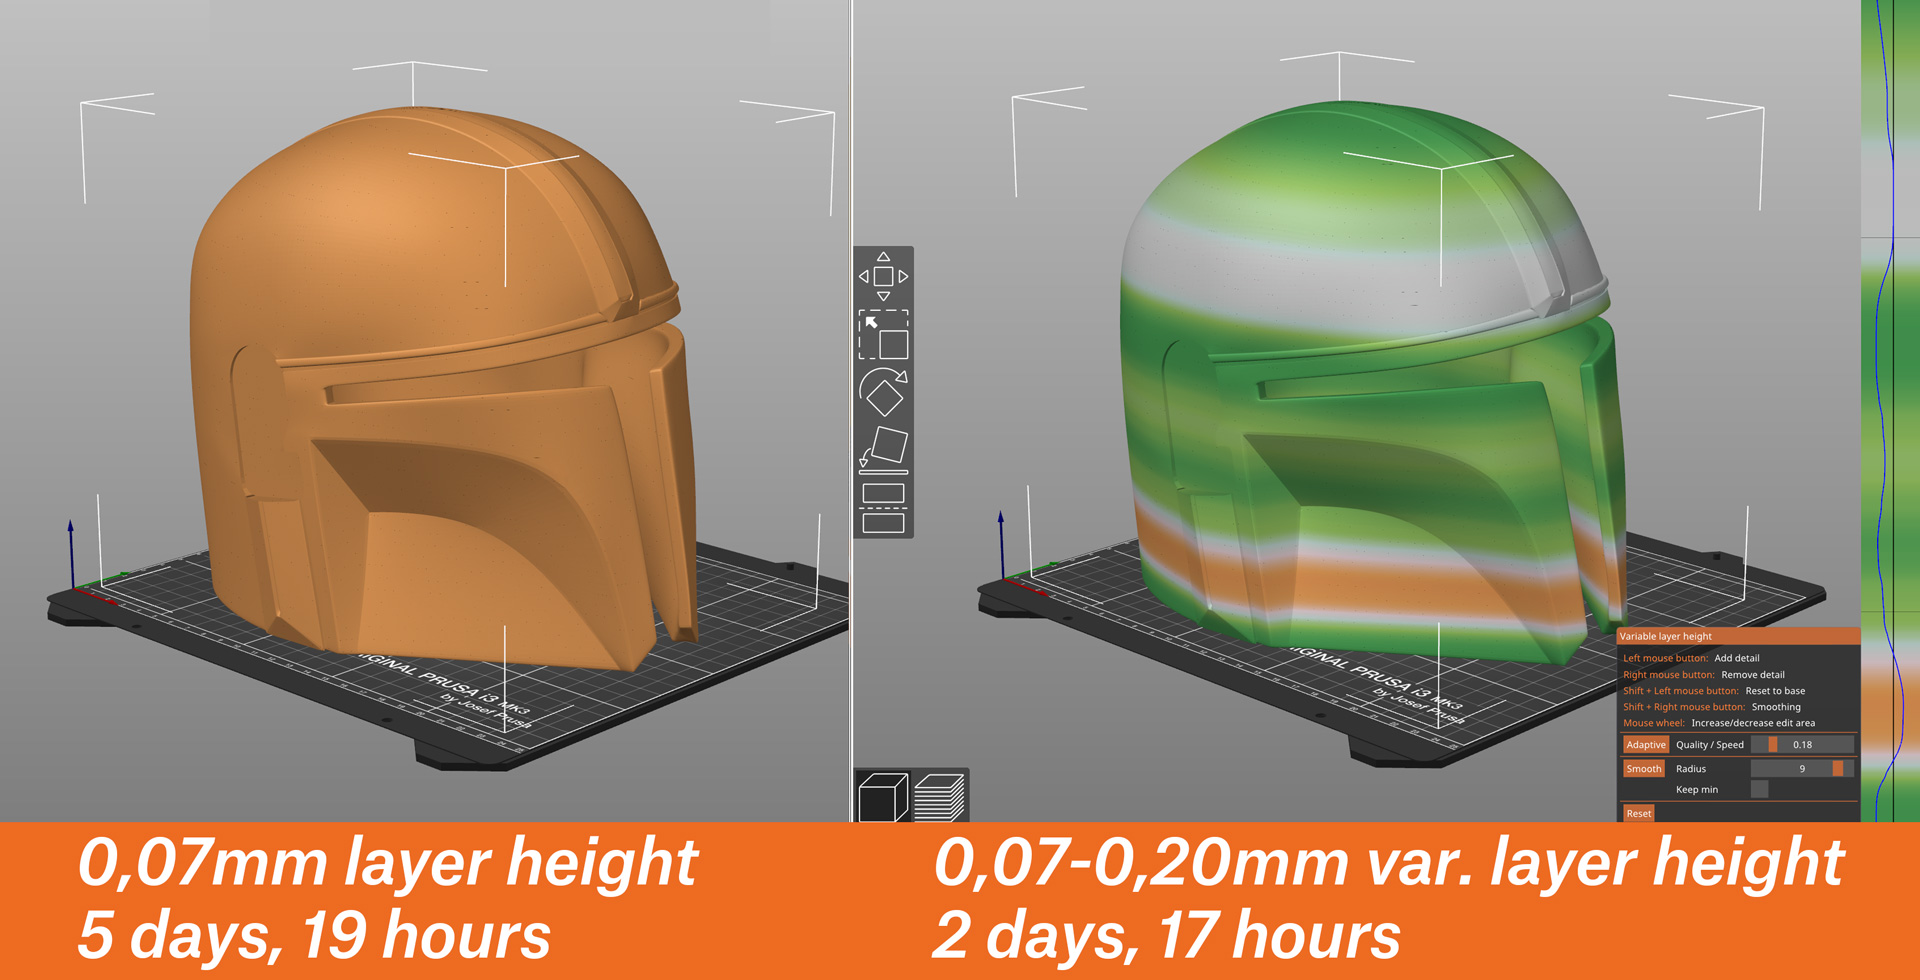
Imagine a situation when you have an object with perfectly vertical walls and a hemisphere at the top – let’s say a helmet for cosplaying. If you want to have the curved part printed nicely, you need to decrease the layer height – the smaller it is, the better the result. However, you will be wasting plenty of time on vertical walls, which would look good even with a higher layer height. Automatic variable layer height to the rescue!
The “Adaptive” tool is accessible through the Variable layer editing menu. It analyzes the imported geometry to suggest which parts can be printed with lower/higher layer height. It’s still an interactive process though. You can smooth the automatic result, edit it manually or recalculate it with slightly different parameters. It takes just a couple of seconds and it can save you even hours during the actual print job. However, keep in mind that the minimum layer height for this procedure is automatically set to 0,07mm by default (you can change this value in settings). This means that you’ll see the biggest difference e.g. between 0,07mm layer height with no variable layer height and 0,15mm layer height with variable layer height set to Adaptive.
If you are interested in learning more about how this feature works, head over to our extensive Documentation!
Adaptive elephant foot compensation
If you’ve ever tried to print two parts that should fit into each other, you might have encountered an issue when the parts were designed with tight tolerances didn’t fit. That’s a side-effect of using melted plastic. As the 3D printer pushes the plastic from the nozzle onto the steel sheet, the material expands to the sides, causing an effect which is called “an elephant foot.” PrusaSlicer had a feature called Elephant foot compensation for some time, but it wasn’t 100% perfect – it merely shrank the contours of the first layer evenly, which could affect thin walls or other small parts of the object.
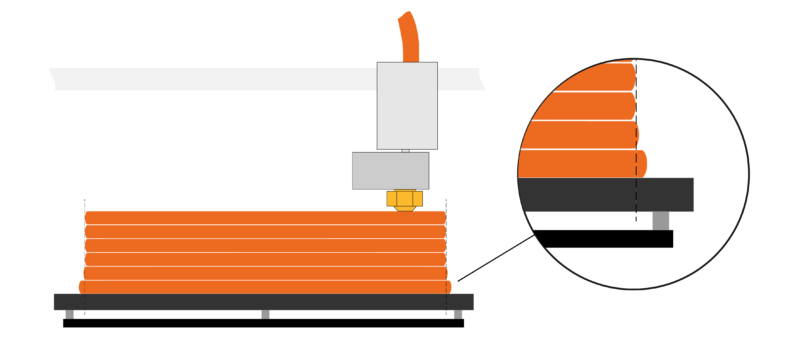
The new release of PrusaSlicer brings an updated (adaptive) elephant foot compensation, which automatically detects thin lines in the first layer and makes sure not to over shrink them. Starting with this release, official Prusa profiles have this feature turned on by default, so you don’t have to set it up. It works both for FFF/FDM and SLA machines.
Useful improvements, tweaks, and fixes
There are, of course, many other improvements and new features in the latest PrusaSlicer 2.2.0, but describing them all would take a ton of space. There’s no better way to see them all than downloading the latest build and checking it out on your own. We always publish an extensive release log on Github, so let’s go through some more features really quickly.
ColorPrint now works with MMU2 and it also has some extra additions – namely an option to add custom G-codes and pauses at selected locations. This is great e.g. for adding magnets into your 3D prints. Find more about this function in our Knowledge base.
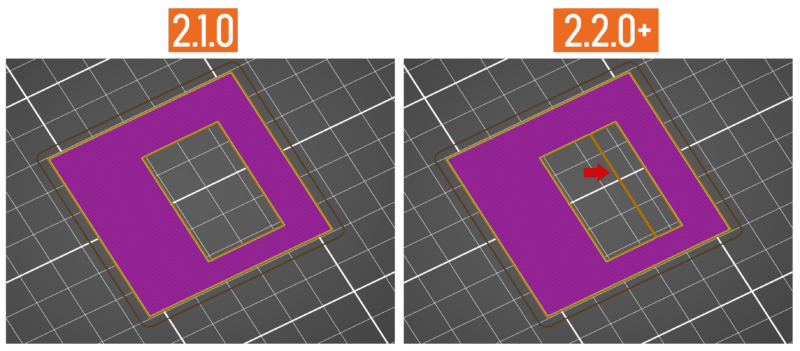
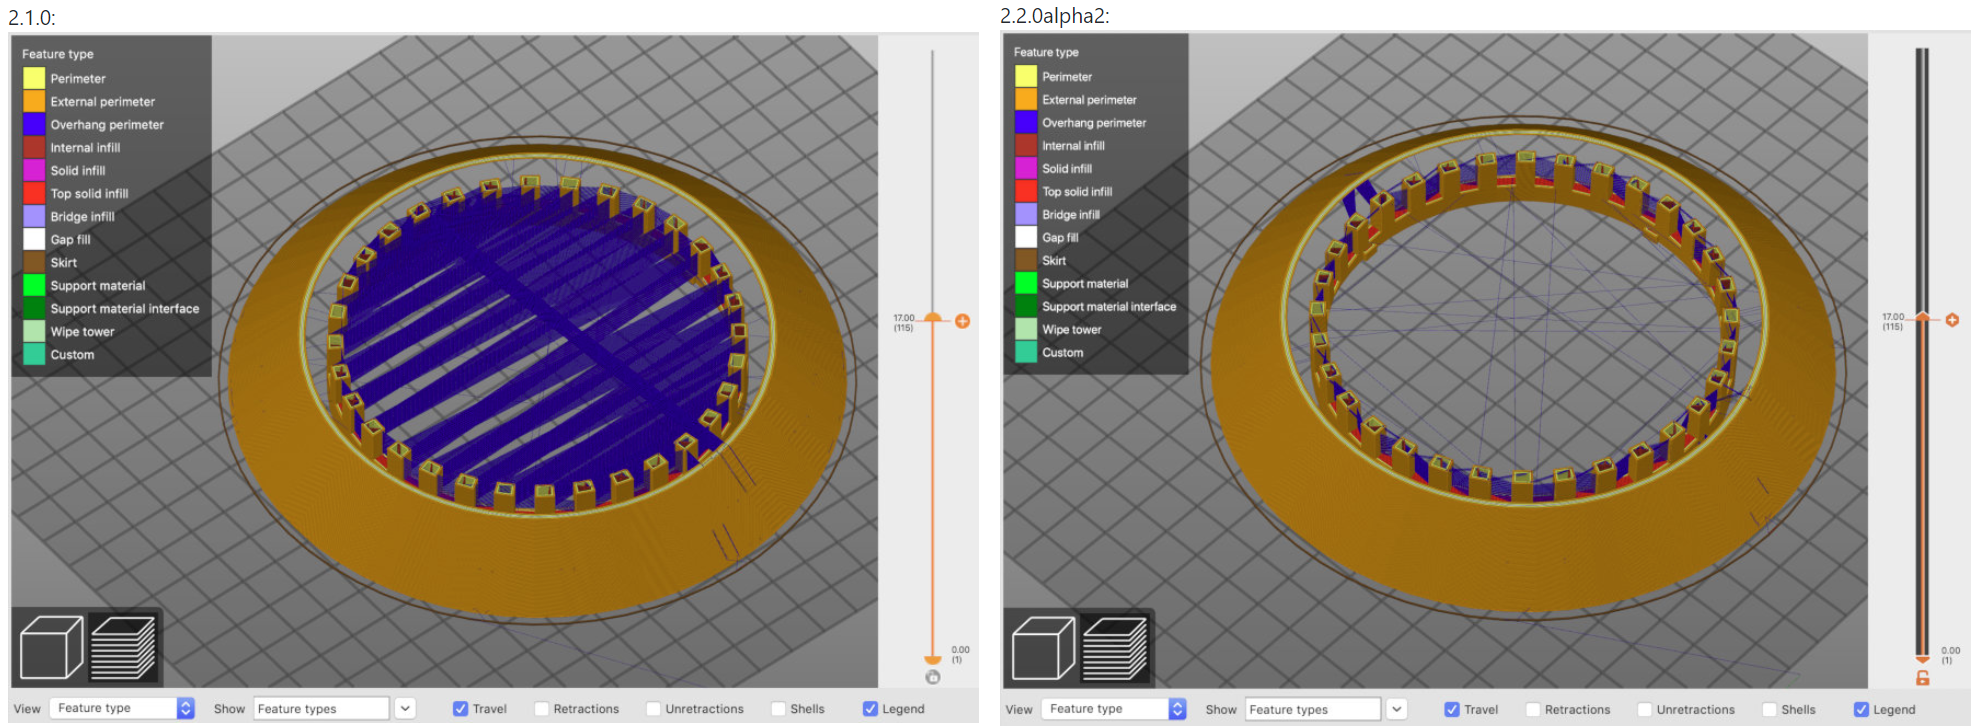
Another change majority users will definitely welcome is better path planning – your prints will be faster thanks to optimized routines for path planning. Check out the screenshot below, it’s a pretty nice difference. And speaking of path planning, if you use the sequential print feature, you can now easily set the order in which the objects will be printed.
Also, there is:
- Full support for 3D Connexion mouse
- USB drive safe unmounting
- Option to add basic shapes onto the virtual print bed
- Updated translations
- OS-specific updates, tweaks, and fixes
- macOS dark mode
- Sequential printing
- …and many other tweaks, fixes, and improvements!
We hope you will enjoy working with the new PrusaSlicer! If you have any suggestions or bugs to report, let us know at Github.com!
Happy printing!
I’m surprised there’s no direct mention of the direct FlashAir upload support here. But maybe I’m biased 😉
>I’m surprised there’s no direct mention of the direct FlashAir upload support here. But maybe I’m biased
Is there a overview for this somewhere?
When I read the polished SD card support I was literally wondering if that would also extend to the FlashAir card!?
On the new 32bit interface, is direct transfer of files possible? Taking place of the FlashAir?
And when might be a good time to start prepping/planning for a likely coreXY platform release?
It cropped up in one of the alpha/beta posts in the forums. Long story short, FlashAir is now an option as a “print host” upload type so you can push directly to a FlashAir card from PS in the same way you could always push to Octoprint.
I can’t speak to any of the other questions; I don’t own a mini, and the XL is going to be on “Prusa Time”, so it’ll get here when it gets here.
i’m confused. I wrote up a flashair guide in the forums way back in 2018 on how to make it a network drive and save right to it.
is this somehow different?
https://forum.prusaprinters.org/forum/original-prusa-i3-mk3s-mk3-user-mods-octoprint-enclosures-nozzles-…/flashair-wifi-sd-card-setup-and-drive-mapping/
One little new feature not mentioned is rotation of an object by Z axis by 45 degree increments with page up/down and moving objects around the print bed with cursor keys.
Where is the option to change the varible layer minimum height? Thanks.
Installed PS2.2.0 reverted back to 2.1.1. BSOD on windows 10.
For me this version works perfectly. But would it be possible to explicitly enter the values of the layers numerically in the variable layers? With the mouse it is not very precise
“Our goal is to turn our PrusaSlicer into a truly universal slicing software for all sorts of third-party printers.”
If this is the goal, the name of the slicer may be an obstacle to uptake by non-Prusa users. After all, part of the reason for the success of Ultimaker’s Cura software is that it doesn’t have the name of a particular brand of printer. Certainly it would be an obstacle for buy-in by other companies, which would be necessary to make Prusa’s slicer more reliable than the slicers these other companies use.
> After all, part of the reason for the success of Ultimaker’s Cura software is that it doesn’t have the name of a particular brand of printer.
Really? How about “Ultimaker Cura”?
Is the issue where changing the Nozzle size to anything other than .25, .4, or .6 immediately renders all print settings as incompatible? This is an incredibly frustrating thing and I honestly don’t see how changing the nozzle size should destroy all of my presets – including any new ones I create to work with that new nozzle size (for example a 0.3 nozzle where I can simply use the .25 print profile and change a few parameters) Or at least add a box that says – is this the same printer? I’m going nuts over here digging through mounds of old profiles that actually are incompatible with my MK3s in order to find a simple default I’ve created for a .3 or .5 nozzle.