


With the holidays around the corner, we prepared an early gift for you – the final version of PrusaSlicer 2.4! With multi-material painting, improved supports, shape gallery… the list of new features is once again nearly endless! Big thanks go to all testers of the alpha, beta, and release candidate versions, your feedback is much appreciated.
What’s New In PrusaSlicer 2.4
Before we jump into a detailed description of new features, here’s a quick overview of the biggest additions:
- Multi-material painting
- Improved supports and bridging
- Shape gallery
- Fuzzy skin
- Windows dark mode
- Brim for individual objects
- Negative volumes
- Automatic color change for logos and signs
- Tip of the day notifications
- Model simplification
- Support for 3DLabPrint airplane models
- New 3rd party printer profiles
- …and more!
You can download PrusaSlicer for all Windows, Mac, Linux and we even provide 64bit ARM builds for devices such as Raspberry Pi and ARM Chromebooks.
We also keep expanding the PrusaSlicer documentation, where you can read a detailed description of its functions with examples of their use.
Multi-Material Painting
Preparing models for multi-material FDM prints used to be a complicated and time-consuming process. With this release of PrusaSlicer, coloring an object requires just a handful of clicks with the smart fill and brushstroke operations!
In PrusaSlicer 2.3, we introduced paint-on supports and seams. Seeing the painting tools in PrusaSlicer, many of you asked for similar tools to help with multi-material printing. An easy way to paint models was something we wanted to do for years, ever since we released the first Multi Material upgrade. But this problem is significantly more complex than it may initially seem. First of all, a regular brush tool we implemented for painting supports and seams would make this just partially easier. You would still have to tediously trace edges with every color. And second, the color can’t be applied just on the surface, it needs to extend inwards. Otherwise, the two polymers would not bind together well and it would be easy to peel the colors off.
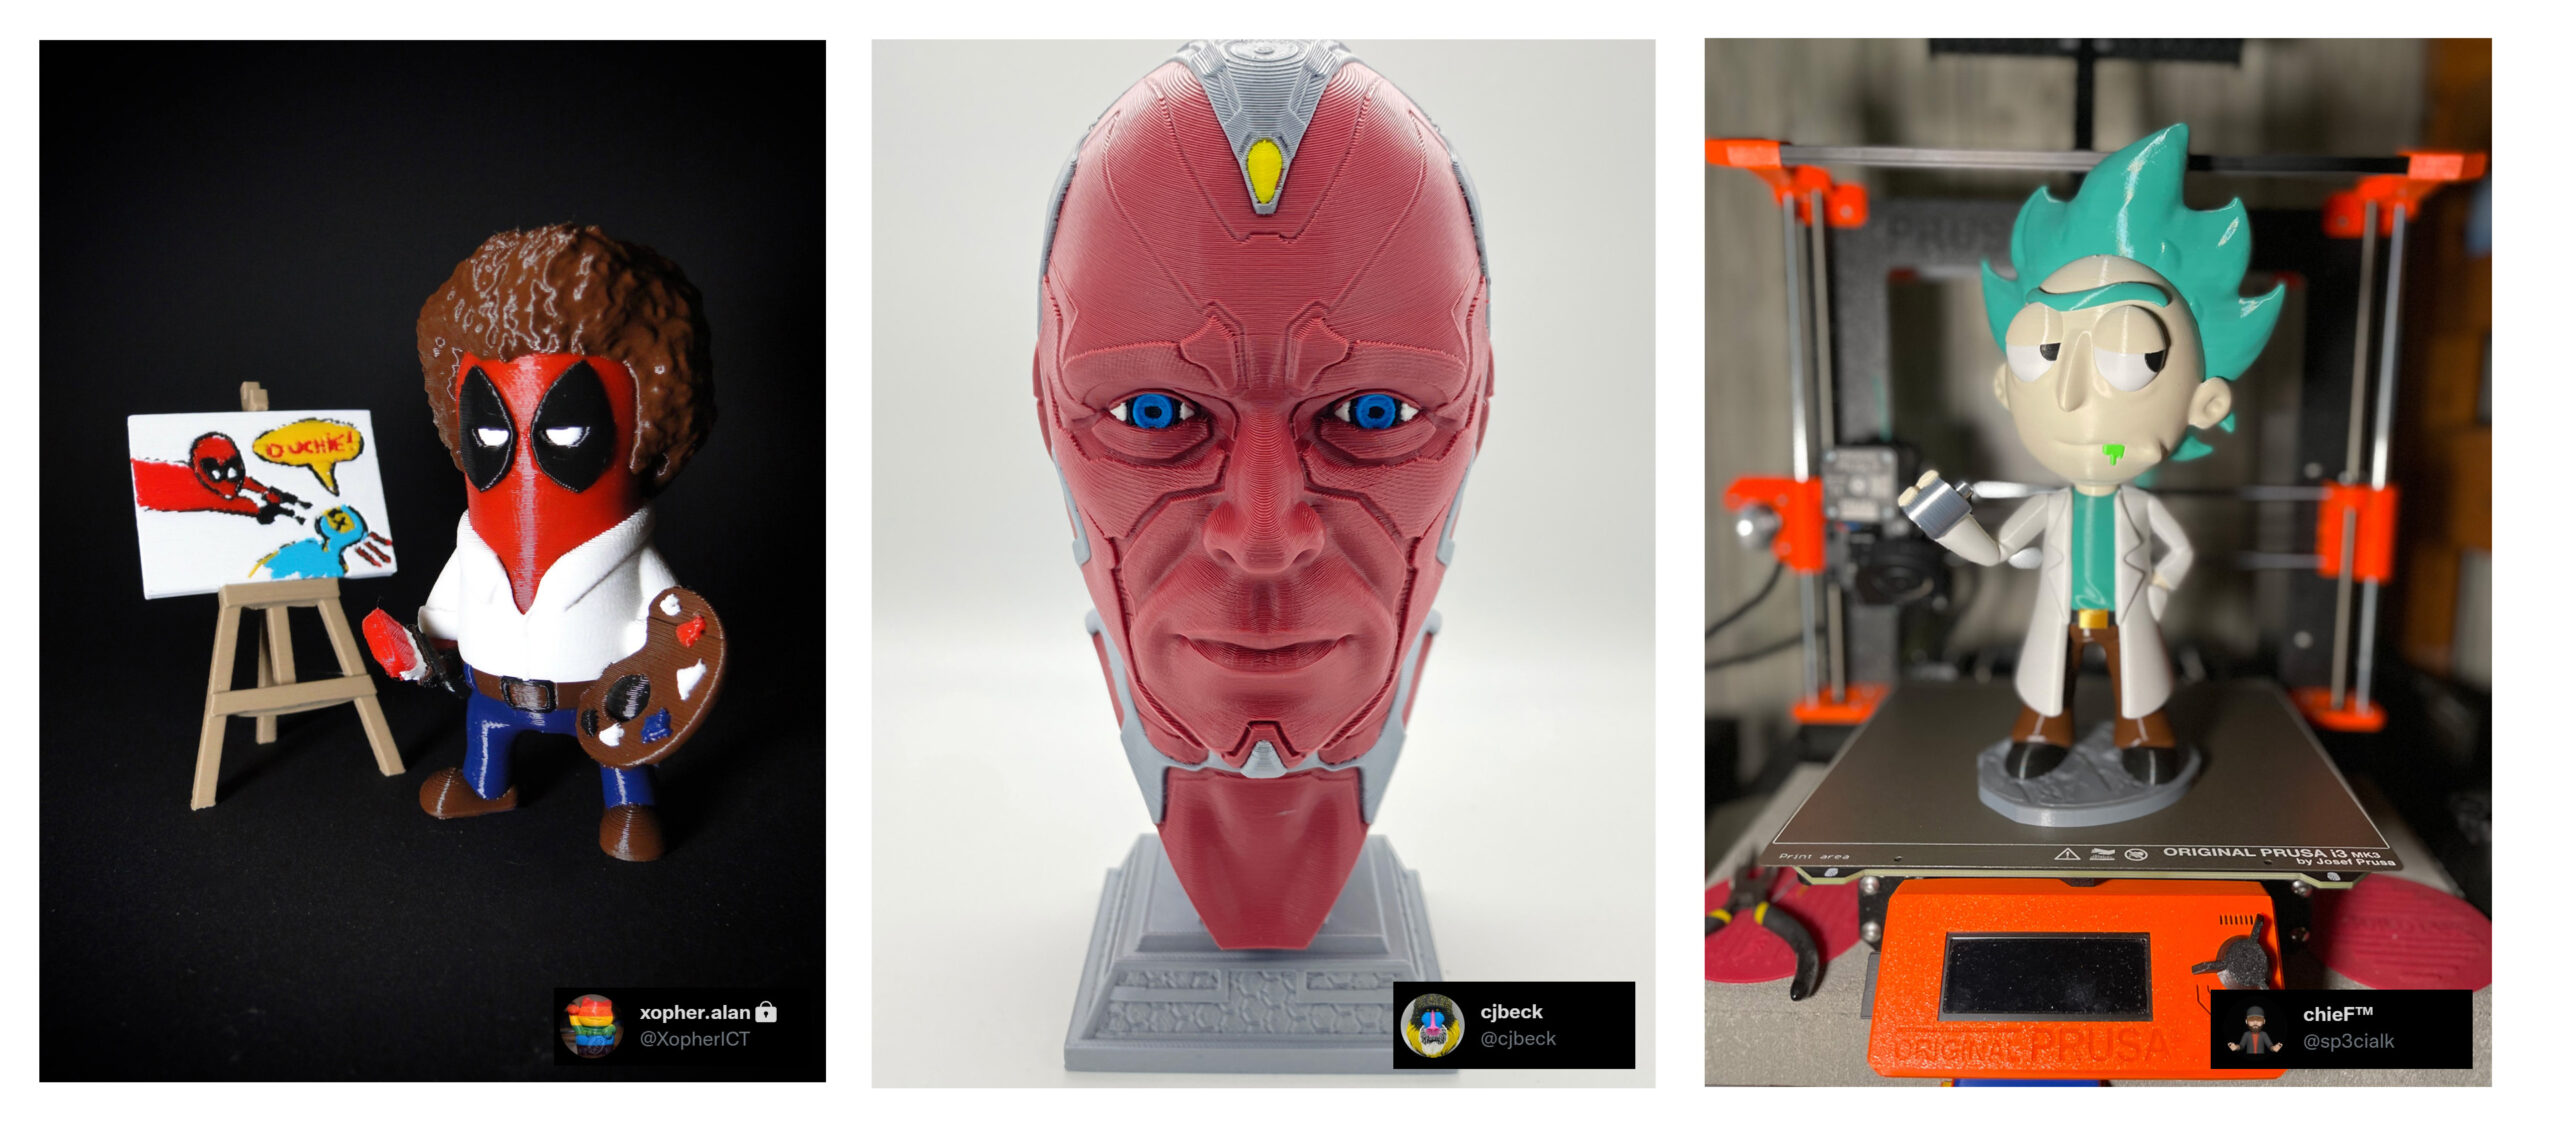
Models painted with PrusaSlicer 2.4
To make coloring quick and easy, we implemented the Smart fill and Bucket fill tools. With the Smart fill tool selected, as you hover the mouse above the model, you get a real-time preview of the automatically detected region to paint. The paint fills a region below the mouse cursor up to a sharp edge, with the threshold angle adjustable. You can also quickly swap continuous patches of color with the Bucket fill tool. Of course, you can also zoom in and use the Brush tool to paint manually. It will automatically split big triangles into smaller ones, so you’ll have enough resolution for your masterpieces. 🙂 During slicing, the painted regions are cleverly extended inwards, giving the different colors/polymers the best chance of binding together.
Improved FDM Supports and New Bridging Mode
One of the most frequent (and rightful) complaints from the community is about PrusaSlicer’s supports. With this release, we have redesigned supports and significantly improved them. We are very well aware of the many requests for Tree supports and we’re planning to add them in the future. But with our new supports, you might find your craving for tree supports significantly lower. 🙂
The default grid supports have a very well-defined minimum area, making them very stable. However, they tend to leak out of regions they support along the walls of the object. We introduce a new type of “Snug” supports. These supports maintain the shape of the overhang, so they do not leak to the walls. The trade-off is the possibility of lower stability of tall and thin support pillars. We are leaving the grid supports as the default, for now, so make sure you switch them manually if you want to try them.
You can now set the support contact distance on the top and bottom independently. If you enable “Support on build plate only”, the support columns will be trimmed to not land on top of the object. The expansion of the first layer is now configurable (very common request). Prints on top of a raft now look better. When you use support enforcers (paint-on or modifier shapes), they will take over “supports on build plate only” and over “don’t support bridges”. And there are many other small improvements.
You can highlight overhangs when painting supports. Using a new checkbox you can limit the brush strokes only to the highlighted overhanging triangles. Lastly, the “Smart fill” tool is also available when painting supports.
New Bridging Mode
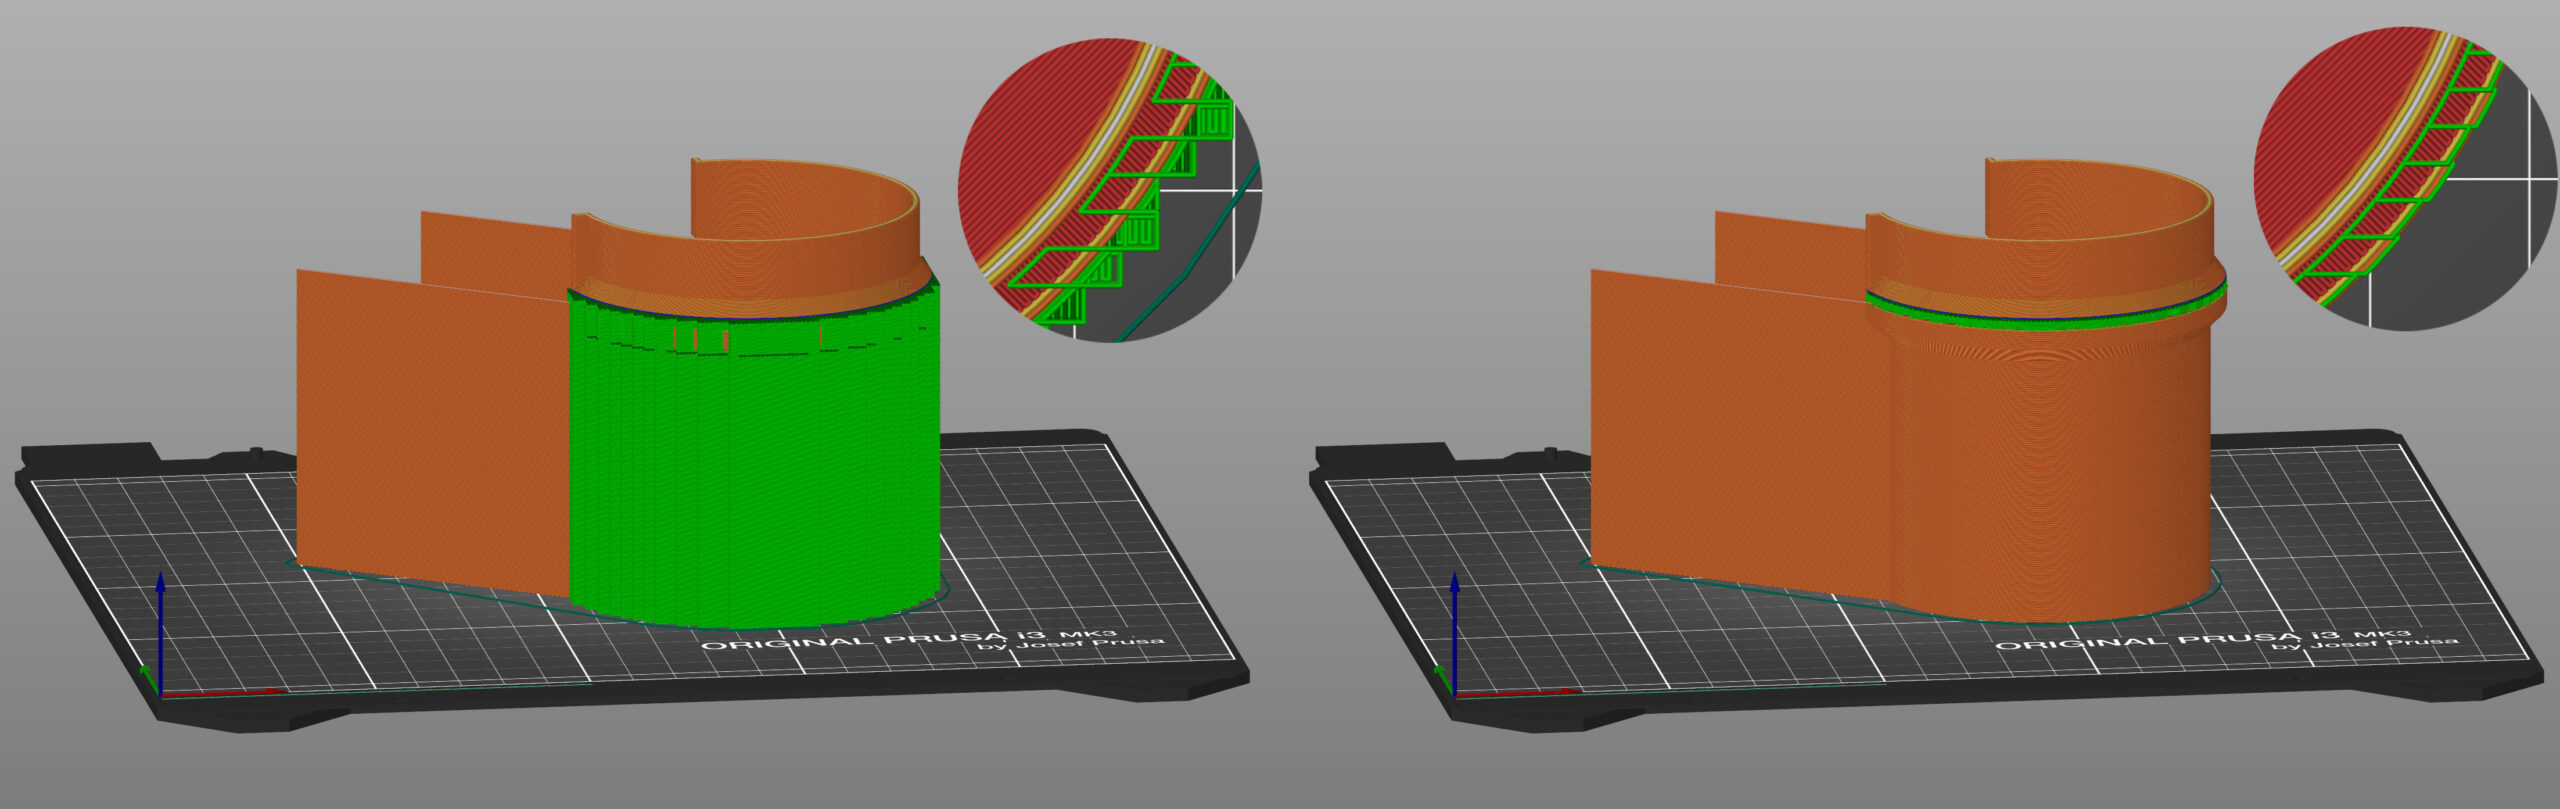
For historic reasons (explained in detail in the changelog), PrusaSlicer used to print bridges with extremely thick lines. This makes bridging very reliable and lets you bridge longer distances, but they didn’t look very good. The new default behavior uses your current layer height for bridging, making bridging reliable for shorter distances, but looking significantly better. This is the strategy that most modern slicers use. You can switch to the old behavior by enabling the “Thick bridges” option. Since the first solid layer above supports uses the bridging settings, this change also has a big impact on how supported overhangs look.
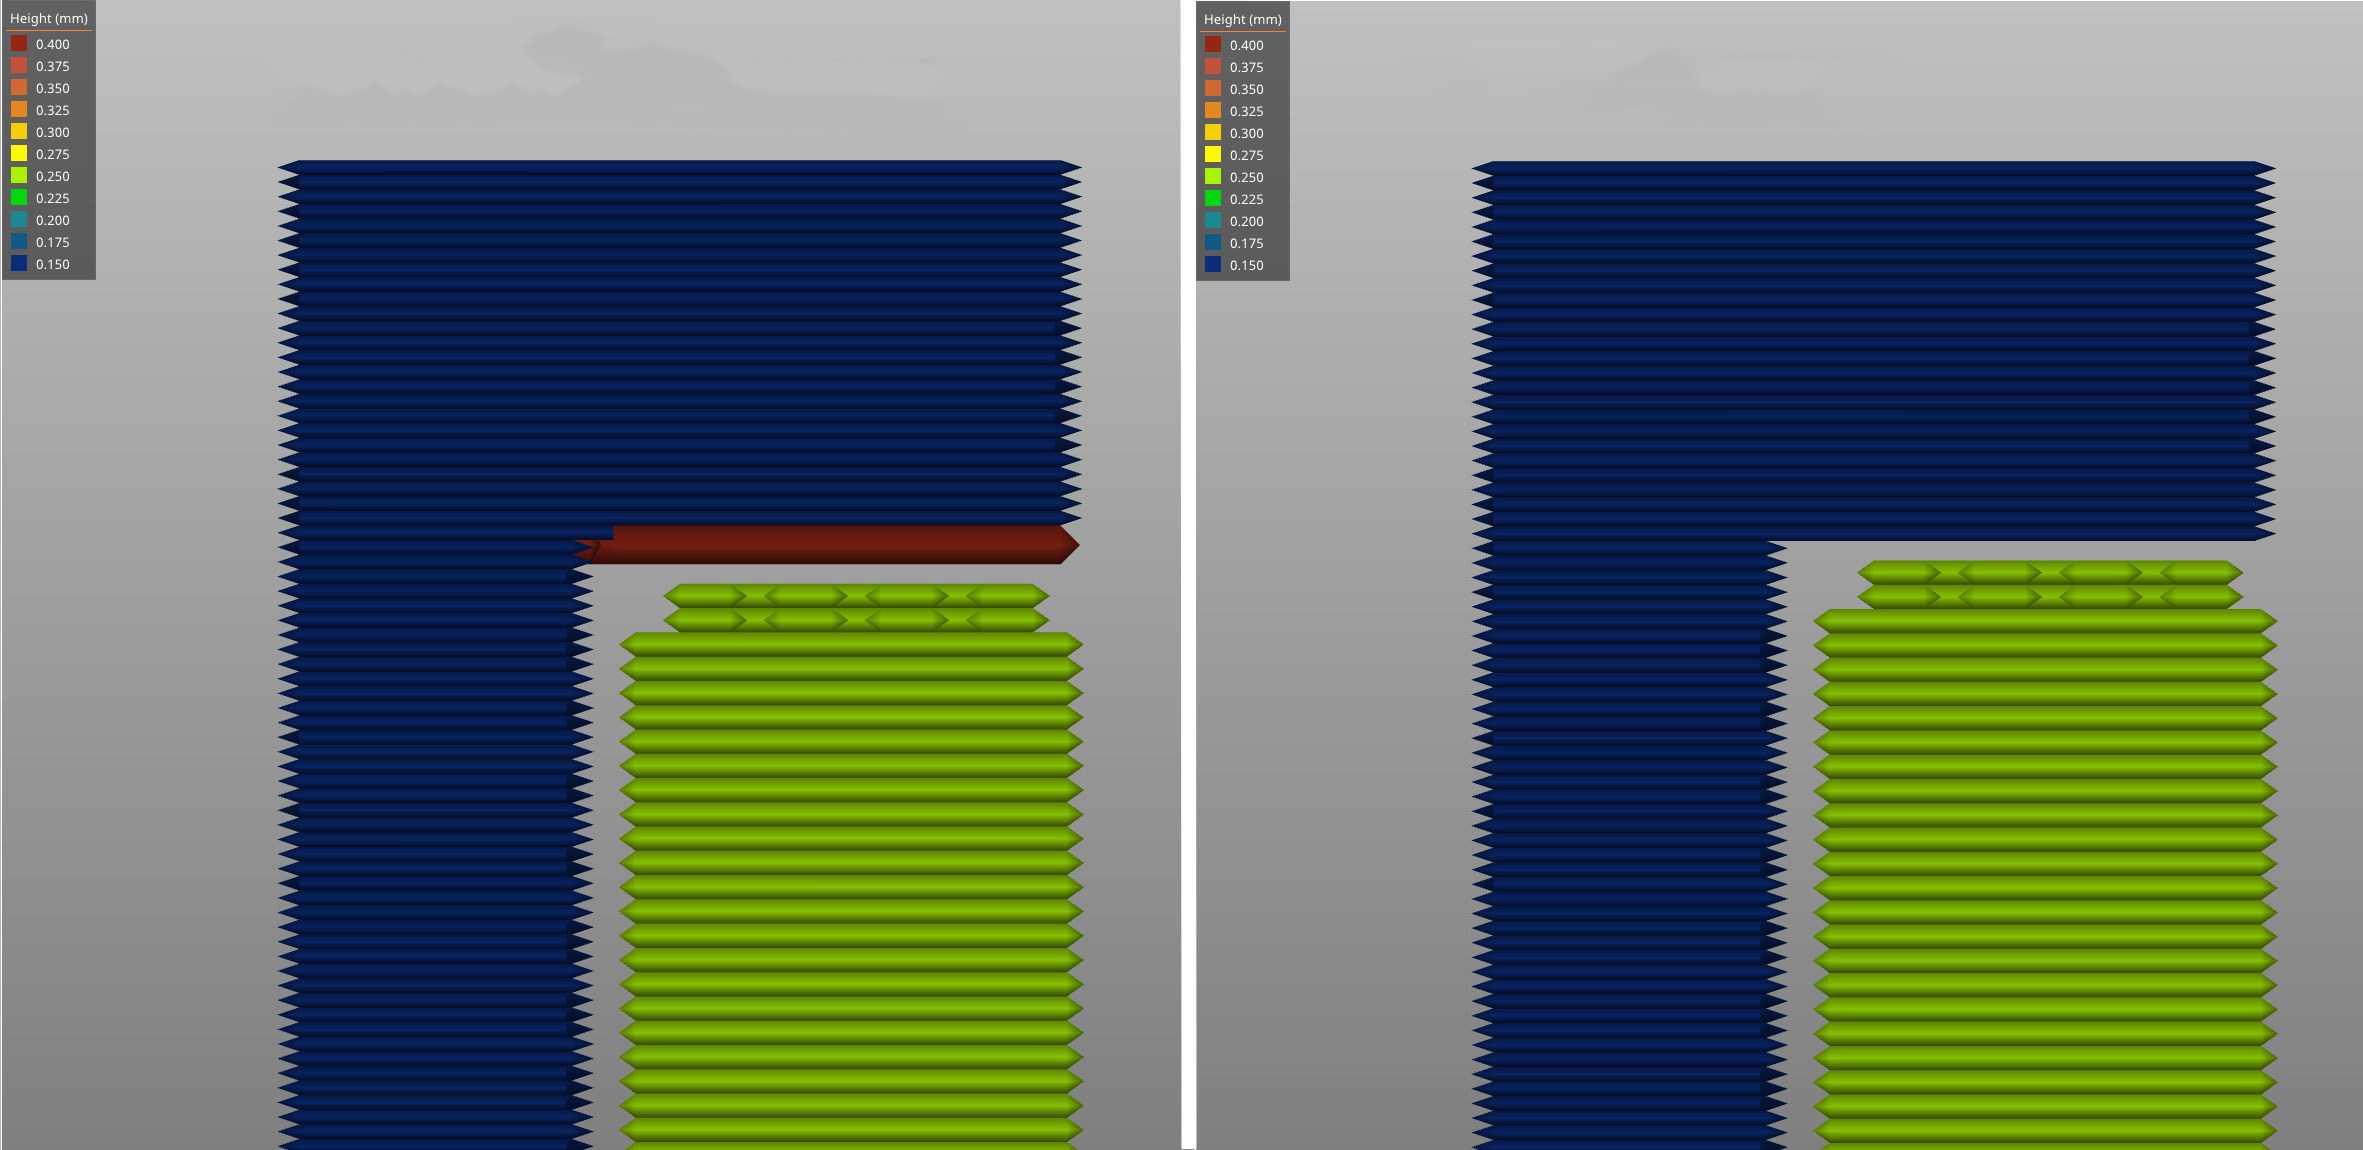
Left: Thick bridges enabled (old behaviour), Right: Thick bridges disabled
Overall, supports should now be easier to remove, more customizable and the supported areas should look better. We will continue tweaking their settings in our automatically updating profiles.
Shape Gallery
The new built-in shape gallery provides a quick and easy way to access your most used models, whether you use them as modifiers or to be placed on the platter and printed. The default shapes include basic primitives (cube, cylinder, sphere…) as well as other useful objects, such as a helper disk or a recycling symbol. You can expand the library with your own models. This could be your company logo, a modifier shape that you use often, or just a model you print over and over again. If you add a model, it will get an automatically generated thumbnail. However, you can replace the generated PNG thumbnail with your own image.
We plan to expand the shape gallery functionality in future releases. We’ll likely add a folder/tab system, so you can organize the shapes. We’re also planning to add a text generator. And we’ll expand the library of the default shapes. If you have a suggestion for a model that should be included by default, let us know!

Fuzzy Skin
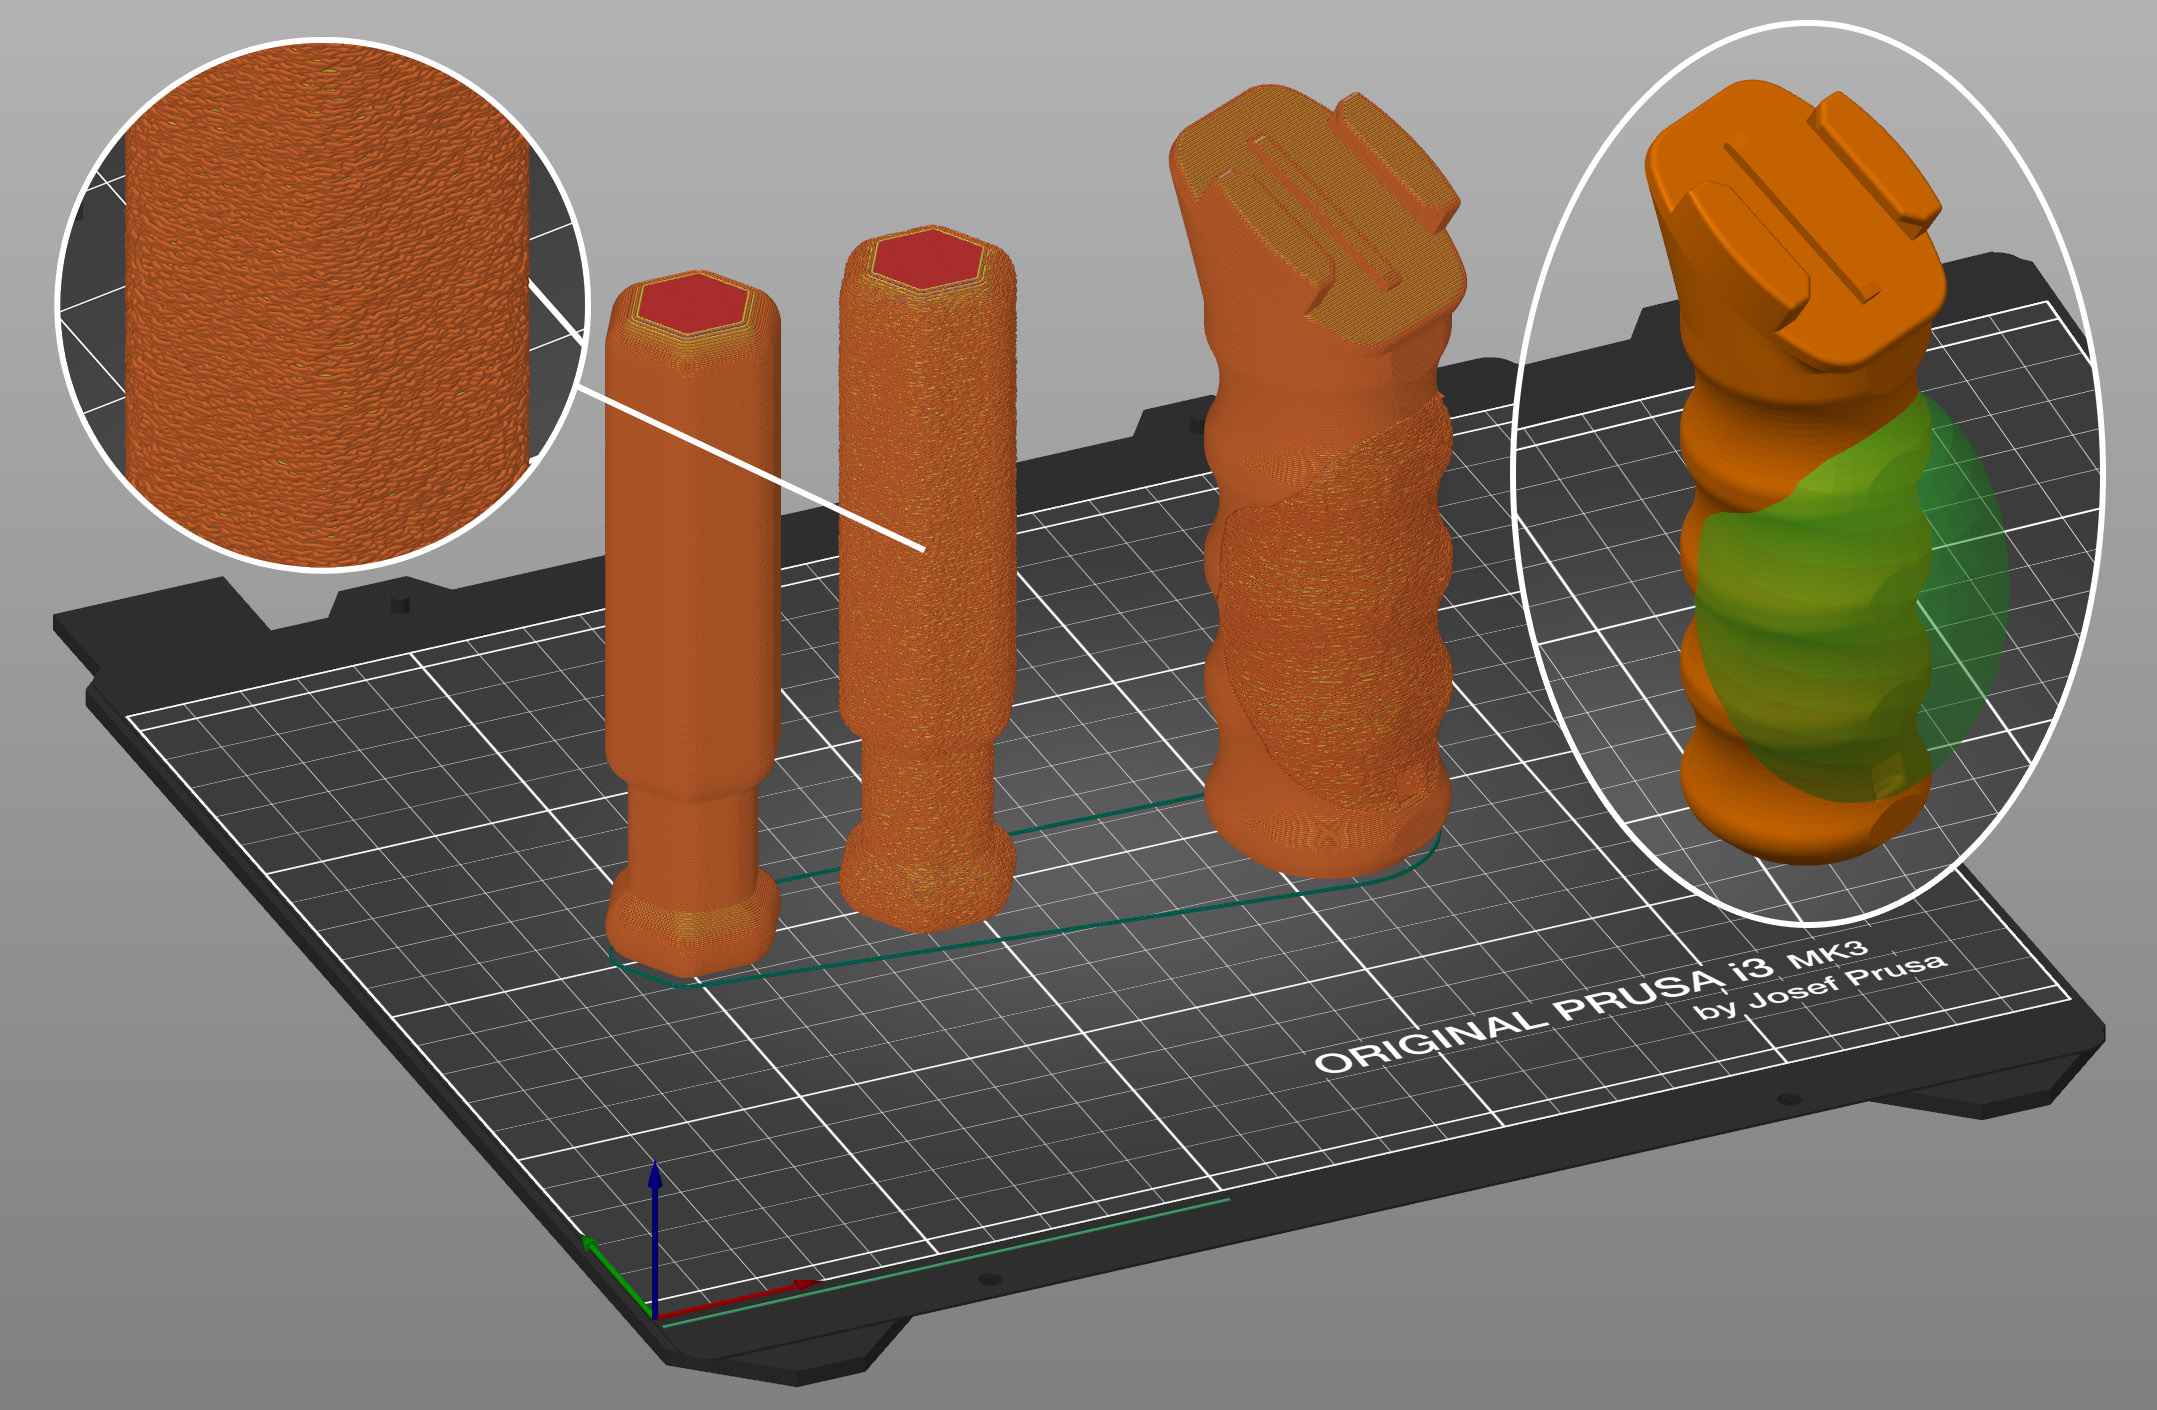
Fuzzy skin lets you create a rough fiber-like texture on the sides of your models by randomly offsetting the perimeter points. It produces surprisingly nice results suitable for tool handles or just to give the print surface a new interesting look. Or to hide print imprecisions. You can also use modifiers to apply fuzzy skin only to a portion of your model.
We have ported this popular feature from Cura. So a big thanks goes to the Cura team for keeping it open-source!
2-4× Faster G-code Generation
We have parallelized and optimized the G-Code export. This results in significant improvement of performance. The total slicing time is now 2× to 4× faster, with higher speed up achieved on high-end CPUs with many cores and threads.
Windows Dark Mode
PrusaSlicer already supported dark mode on OSX and Linux, based on popular demand, we implemented dark mode for Windows as well. This took significantly more effort than we expected. Unlike OSX and Linux, Windows has no official dark mode for Win32 controls, which our multi-platform GUI library (wxWidgets) uses. So we embarked on a journey to implement it ourselves. We started skinning the existing Win32 components and implementing replacements for those, which were not skinnable. Luckily, we discovered Notepad++! As far as we’re aware, Notepad++ is the only Win32 open-source application that implements Dark Mode to a reasonable extent. We ended up using some of the source code from Notepad++ interfacing with the unpublished Dark Mode API, which is based on this project.
More Awesome Features
Brim For Individual Objects, Inner Brim
Brim settings are now object-specific. That means you can turn on brim just for some of the objects, use different brim widths for individual objects, etc. This seemingly small change required a surprisingly significant change of PrusaSlicer’s code. You can now also select to generate outer brim, inner brim, or both.
In previous versions, elephant foot compensation (EFC) was applied on the first layer of the object, while the brim was left as if no EFC was applied. This leads to a small gap between the object and the brim. When printing, this gap should be filled due to the elephant foot effect. However, this made the actual sticking of the brim quite sensitive to the adjustment of first layer calibration. And sometimes it led to inadequate attachment of the brim to the object. Starting with this release, the brim is generated after EFC of the object, without the gap. But the offset of the brim can be adjusted with a new configuration parameter “brim_separation”.
Negative Volumes
The negative volume lets you subtract one mesh from another. Similarly how boolean operators work in other 3D programs. That way you can, for example, create easily resizable holes directly in PrusaSlicer. Or you can load one of the objects from the new Shape gallery as the negative volume.
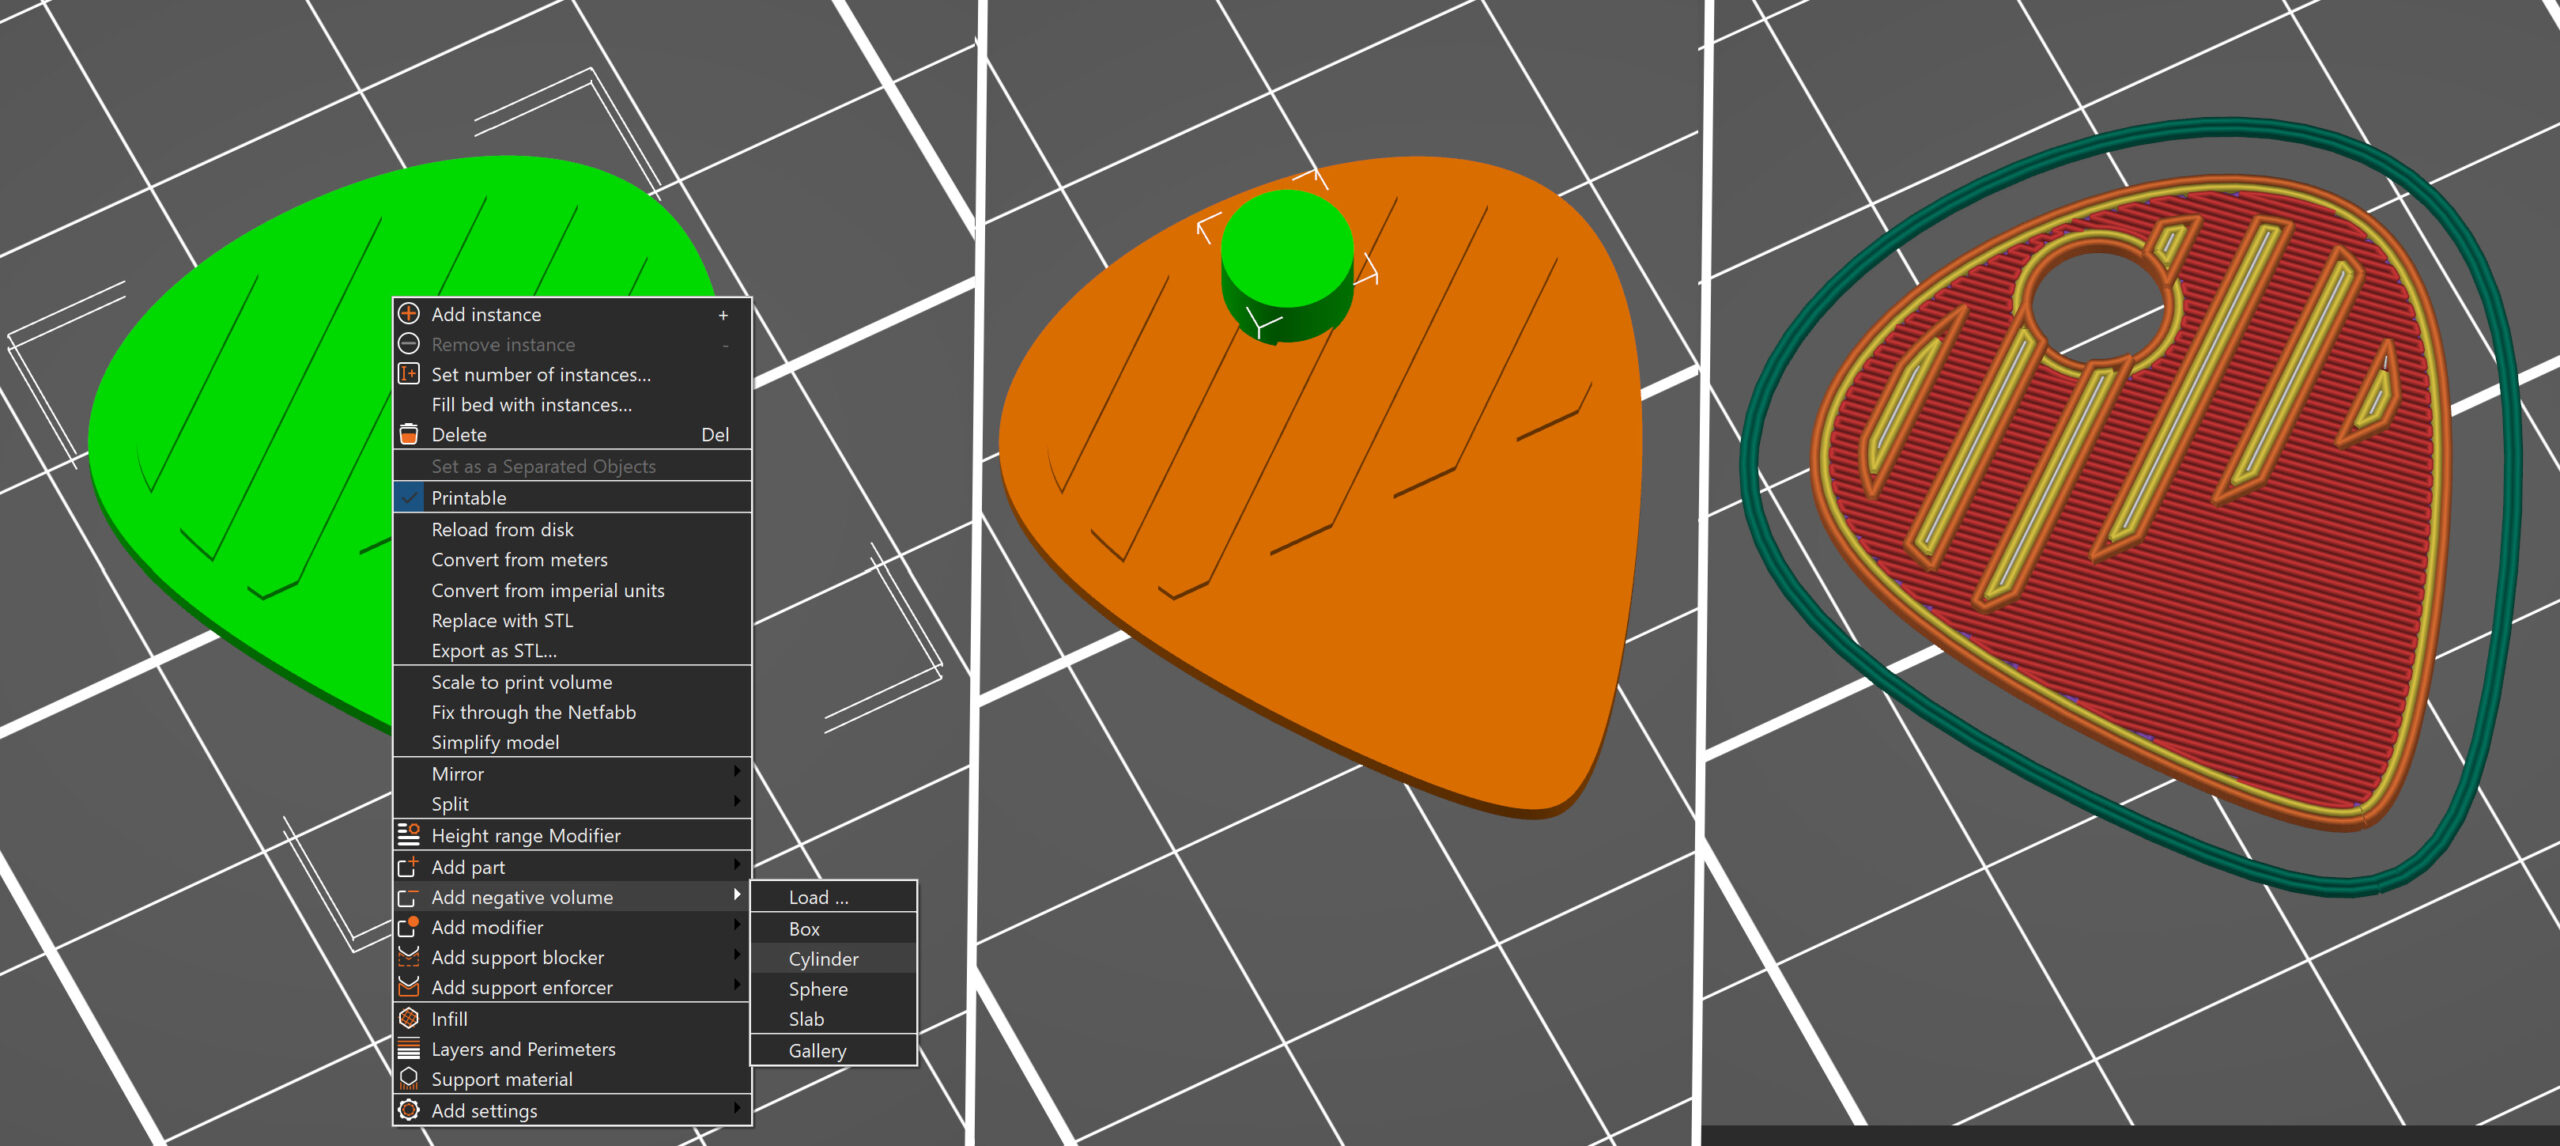
Automatic color change for logos and signs
When PrusaSlicer detects the model looks like a logo or a sign, a notification will offer you to automatically add color changes to the correct heights. This feature was proposed by Richard Horne, thank you for the suggestion! It saves you time and removes the guesswork from inserting the color changes at the right height.
Tip Of The Day Notifications
As is evident from this long article, PrusaSlicer grows more powerful every day. Offering many unique features not found in other slicers. The downside of adding new features is the ever-increasing complexity of the program. To streamline everyday slicing, many features are accessible through hotkeys and keyboard modifiers (Ctrl / Alt + mouse key). In version 2.3, we added the search function. Now, we present “Did you know” hints inside a notification, often providing a hyperlink to highlight a user interface element (toolbar button, configuration parameter) or to open the documentation in a web browser. Every time you launch PrusaSlicer, one hint notification is displayed, presented by our trusty Clippy Jo. You can even print him! 🙂 We did our best to fill the tips with actual useful information and little-known features, described in short, digestible bits. But of course, you can disable them in preferences.

Model simplification
3D scans and sculpted models often have a huge number of triangles, making them difficult to work with. These files can slow PrusaSlicer down, take a very long time to slice and even slow down FDM 3d printers, due to the huge number of short toolpaths generated. You can reduce the number of triangles in a mesh using the new Simplify mesh feature. Right-click the model and pick Simplify model from the context menu. You can limit the simplification either by detail level or by the ratio of triangles to remove.
This feature can also be used to create the “Low-poly effect” directly in PrusaSlicer.

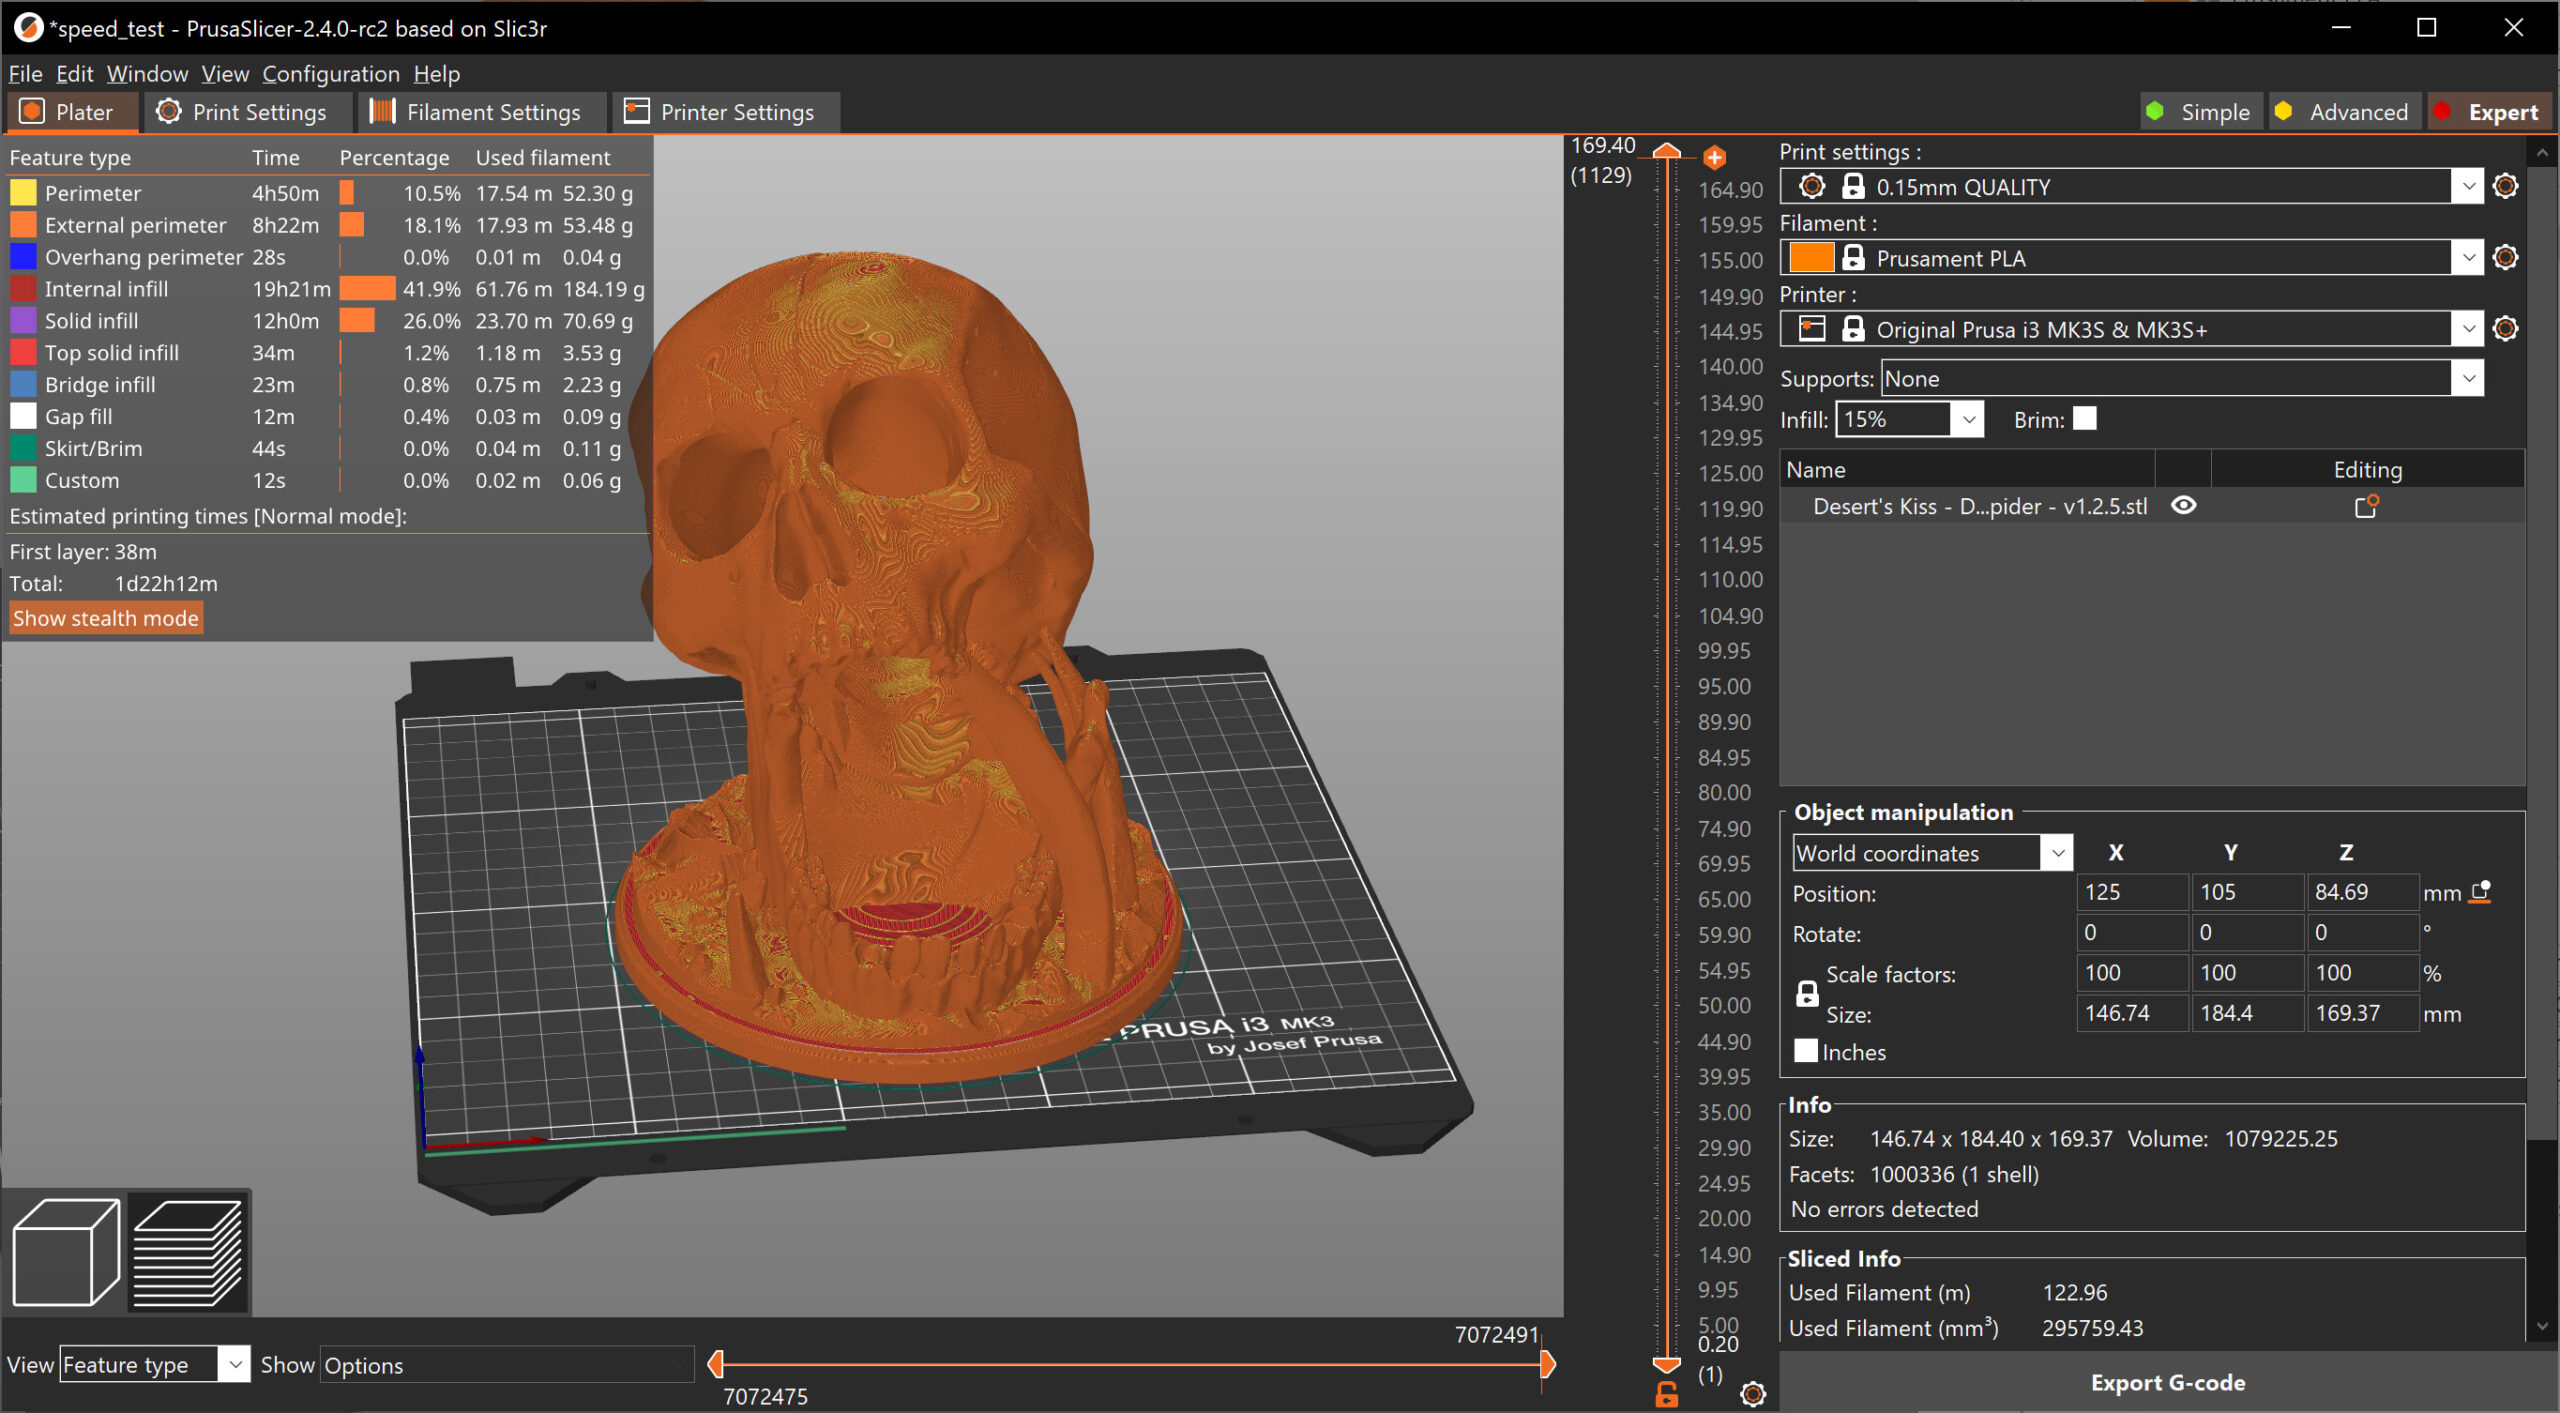
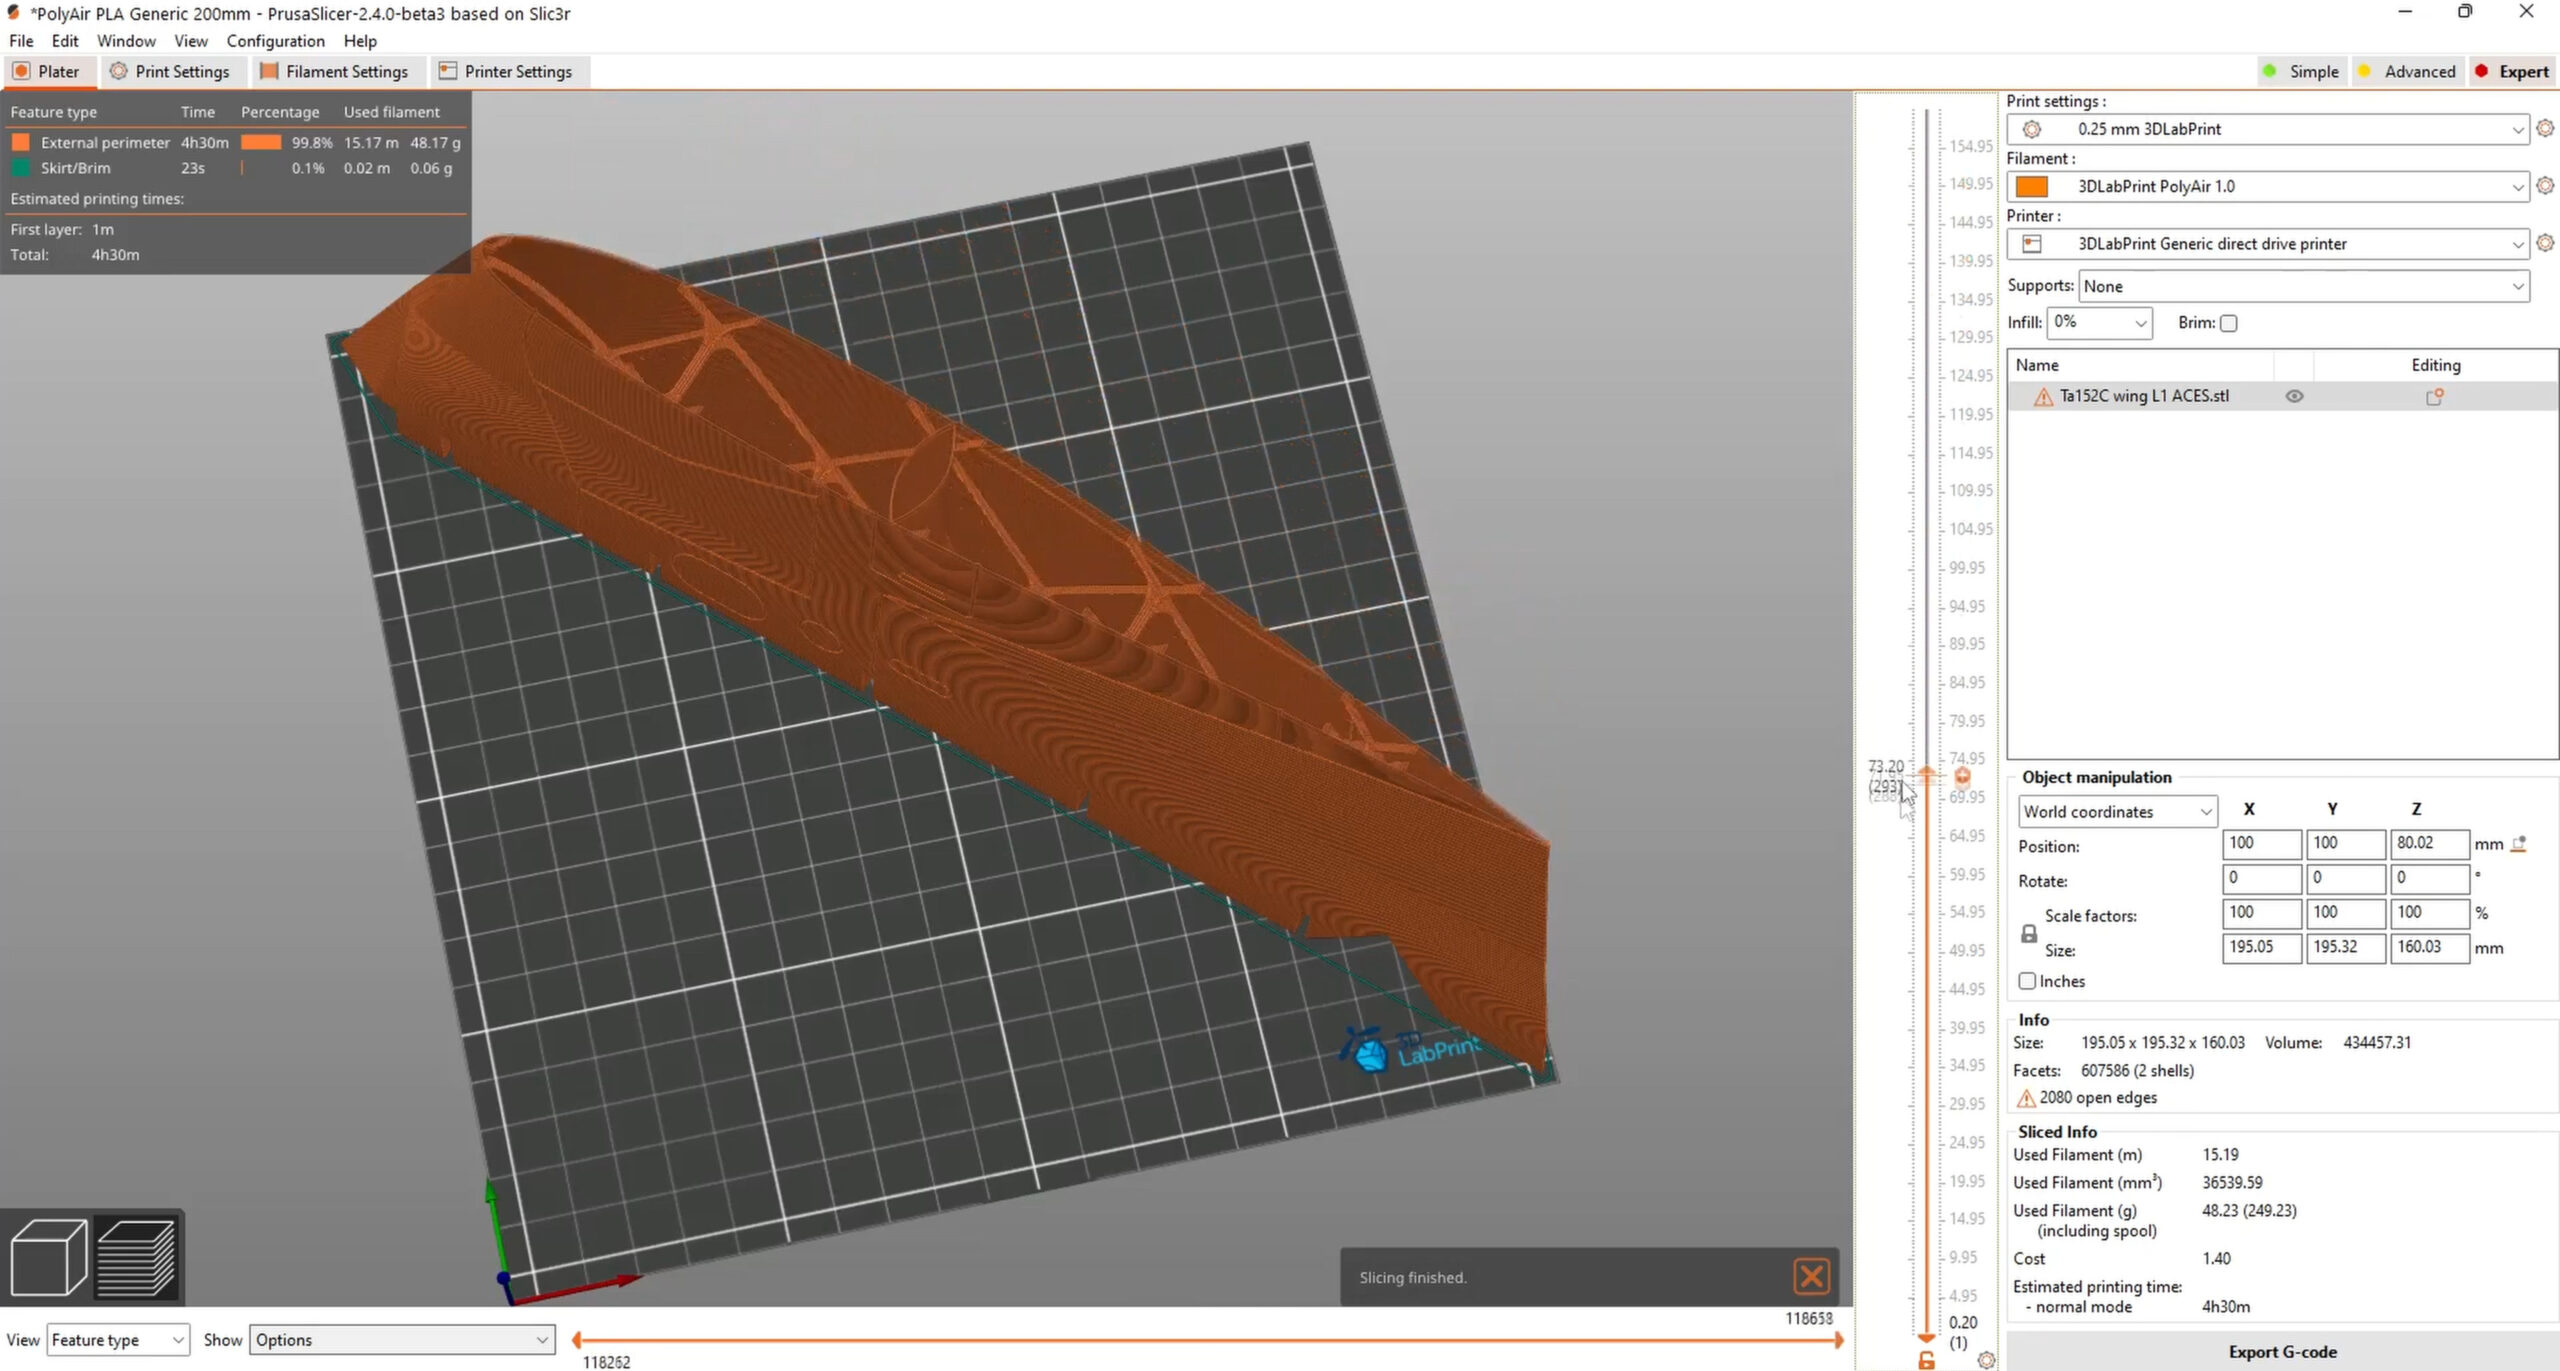
Support For 3DLabPrint Airplane Models
PrusaSlicer newly supports slicing of 3DLabPrint airplane models. These 3DLabPrint models were designed to be sliced with Simplify3D with a single perimeter and no infill to produce a lightweight wing reinforced by single perimeter ribs. From the solid geometry point of view, these models contain overlapping bodies and are not valid solid models. But because the models were designed specifically for Simplify3D and the way it evaluates such objects, the exported G-code was correct. To allow slicing the 3DLabPrint models, PrusaSlicer implements a new “Slicing Mode” option, allowing one to switch between the “Positive” (default) and “Even / Odd” fill rule. Use the “Even / Odd” option to slice 3DLabPrint airplanes correctly. Yet another new “Slicing Mode” option “Close Holes” makes PrusaSlicer fill in all internal structures.
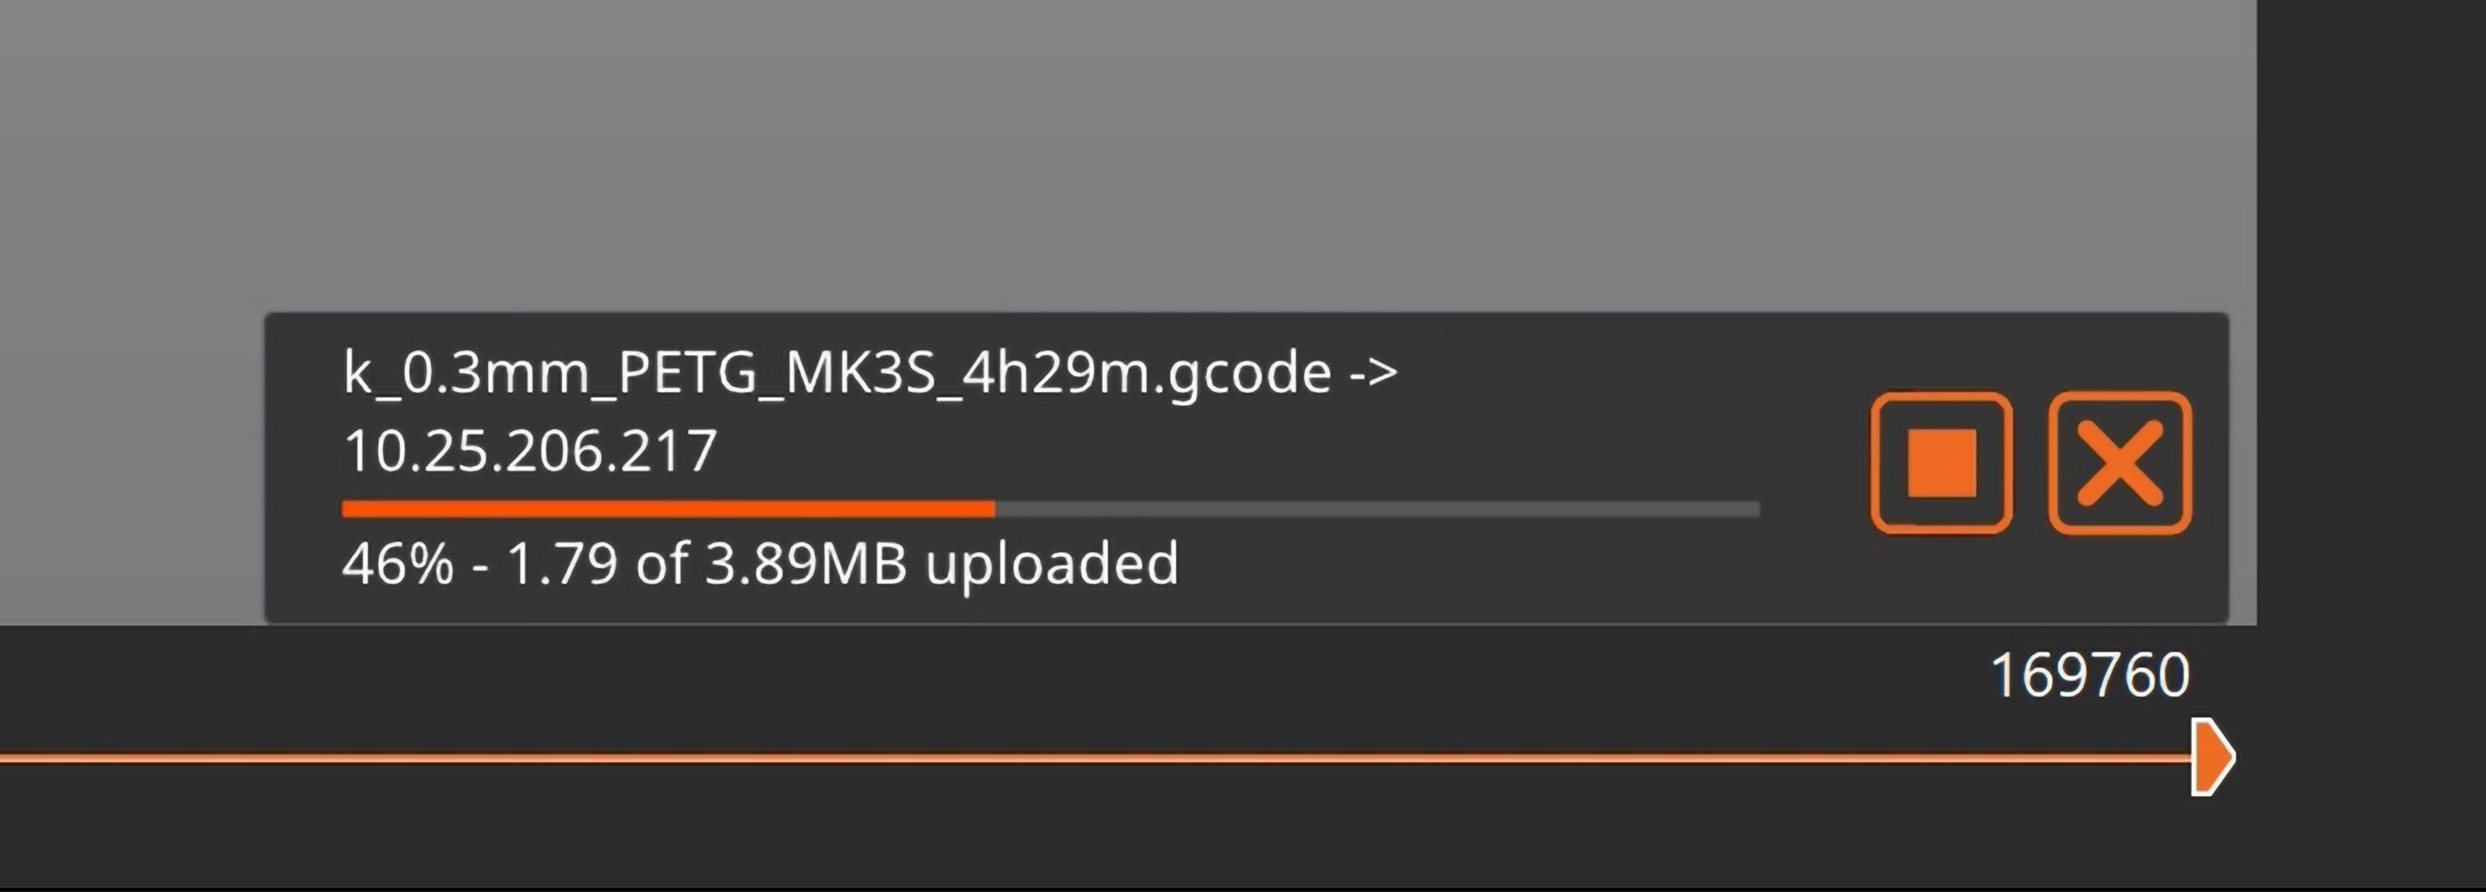
Upload Progress
When you upload the G-code via the network, a new progress bar is displayed as a special notification. And the existing “Print Host Upload Queue” dialog newly supports sorting by columns and a file size column has been added.
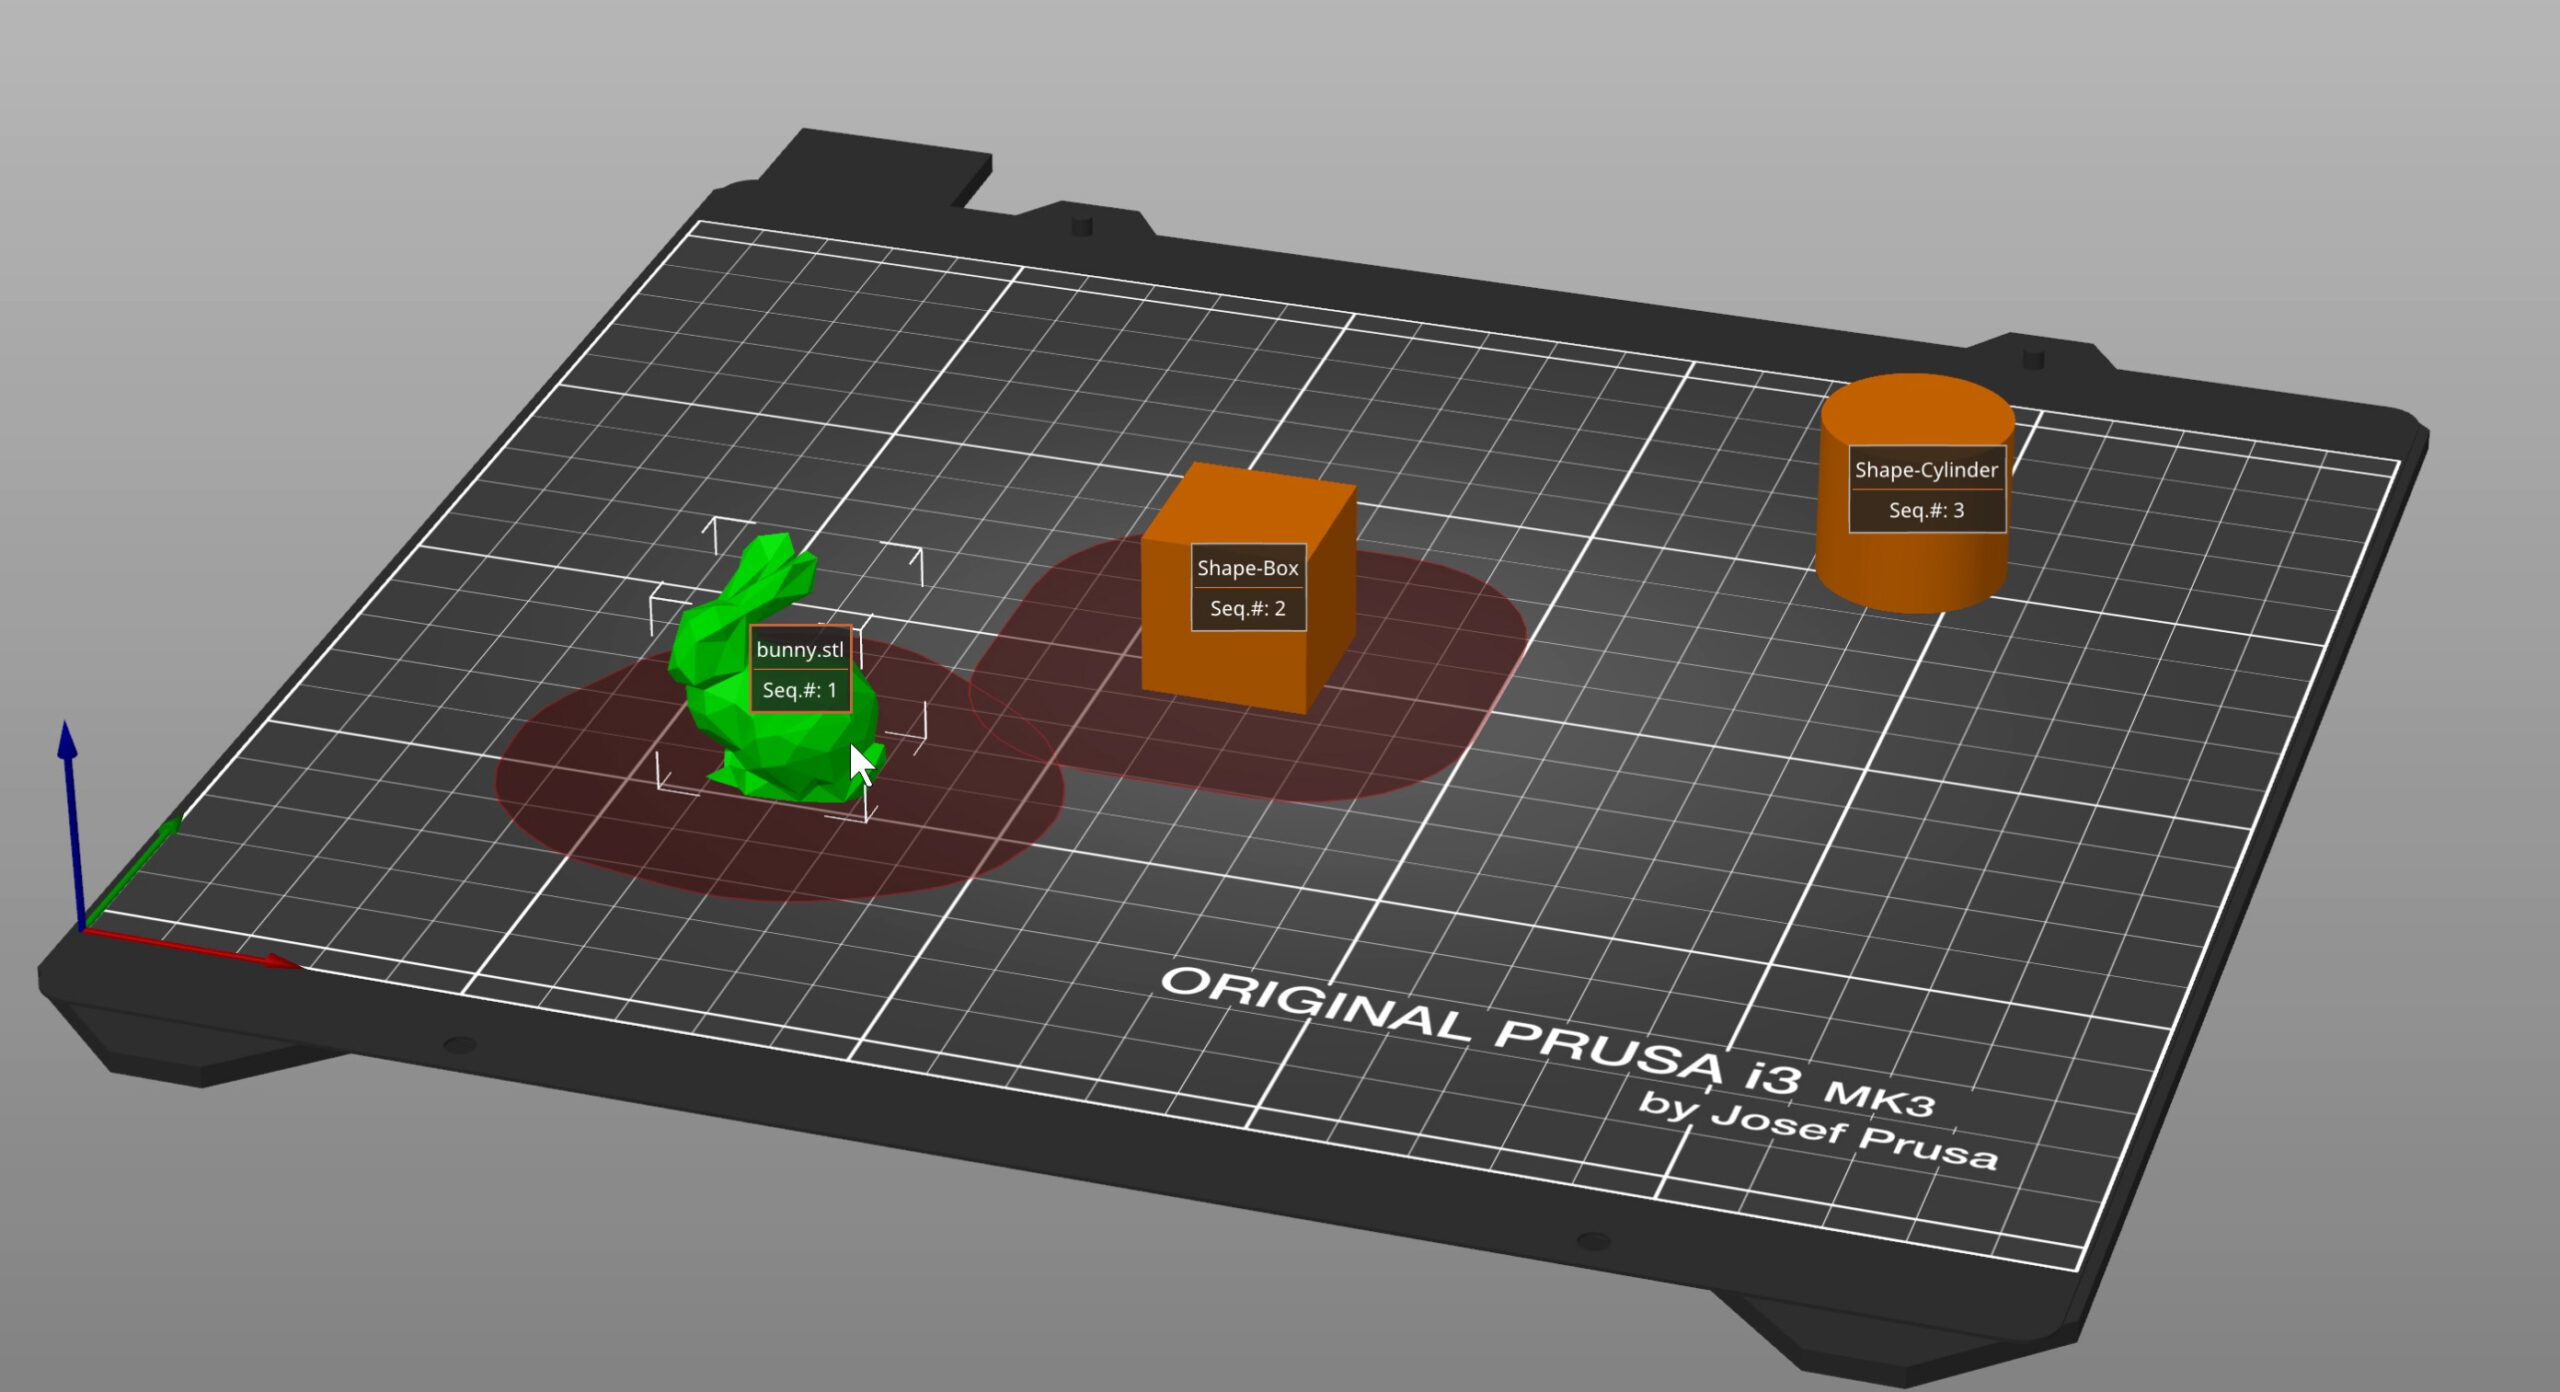
Sequential Print Collision Zone Visualization
When you enable sequential printing, there is always a risk that the print head will hit some of the completed objects while printing another object. PrusaSlicer can check for such collisions and warn you. In the past versions, users were sometimes confused why they’re getting the warning. Thinking they have enough clearance around each object. In PrusaSlicer 2.4, the clearance areas are now visualized in the scene when moving objects and in case of a collision. This makes it very easy to spot the problem.
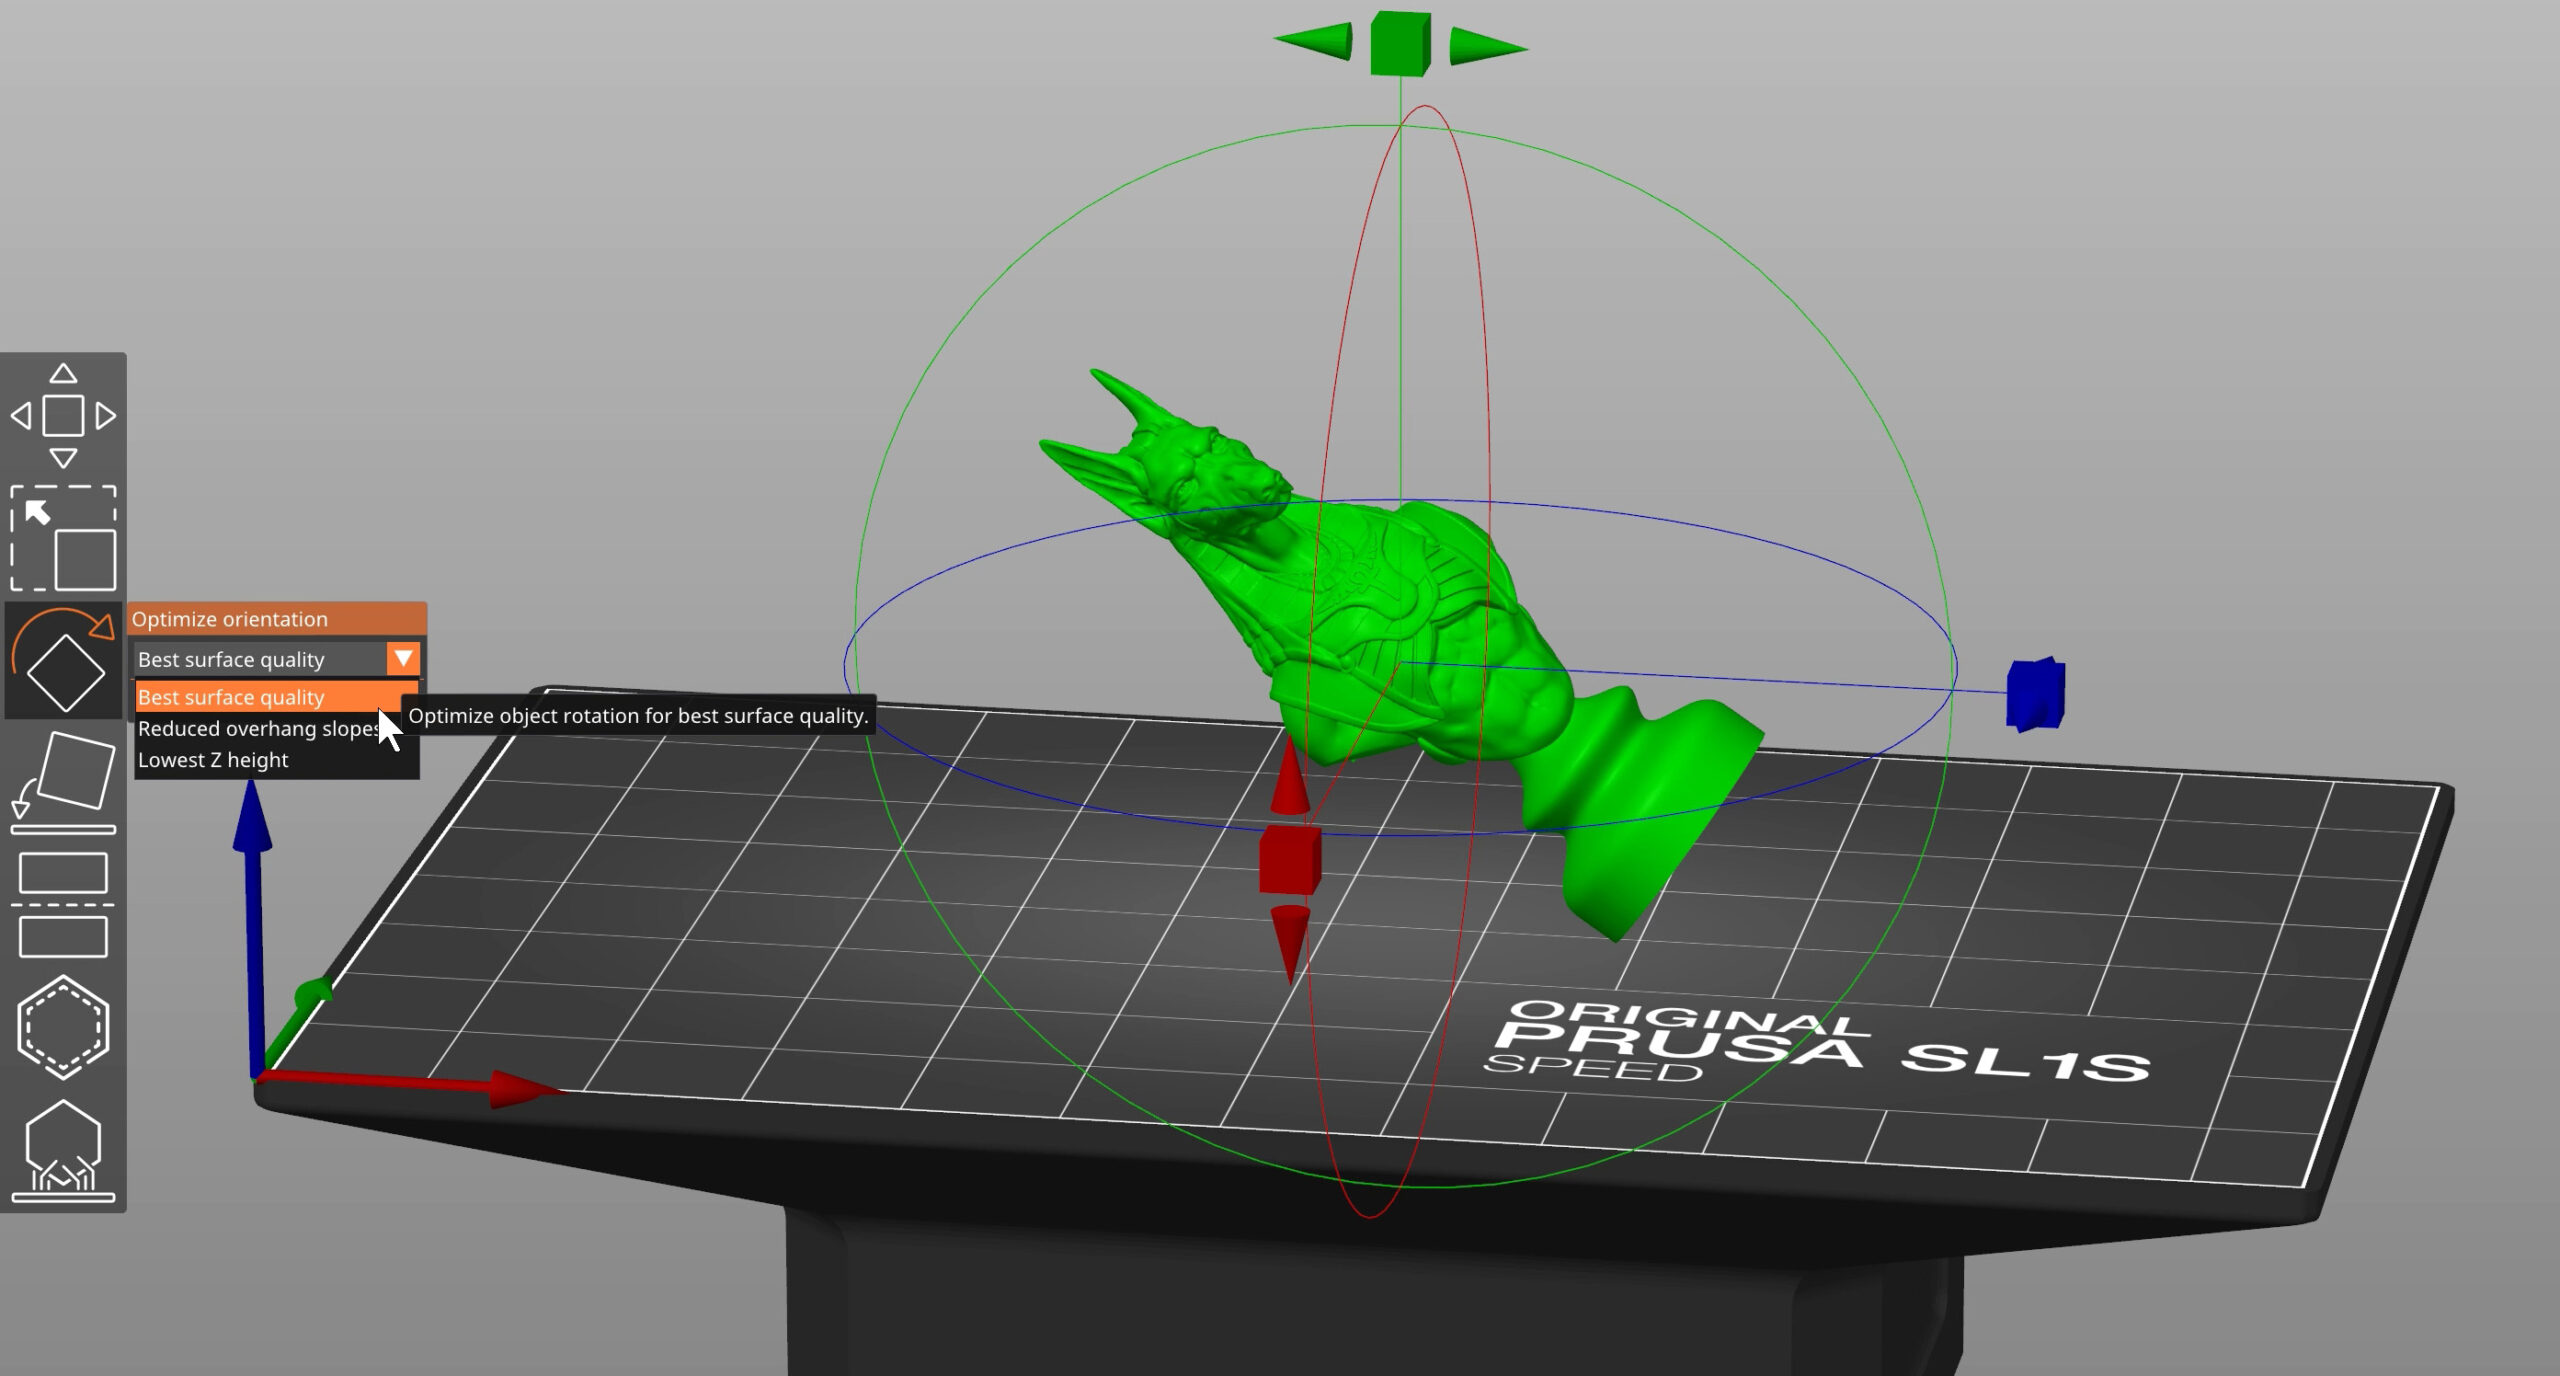
SLA Auto Orientation
For a few versions now, PrusaSlicer has had a feature that automatically optimizes the orientation of a model for printing on (M)SLA printers. In PrusaSlicer 2.3 we have changed the SLA auto-orientation algorithm, but some users were not happy about the change. In PrusaSlicer 2.4 we newly let the user choose from 3 different auto-orientation algorithms:
- Best surface quality
- Reduced overhang slopes (minimum supports)
- Lowest Z height (lowest print time)
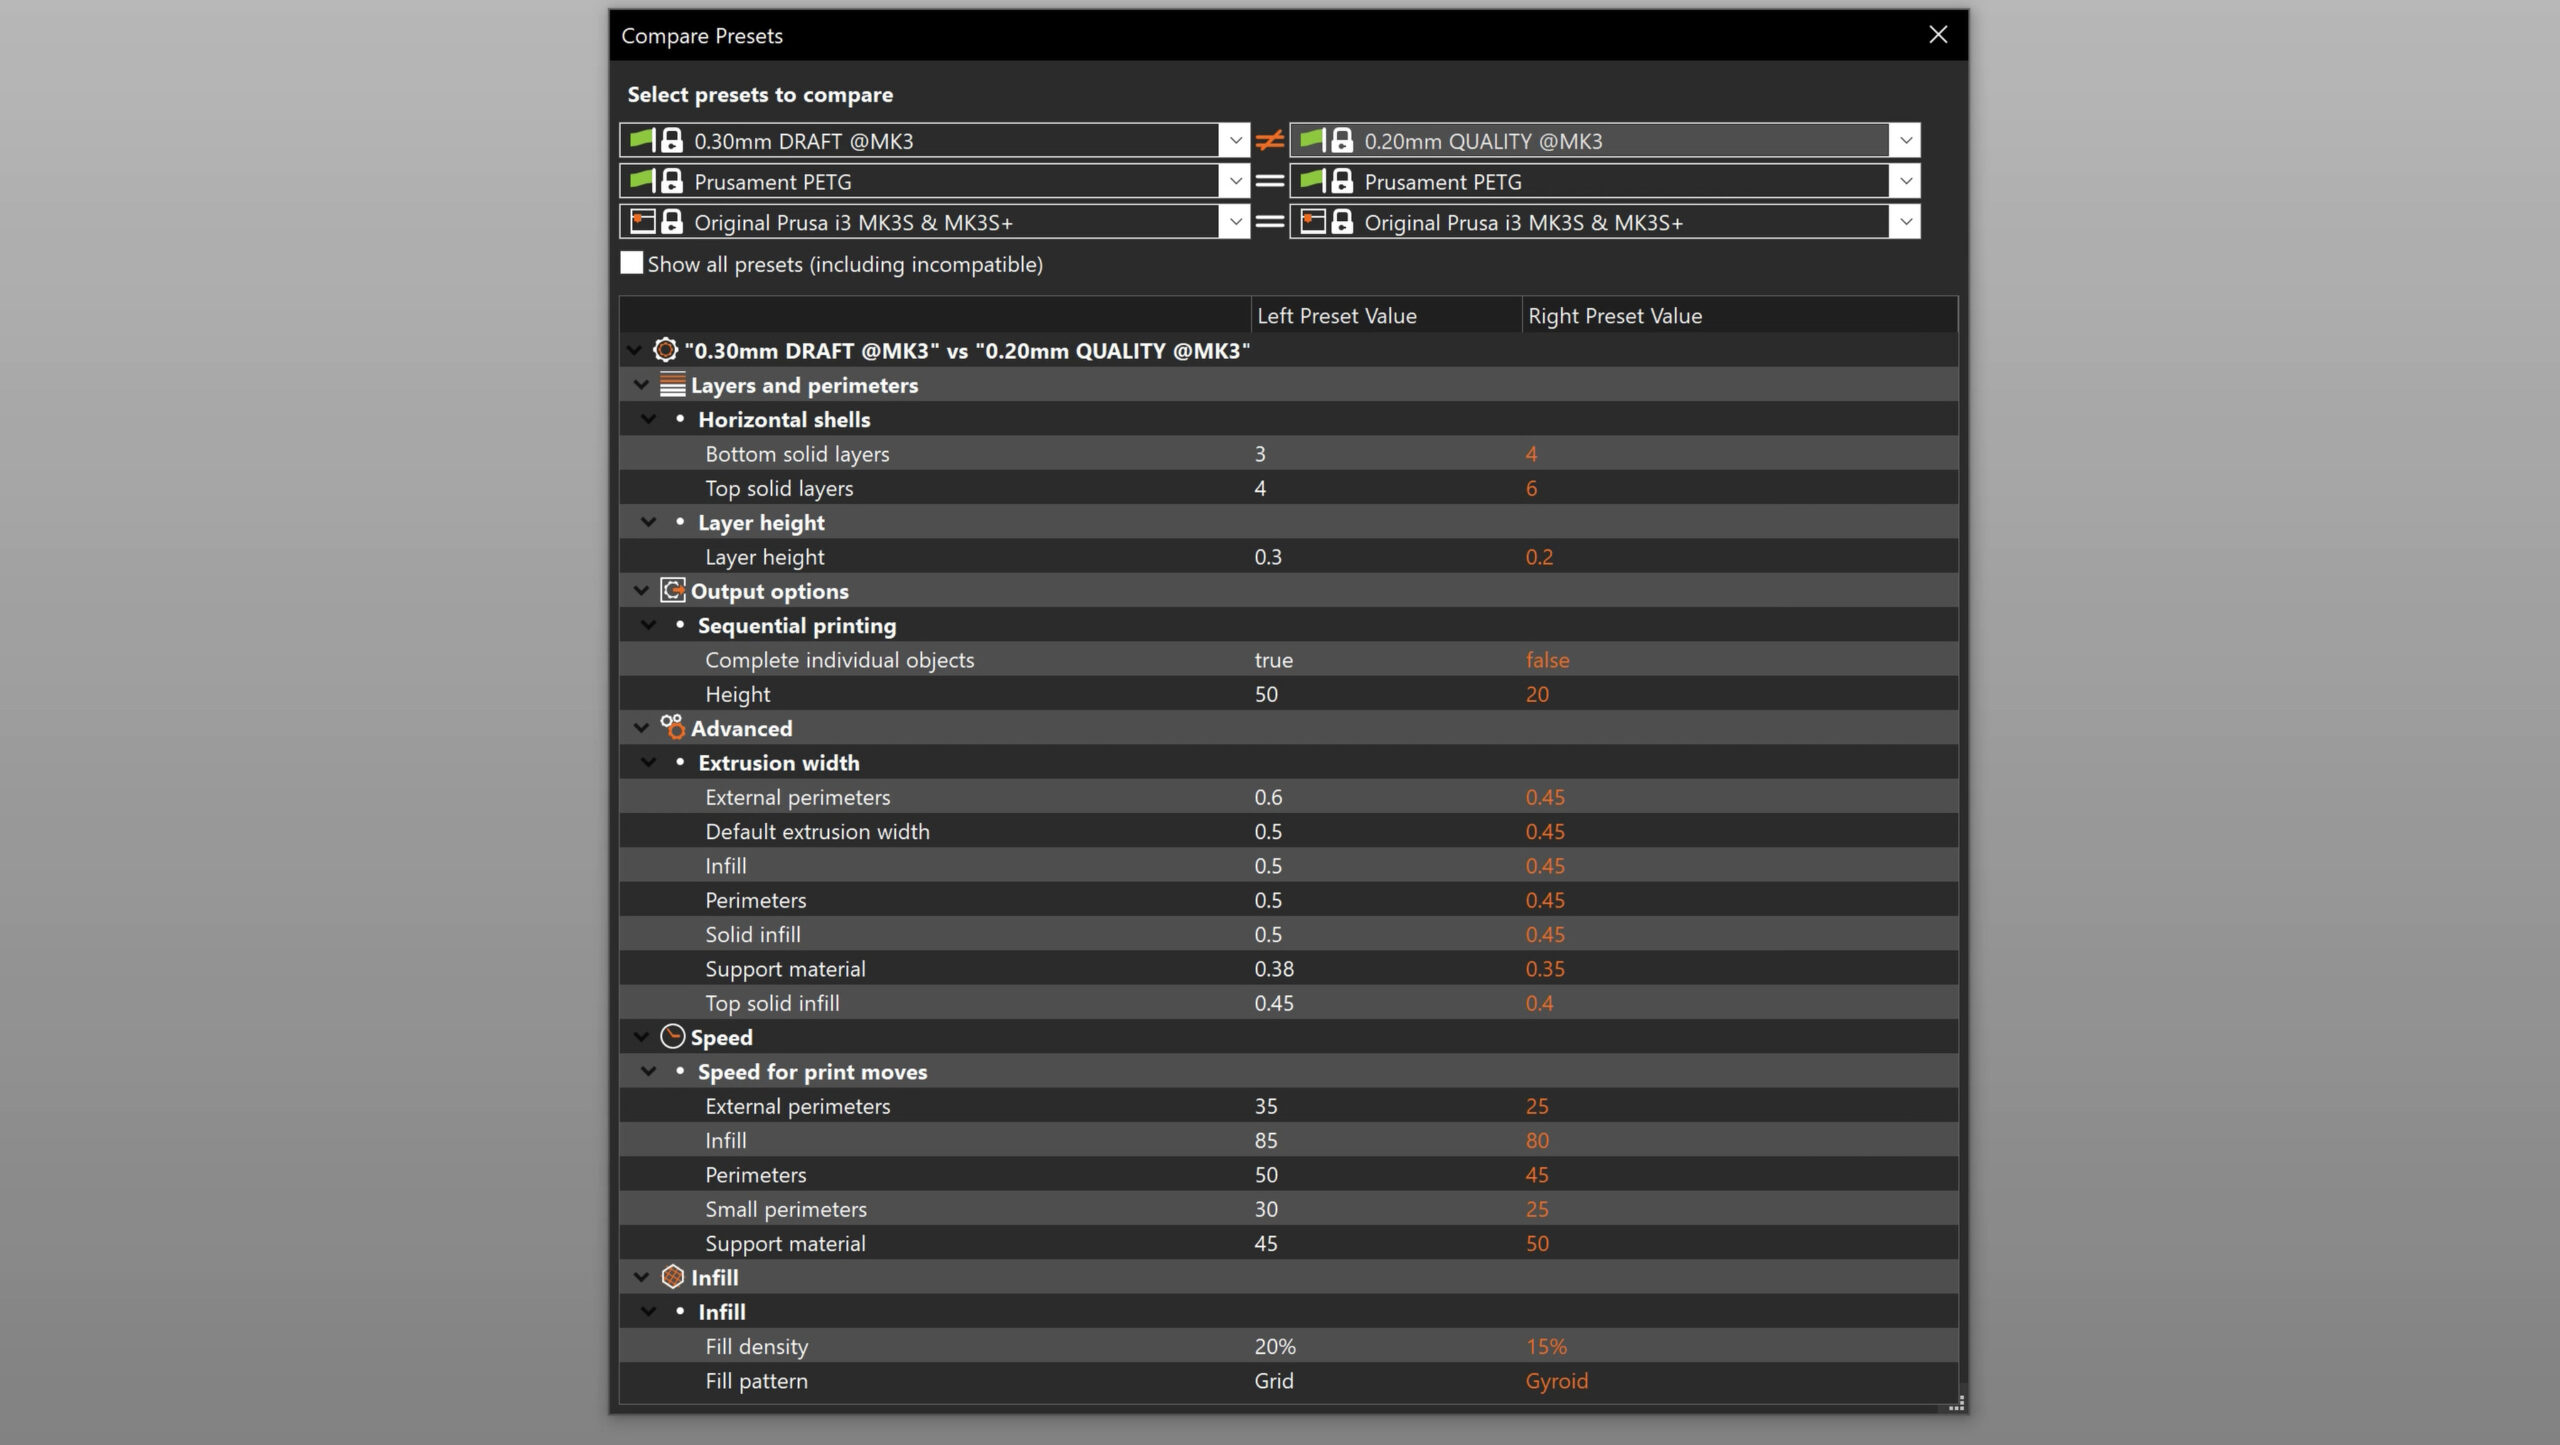
Compare Profiles
You can now easily compare the differences between 2 profiles with a special view. Enable it by selecting Window-Compare presets.
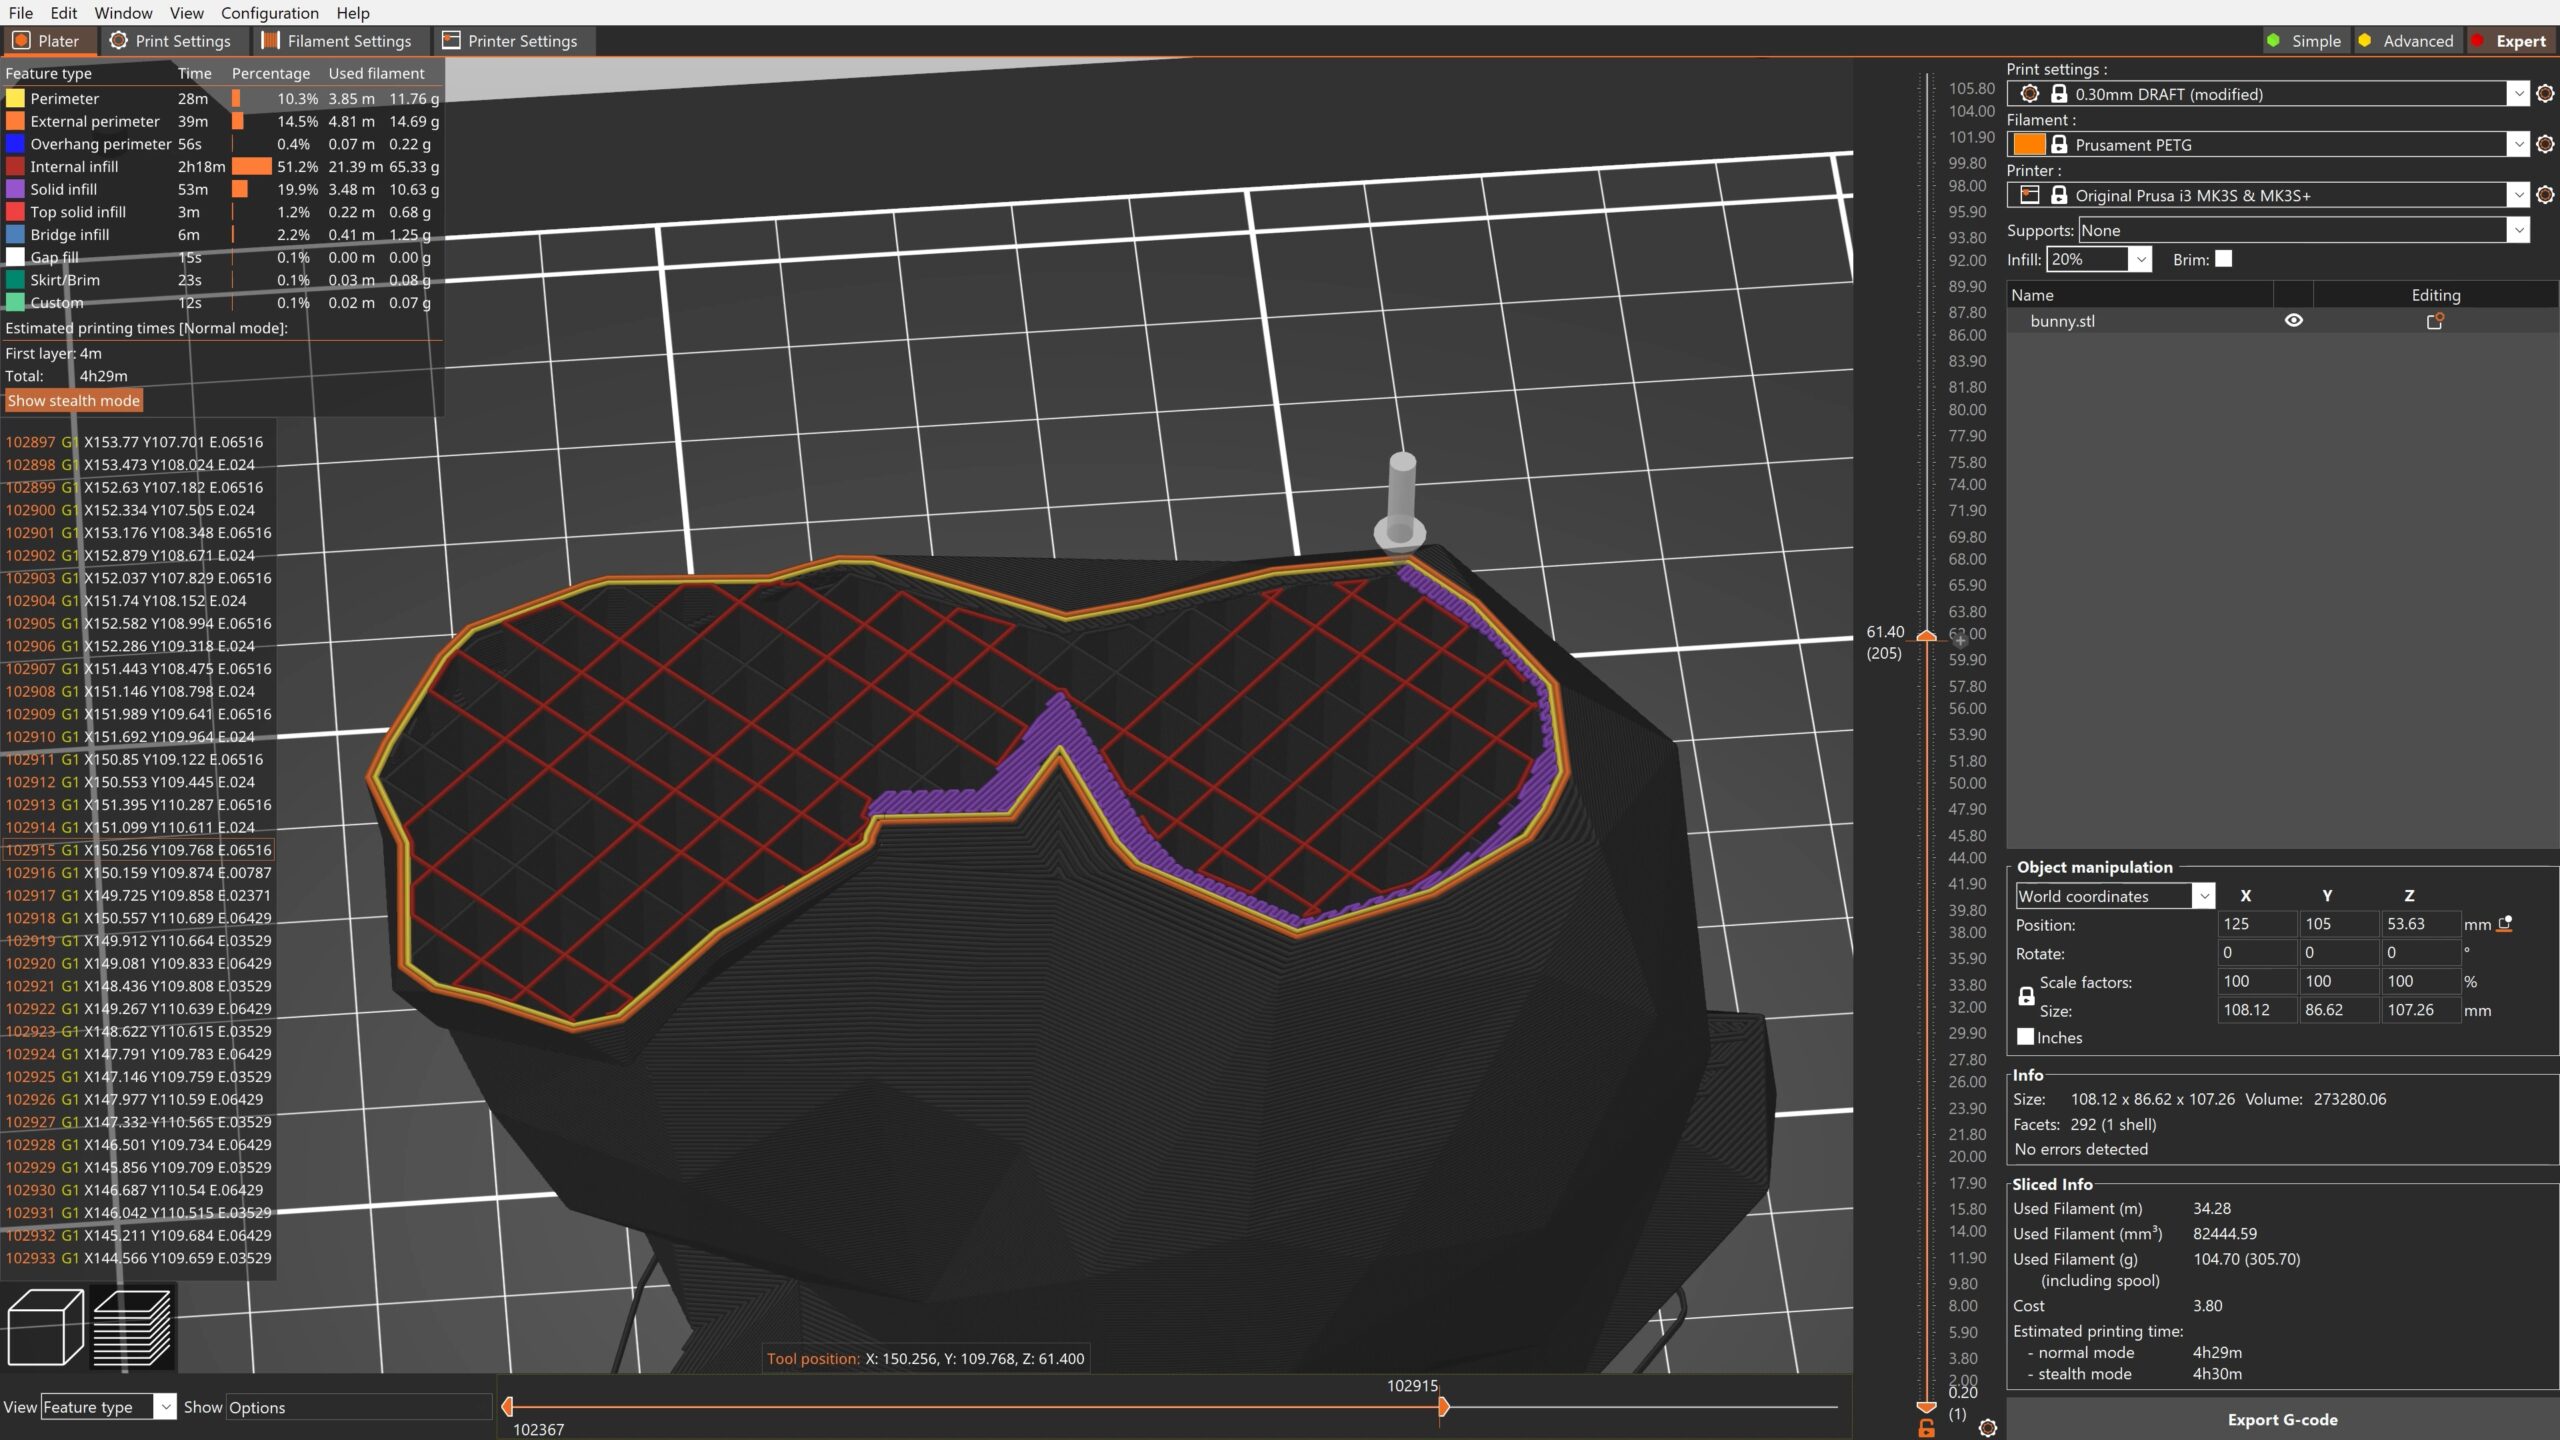
G-Code Text Viewer On The Side
When you drag the horizontal slider in the preview screen, you can inspect the order of moves in the current layer. Newly, we also display the generated G-code on the left side of the screen, including the line number. This can be used for advanced G-code analysis. You can, for example, find the perfect spot where to place a custom G-code using an external text editor.
Send System Info
In order to focus our future efforts, we decided to optionally collect some general information about the systems PrusaSlicer is commonly executed on. Such system information will help us to deprecate support of obsolete platforms in order to concentrate on up-to-date hardware and operating systems to reduce maintenance cost, improve PrusaSlicer performance and bring up new features. The system configuration data collected are strictly anonymous and you can inspect the full content in the “Send system info” dialog. This prompt is only displayed once. We want to thank in advance everyone who decides to share their system configuration with us.
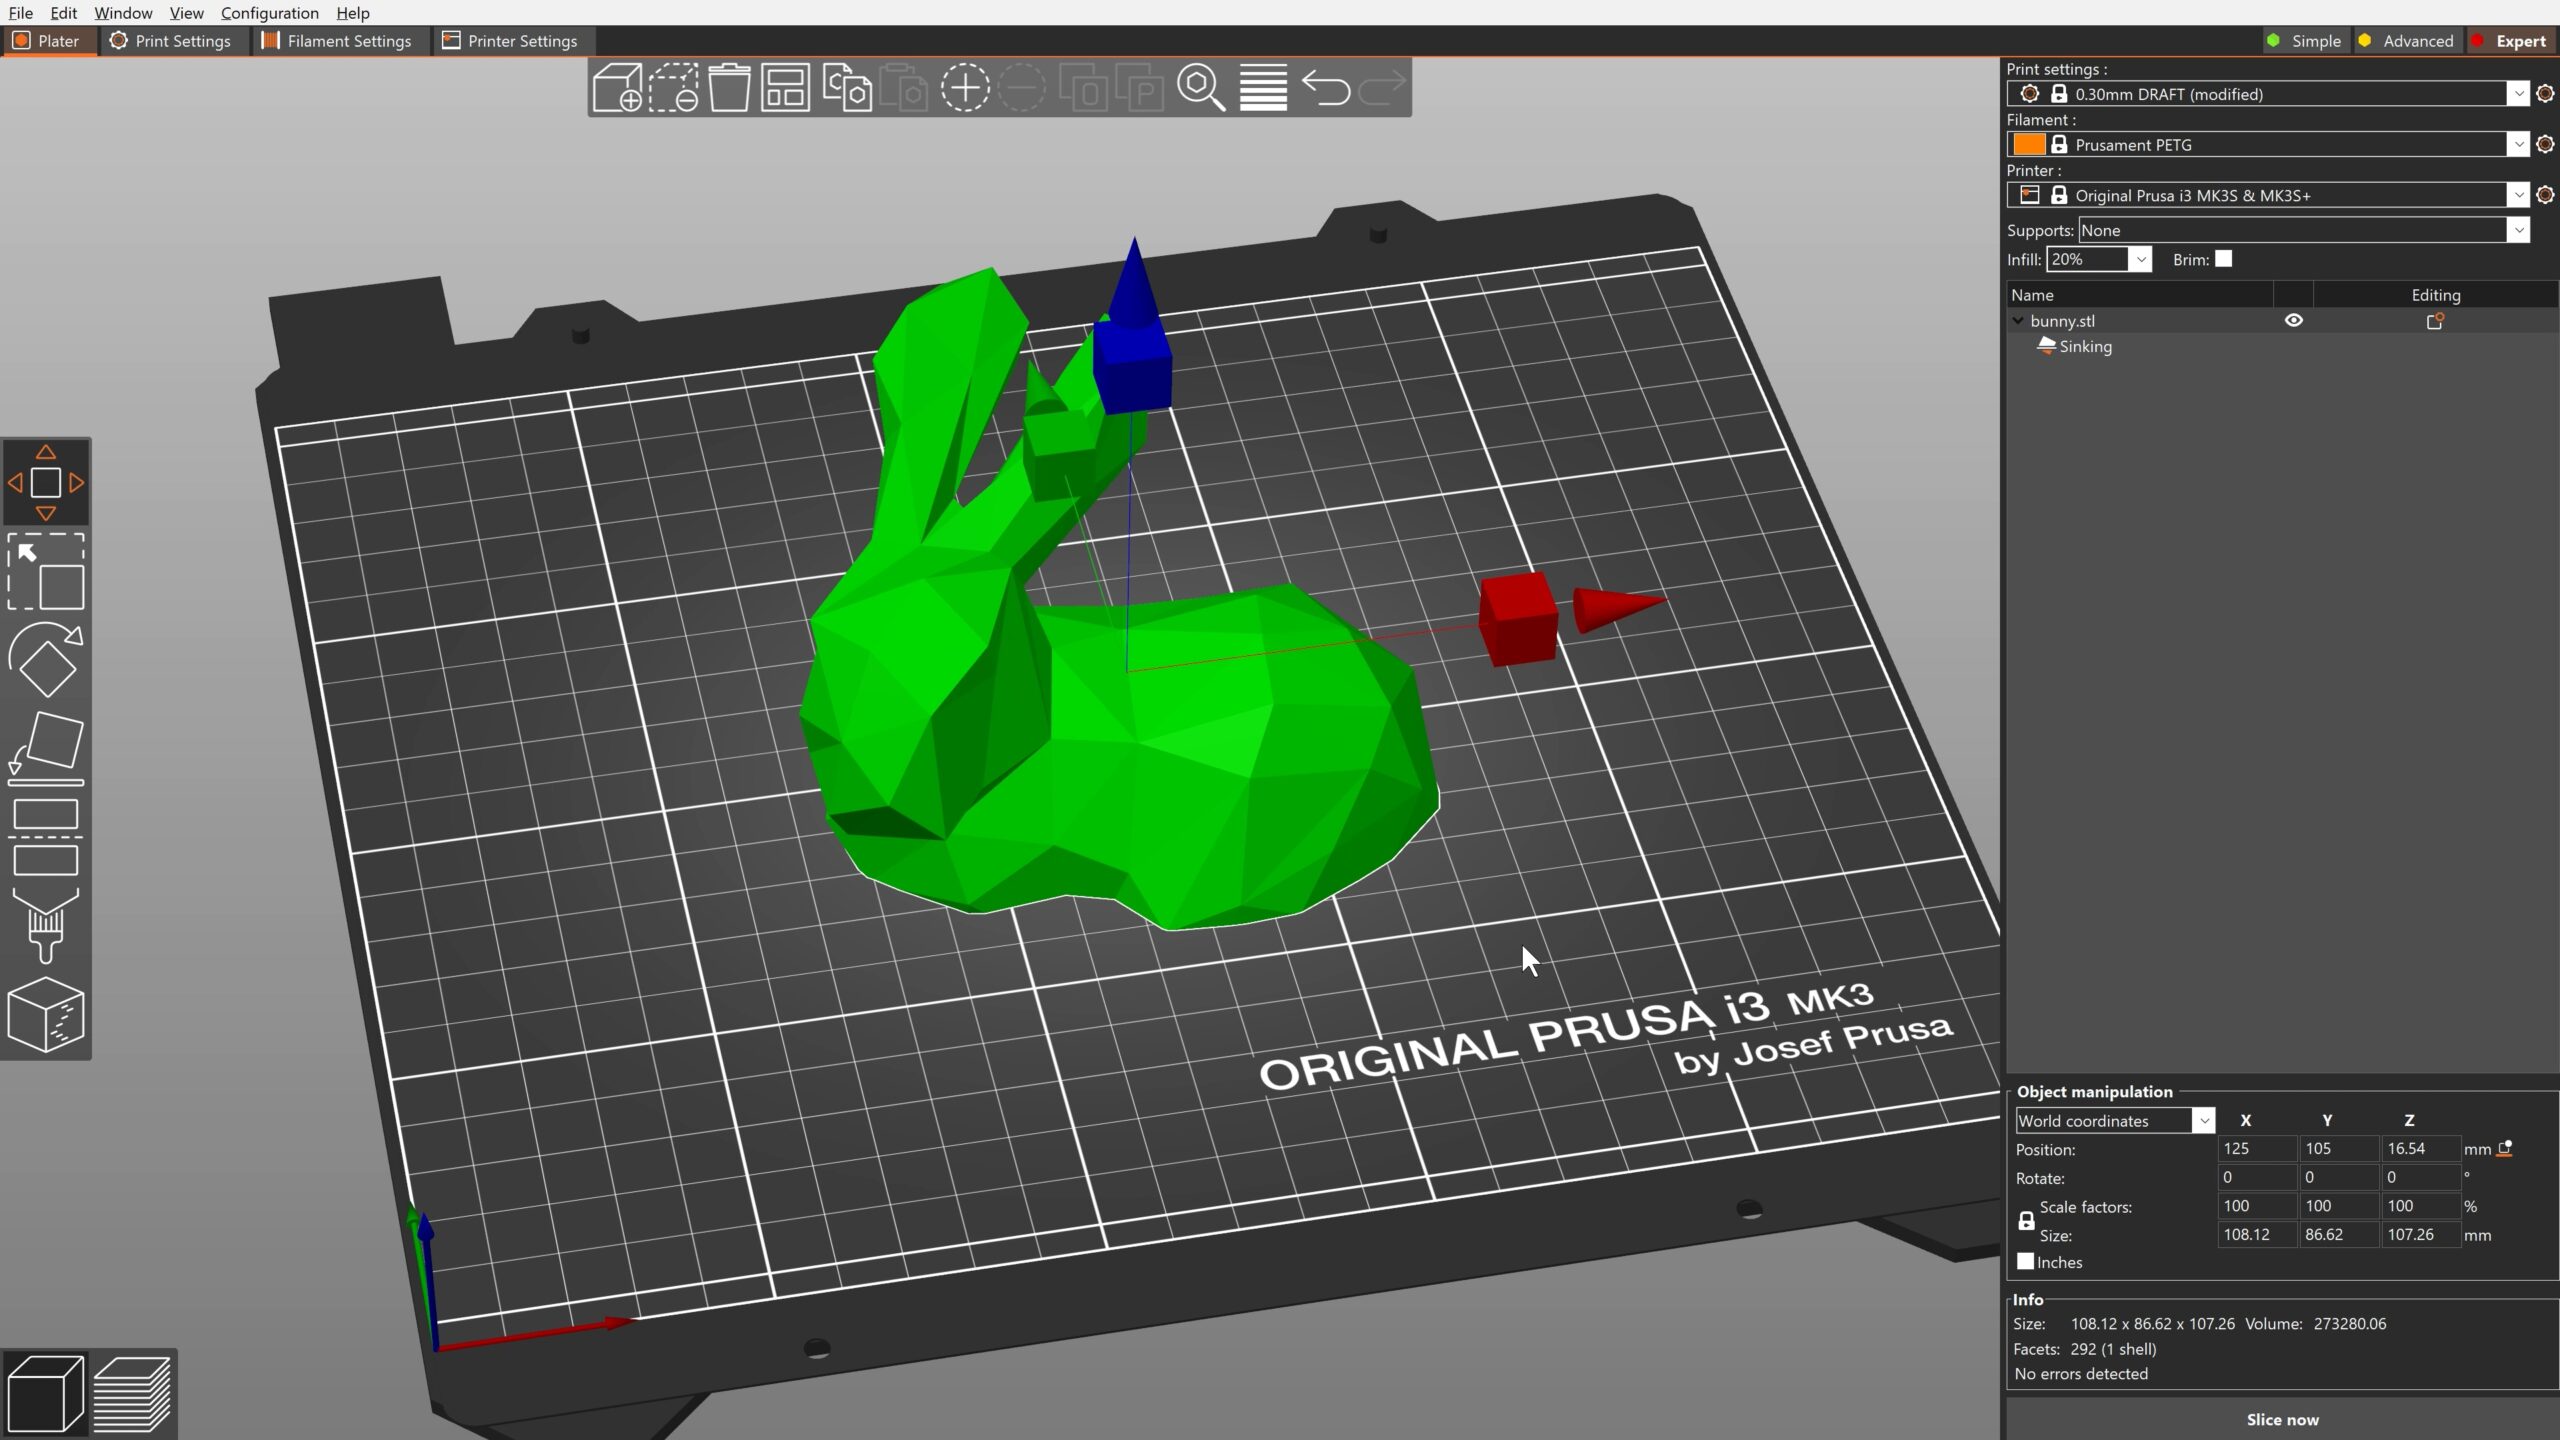
Moving The Object Below The Print Bed
Based on many requests, we are newly allowing an object to be moved below the print bed to print just the part of the object above the print bed. Arguably this was already doable with the “Cut” tool. But the new way is much simpler to use and very handy, for example, if you just need to flatten the bottom of an uneven object to be printable without a raft. There is also a new button “Drop to bed” at the object manipulation panel to move the object back to the print bed. The intersection of the model with the bed is visualized with a white outline. Moving objects below the print bed is not allowed in SLA mode, for now. It would make the placement of SLA supports confusing.
And even more news!
Thanks to the community contributions, we added more 3rd party printer profiles, including those for Voron printers. You can switch the “printable” property for multiple objects at once. When closing a project, you will now be warned about unsaved changes. Sliders now have a dedicated button to type-in an exact value. And the list goes on and on!
If you want to read the full changelog, check PrusaSlicer’s GitHub releases page. We suggest reading them chronologically, starting with the PrusaSlicer 2.4-alpha1 changelog.
What should we add next?
Do you have a feature in mind that you’d love to see in PrusaSlicer? Let us know in the comments, tag us (@Prusa3D) on Twitter or create a new GitHub issue. We have plenty of ideas on the to-do list already, but we shift our priorities based on your feedback!
Version after version, the PrusaSlicer team keeps pushing the limit of what you can do in a slicer and we are very proud of their work. Many new exciting features are already in the works but didn’t make the cut for the 2.4 stable version. We’re looking forward to showing them to you in 2022! 🙂
Awesome! Just in time for my next project! Keep up the good work!
Great update folks! But one huge thing is missing here and that’s getting this network part working.. networking needs to be #1 prio !!
Excellent work, as always. I plan on making plenty of use of the shapes gallery. It’s a feature I didn’t even know I wanted.
Two comments/requests. The default “Recycling” objects in the shapes gallery are named ‘recycling’ but they’re actually resin identification codes. It comes off a bit like “well ackshually…”, but they were originally designed with the intent to be confused with a recycling symbol, so I hate to see that perpetuated. Of course the actual symbol might even be more useful than an actual recycling symbol, but it’d be cool if it was just named “PETG_resin_symbol”. I mean, it’s pretty clear from the thumbnail it’s “one of those plastic codes”, so I doubt it would add any confusion.
Second request, sort of the opposite of an “add negative volume” would be a “print only” shape modifier. I often have to print just a small segment of a model just to make sure a connection or part is going to fit, but don’t want to print the whole thing. You can sort of work around it by cutting the model in every direction, or having the main model be 0% infill, 0 layers, but with a 15% and default layers modifier. It’d just save a ton of time to make it a separate feature, I wager.
+1 on that second request, great idea
+ another 1 on the print only.
Most of my Fusion 360 projects have loads of unneeded operations to just boolean out an area I need to print to print a test area for a mechanical feature.
It would be really handy if I could define and print just these in the slicer.
Possibly a bit long-winded, but maybe a workaround instead of cutting:
Could you use 4 blocks to “add negative volume” and resize them to frame the part you want printed?
That’s a good suggestion. I just tried it and 4 negative cubes is still sort of tedious, but less so than rotating and cutting in so many directions. Big bonus for the 4 cubes (or 5 if you’re restricting the height, too) is that if it’s wrong, you can modify the STL and ‘Replace with STL’ without having to make a bunch of angled cuts again.
In the long run though, I’d love to simply drag a box/cylinder over the tricky section I’m having trouble getting just right and saying “just print this”.
Short version, you want a “crop to this volume” button 🙂
So awesome!
thank you for all of the hard work that everyone puts into the project
+1 from me
What a nice christmas present…
I tested the Multi Material Painting with an old Batman Sculpture – it is so easy to use – this will immediately lead to a new series of Multi-Color-Prints. Really great feature and a phantastic implementation – compliments to the development team.
And the new support implementation and and…
Thanks!
Can’t wait to try out the profile comparisons feature! Should make managing profiles so much easier, thank you!
I have wanted the following feature even before 3D printers were invented:
When printing multiple objects, it would be great if we can configure the slicer to print just the perimeters of ALL the objects on the first layer before moving on to all the infills. The reason: most failures happen on the first layer AND on one of the objects’ perimeters. If the perimeters of an object print successfully, chances are its infill will print successfully. If we can get ALL perimeters on the first layer to print without issues before moving onto the infills, then chances are the first layer will complete successfully. Very few things are worse than spending 45 minutes printing the first layer (including perimeters and infills) then on the last object the perimeter curls up and dies, then you have to start over.
In the mean time, I’ve had good luck with an OctoPrint plugin, cancelobject. It lets you cancel a single object mid-print in case one out of fifty little doodads decide to pop off the bed early on and risk ruining the rest of them. It takes a bit of configuration in Prusa so that OctoPrint knows which bit of G-Code belongs to which objects, but it’s saved me a ton of hassle more than a few times. Of course in your scenario you’d still have to wait the 45 minutes, but at least “start over” becomes “finish up after”
That’s how simplify3D worked. I found it a bit annoying when switching to PrusaSlicer to have to wait for the entire first layer of a model just to watch it mess up the perimeter on the second object. Would be a welcome change for me as well.
Amazing stuff, thank you!
Multi-material painting is a game changer. I especially love the smart fill feature with its adjustable angle – it really does make coloring details a breeze! Thank you for this update.
To anyone else wondering how to initiate the auto color changes for logos etc, since they didn’t put a screenshot in there for that one…
1) Slice the object. The height bar appears with a little settings gear at the bottom of it.
2) click the settings gear
3) click the “Set auto color changes” menu option. Note that this will erase any existing layer color changes.
Thank you all Prusa team for the hard work you put into the slicer.
I have a question, can I adjust the seam by adding a modifier (ie: cylinder) instead of painting?
I want to add a thin cylinder to a part and make the seam through this cylinder, but not finding any seam settings in the “Add Settings” on the modifier.
Painting the seam is somewhat a tedious work, dragging the mouse slooowly for an accurate seam line.
If this option is not available yet, it would be a suggestion for future updates.
Nice to see continued improvements and enhanced features. It’s great to see the community involvement too.
The multi-material painting thing works like a charm! It is a fantastic feature.
My only request – it would be great if there was a way to save a painted model as different colored parts. That is because if I paint lets say some things with Tool 1, and then later decide I prefer to use Tool 4 for all of those things, I need to go back and repaint. If they were saved as parts, I could simply switch what tool color to use.
The first new thing I notice is the flat design. All the buttons and tabs are now flat. I use the classic theme and it has an awkward aspect in contrast with the classic 3d style of dropdowns and checkboxes.
Besides of that, I like specially the new negative volume, and the collision zone visualization for printing multiple models at once.
I am still not convinced. I have not used PrusaSlicer since I did as you said and tried to install 2.4 about a year ago. I had no clue what was going on as there was no explanation on how to install the new version you were so proud of. When I finally did get it to boot everything was great until I closed the program and it deleated every profile I had for my five machines. I deleated everything prusa and went with SuperSlicer/SuperMill. It works and it has never deleated my profiles. I don’t need profiles for multi thousand dollar Voron printers with 200mm platers either. The more complicated you make it the the more it becomes just another buggy Cura. Are you becoming the new ULTIMAKER?
So youve tried the beta/alpha a year ago?
These versions store their configuration files in a seperate beta folder, maybe they are there.
Also they are expected to be buggy. Dont use beta versions for important stuff!
Great work guys! I missed the fuzzy skin feature for some time already as doing this with object geometry is just so unnecessary and takes too much time.
Would it be possible to add a bump map possibility to achieve the same, but coordinated feature please?
Thanks 🙂
I am loving the fuzzy skin, but I would like to export to STL with fuzzy skin applied, this way others can slice / print without the risk of using gcode on a incompatible printer and also allowing future re-slicing from this STL without having to reapply FS.
The multimaterial painting tool is exactly what I needed. Is it at all possible to import Meshmixer FaceGroups into PrusaSlicer? I painted a model a few days ago with Meshmixer and got stuck with seperating the FaceGroups into separate bodies for a reason I won’t get into here. The new painting tool of PrusaSlicer is exactly what I need to solve my problem, I only hope I don’t need to repaint the whole model, a process that took me quite a while.
Great Article
Informative article
PrusaSlicer 2.4 has many new interesting features!
vex 6
I would like to be able to print text in a different color but without having it to lift up from the base. so basically print a sign, but the text is flat (printed on the bed) with the rest of the sign. i was able to do this with a 0.2mm thick font on a 0.4mm thick sign and then paint the font white. but it is not possible e.g. if the whole peace is 1mm thick.
Nice article!
Why not having a gcode to stl or step conversion tool for instance fuzzy skin modified meshes. Would be awesome.
Another point: it would be nice to have the choice for multiple colour stuff to print a 3d object of choice instead of the sacrificial stuff. for instance a pen holder or a vase… what so ever… best Regards.
Frog!
Hey,
as all of the above comments already mentioned, you did an awesome job with that PrusaSlicer 2.4 !
I got a request which has to do with especially fast printing profiles. When you are pushing wall speeds pretty high like 60 mm/s and above, you are not really getting any problems when printing less complex and big geometries. However, if in this geometry is a hole with, lets say a diameter of 3mm, pushing 60 mm/s results in huge angular velocity and most of the time (for me) in bad printing quality. What I need to do in those situations is to lower the wall speed for the whole part (let’s say the hole goes all the way through the part, so you are not really able to use the height modification). That obviously results in longer printing time.
What I would love to see is a “layer modifier”. What I mean by that is, that you are able to select a specific part of the layer after slicing and modify it. For example, I could choose the walls of the tiny hole and only lower the speed of that specific walls in that particular layer. I think that has lots of advantages for other purposes too.